Adobe Release CS5 and CS5 Extended


Adobe Release CS5 and CS5 Extended


Adobe have released both Photoshop CS5 and CS5 Extended. They can be purchased seperately or as part of the Creative Suite 5 package. Photoshop CS5 and CS5 will retail at around US $699 and $999. Licensed users of the previous versions can upgrade for $199 and $349 respectively.


The full press release is below

SAN JOSE, Calif., April 12, 2010. Adobe Systems Incorporated (Nasdaq:ADBE) today announced Adobe Photoshop CS5 and Photoshop CS5 Extended software, must have releases of the professional industry standard for digital imaging. With millions of users celebrating the product's 20th anniversary this year, Photoshop CS5 builds upon a rich history of innovation and leadership with groundbreaking features and performance gains that boost creativity and workflow efficiency. Packing in more technological advancements from Adobe Labs than any other release and incorporating enhancements to everyday tasks requested by the Photoshop community, the software has greater intelligence and awareness of the content within images, allowing for complex and magical manipulation in just a few clicks. Adobe Photoshop CS5 Extended delivers everything in Photoshop CS5, as well as advanced tools for 3 D which address the unique needs of the video, Web, medical, manufacturing and engineering industries.

Photoshop CS5 and Photoshop CS5 Extended will be available as stand alone applications or key components of the Adobe Creative Suite 5 family.

'The past two decades have demonstrated an amazing interplay between customers who want to push the limits of their personal creativity and a passionate team of Adobe engineers who make those visions a reality,' said Kevin Connor, vice president of product management for professional digital imaging at Adobe. 'We experienced this firsthand when we posted a 'sneak peek' video of the team's work on the Content Aware Fill feature a few weeks ago. It quickly became the number one viral video online, with close to 2 million views and its 'magic' was one of the top trending Twitter topics of discussion. This version of Photoshop has some of the most innovative and extraordinary technologies to ever come from our labs and clearly customers are already clamoring for it.'

Redefining the Image Editing Experience
Now a native 64 bit application on both Mac and Windows, Photoshop CS5 delivers superior tools and creative control so users can perform advanced image manipulations and compositing with ease. Revolutionary image intelligence behind Content Aware Fill magically removes any image detail or object, examines the surroundings and seamlessly fills in the space left behind. Lighting, tone and noise of the surrounding area match perfectly, looking as if the removed content never existed. New Refine Edge makes nearly impossible image selections possible. This innovative technology precisely detects and masks the trickiest types of edges, such as hair and foliage, while eliminating background color contamination.

For photographers, Photoshop CS5 now offers next generation high dynamic range (HDR) capabilities. When combining multiple exposures into a single HDR image, Photoshop CS5 preserves the full tonal range of a scene with unprecedented speed and accuracy. The new HDR Pro offers exceptional ghost artifact removal and greater tone mapping and adjustment control. With HDR toning, users can emulate the striking look of an HDR image with any single exposure image.

Photoshop CS5 provides revolutionary tools that maximize users' creative impact. Breakthrough painting capabilities include a Mixer Brush that blends an infinite combination of colors onto a single paintbrush tip, and Bristle Tips that offer lifelike brush strokes. Puppet Warp gives users the power to precisely reposition or warp any image element, such as straightening a bent arm in a photo or manipulating the landscape to generate a new perspective.

'Since its inception, Adobe Photoshop has been a key tool for pre and post production work in the motion picture industry,' said Jon Landau, Academy Award winning producer of Avatar and Titanic. 'With Photoshop CS5 Extended, Adobe gives filmmakers new painting, HDR and 3 D tools that will help them push the limits of creativity. Faster performance with cross platform 64 bit support and tight integration with other Adobe Creative Suite 5 software makes Photoshop CS5 an even more powerful tool in a filmmaker's arsenal. Photoshop empowers filmmakers and creative professionals in virtually every other industry to turn their imagined ideas into onscreen reality.'

Community Involvement Drives Enhancements
In addition, more than 30 features and enhancements requested directly by the Photoshop community have been added to this release, including automatic image straightening, rule of thirds crop tool, color picker and the ability to save 16 bit images as JPEGs. The goal of this engineering effort was to address seemingly minor enhancements that directly impact everyday workflow, but aren't always at the top of the development list for a new release. A new customizable Adobe Mini Bridge panel is also available directly in the software for faster file browsing and management.

Taking 3D and Motion to the Next Level
Photoshop CS5 Extended includes everything in Photoshop CS5 plus tools for editing 3D and motion based content. With new Adobe Repousse technology, users can easily create 3D logos and artwork from any text layer, shape or mask, as well as twist, rotate and extrude designs for different looks. To mirror the realism and appearance of 3D objects, a new materials library offers a breadth of rich options, including chrome, glass and cork. Users can also enhance the appearance of 3D objects by quickly creating shadows with the new shadow catcher. For motion content, tools including paint, text and clone can be used directly over multiple frames of a video sequence with ease using single key shortcuts.

Adobe Photoshop Family
Building upon the 20 year history of Photoshop innovation and leadership, Adobe offers a line of Photoshop solutions for every level of user. Photoshop CS5 and Photoshop CS5 Extended software are at the heart of the Photoshop family, providing unrivaled power and editing freedom. Adobe Photoshop Lightroom addresses the workflow needs of serious, amateur and professional photographers, helping them find, manage, enhance and showcase images in powerful ways. Adobe Photoshop Elements software provides accessible tools and sharing options for photo enthusiasts. Snap shooters can quickly and easily share and edit photos with simple gestures using the free Photoshop.com Mobile application on their iPhone or Android devices. Photoshop.com completes the Photoshop line providing an online photo sharing, editing and hosting resource for all.


Working with 3D Images in Adobe Photoshop CS6


This lesson will take about 90 minutes to complete. Copy the Lesson12 folder onto your hard drive if you have not already done so. As you work on this lesson, you’ll preserve the start files. If you need to restore the start files, copy them again from the Adobe Photoshop CS6 Classroom in a Book DVD.
Image
Traditional 3D artists spend hours, days, and weeks creating photo-realistic images. The 3D capabilities in Photoshop let you create sophisticated, precise 3D images easily—and you can change them easily, too.

Getting started

This lesson explores 3D features, which are available only if OpenGL 2.0 is supported by your video card and enabled on your computer. To learn about your video card, choose Edit > Preferences > Performance (Windows) or Photoshop > Preferences > Performance (Mac OS). Information about your video card is in the Graphics Processor Settings area of the dialog box.
In this lesson, you’ll create a three-dimensional scene for a wine advertisement. First, you’ll view the finished scene.
  1. Start Photoshop, and then immediately hold down Ctrl+Alt+Shift (Windows) or Command+Option+Shift (Mac OS) to restore the default preferences. (See “Restoring default preferences” on page 4.)
  2. When prompted, click Yes to delete the Adobe Photoshop Settings file.
  3. Choose File > Browse In Bridge to open Adobe Bridge.
  4. In Bridge, click Lessons in the Favorites panel. Double-click the Lesson12 folder in the Content panel.
  5. View the 12End.psd file in Bridge. A three-dimensional wine bottle, wine glass, and sale card sit atop a wooden box with 3D lettering.
  6. Double-click the 12End.mp4 file to view the movie in which light has been animated to simulate a sunrise. When you’re done viewing the movie, exit QuickTime.
  7. Double-click the 12Start.psd file to open it in Photoshop.
The file contains an image of a vineyard, a black background layer, and two additional layers.
2. Creating a 3D shape from a layer

Vector Drawing Techniques in Adobe Photoshop CS6


 you’ll learn how to do the following:
  • Differentiate between bitmap and vector graphics.
  • Draw straight and curved paths using the Pen tool.
  • Convert a path to a selection, and convert a selection to a path.
  • Save paths.
  • Draw and edit shape layers.
  • Draw custom shapes.
  • Import and edit a Smart Object from Adobe Illustrator.
Image
This lesson will take about 90 minutes to complete. Copy the Lesson08 folder onto your hard drive if you haven’t already done so. As you work on this lesson, you’ll preserve the start files. If you need to restore the start files, copy them from the Adobe Photoshop CS6 Classroom in a Book DVD.
Image
Unlike bitmap images, vector images retain their crisp edges when you enlarge them to any size. You can draw vector shapes and paths in your Photoshop images and add vector masks to control what is shown in an image.

About bitmap images and vector graphics

Before working with vector shapes and vector paths, it’s important to understand the basic differences between the two main categories of computer graphics: bitmap images and vector graphics. You can use Photoshop to work with either type of graphic; in fact, you can combine both bitmap and vector data in an individual Photoshop image file.
Bitmap images, technically called raster images, are based on a grid of dots known as pixels. Each pixel is assigned a specific location and color value. In working with bitmap images, you edit groups of pixels rather than objects or shapes. Because bitmap graphics can represent subtle gradations of shade and color, they are appropriate for continuous-tone images such as photographs or artwork created in painting programs. A disadvantage of bitmap graphics is that they contain a fixed number of pixels. As a result, they can lose detail and appear jagged when scaled up onscreen or printed at a lower resolution than they were created for.
Vector graphics are made up of lines and curves defined by mathematical objects calledvectors. These graphics retain their crispness whether they are moved, resized, or have their color changed. Vector graphics are appropriate for illustrations, type, and graphics such as logos that may be scaled to different sizes.
Figure 1 Logo drawn as vector art
Figure 2 Logo rasterized as bitmap art
2. About paths and the Pen tool

Masks and Channels in Adobe Photoshop CS6


Masks and Channels in Adobe Photoshop CS6


Contents

  1. 6. Masks and Channels
  2. Getting started
  3. Creating a mask
  4. Refining a mask
  5. Creating a quick mask
  6. Manipulating an image with Puppet Warp
  7. Working with channels

Article Description

Learn how to create a mask to remove a subject from a background, refine a mask to include complex edges, create a quick mask to make changes to a selected area, edit a mask using the Properties panel, manipulate an image using Puppet Warp, save a selection as an alpha channel, view a mask using the Channels panel, load a channel as a selection, isolate a channel to make specific image changes.

From the book

Adobe Photoshop CS6 Classroom in a Book
$43.99 (Save 20%)
Note: This excerpt does not include the lesson files. The lesson files are available with purchase of the book.
Lesson overview
In this lesson, you’ll learn how to do the following:
  • Create a mask to remove a subject from a background.
  • Refine a mask to include complex edges.
  • Create a quick mask to make changes to a selected area.
  • Edit a mask using the Properties panel.
  • Manipulate an image using Puppet Warp.
  • Save a selection as an alpha channel.
  • View a mask using the Channels panel.
  • Load a channel as a selection.
  • Isolate a channel to make specific image changes.
Image
This lesson will take about an hour to complete. Copy the Lesson06 folder onto your hard drive if you haven’t already done so. As you work on this lesson, you’ll preserve the start files. If you need to restore the start files, copy them from the Adobe Photoshop CS6 Classroom in a BookDVD.
Image
Photography © Image 
Use masks to isolate and manipulate specific parts of an image. The cutout portion of a mask can be altered, but the area surrounding the cutout is protected from change. You can create a temporary mask to use once, or you can save masks for repeated use.

Working with masks and channels

Photoshop masks isolate and protect parts of an image, just as masking tape protects window panes or trim from paint when a house is painted. When you create a mask based on a selection, the area you haven’t selected is masked, or protected from editing. With masks, you can create and save time-consuming selections and then use them again. In addition, you can use masks for other complex editing tasks—for example, to apply color changes or filter effects to an image.
In Photoshop, you can make temporary masks, called quick masks, or you can create permanent masks and store them as special grayscale channels called alpha channels. Photoshop also uses channels to store an image’s color information. Unlike layers, channels do not print. You use the Channels panel to view and work with alpha channels.
A key concept in masking is that black hides and white reveals. As in life, rarely is anything black and white. Shades of gray partially hide, depending on the gray levels (255 is the value for black, hiding artwork completely; 0 is the value for white, revealing artwork completely).

Adobe Photoshop CS6 Classroom


Adobe Photoshop CS6 Classroom


Note: This excerpt does not include the lesson files. The lesson files are available with purchase of the book.

Lesson overview

In this lesson, you’ll learn how to do the following:

Understand image resolution and size.
Open and edit an image in Camera Raw.
Adjust the tonal range of an image.
Straighten and crop an image.
Paint over a color with the Color Replacement tool.
Adjust the saturation of isolated areas of an image using the Sponge tool.
Use the Clone Stamp tool to eliminate an unwanted part of an image.
Use the Spot Healing Brush tool to repair part of an image.
Use the content-aware Patch tool to remove blemishes.
Apply the Unsharp Mask filter to finish retouching photos.
Save an image file for use in a page layout application.


This lesson will take about an hour to complete. Copy the Lesson02 folder onto your hard drive if you haven’t already done so. As you work on this lesson, you’ll preserve the start files. If you need to restore the start files, copy them from the Adobe Photoshop CS6 Classroom in a Book DVD.


Adobe Photoshop includes a variety of tools and commands for improving the quality of a photographic image. This lesson steps you through the process of acquiring, resizing, and retouching a photo intended for a print layout. The same basic workflow applies to web images.

Strategy for retouching

How much retouching you do depends on the image you’re working on and your goals for it. For many images, you can achieve your desired outcome with just a few clicks in Adobe Camera Raw, which is installed with Adobe Photoshop. For others, you may start in Camera Raw to adjust the white point, for example, and then move on to Photoshop for more advanced retouching, such as applying filters to selected parts of an image.

Organizing an efficient sequence of tasks

Most retouching procedures follow these general steps:

Duplicating the original image or scan; working in a copy of the image file makes it easy to recover the original later if necessary
Ensuring that the resolution is appropriate for the way you’ll use the image
Cropping the image to final size and orientation
Repairing flaws in scans of damaged photographs (such as rips, dust, or stains)
Adjusting the overall contrast or tonal range of the image
Removing any color casts
Adjusting the color and tone in specific parts of the image to bring out highlights, midtones, shadows, and desaturated colors
Sharpening the overall focus of the image
Usually, you should complete these processes in the order listed. Otherwise, the results of one process may cause unintended changes to other aspects of the image, making it necessary for you to redo some of your work.

NOTE

In Lesson 1, you used an adjustment layer, which gives you great flexibility to experiment with different correction settings without risking damage to the original image.

Adjusting your process for different intended uses

The retouching techniques you apply to an image depend in part on how you’ll use the image. Whether an image is intended for black-and-white publication on newsprint or for full-color online distribution affects everything from the resolution of the initial scan to the type of tonal range and color correction that the image requires. Photoshop supports the CMYK color mode for preparing an image to be printed using process colors, as well as RGB and other color modes for web and mobile authoring.

To illustrate one application of retouching techniques, this lesson takes you through the steps of correcting a photograph intended for four-color print publication.

For more information about CMYK and RGB color modes, see Lesson 14, “Producing and Printing Consistent Color.”

Design an Interesting Cloud Text Effect in Photoshop


Design an Interesting Cloud Text Effect in Photoshop
Posted on November 25th, 2012 in Text Effects.
In this tutorial, I will show you the steps I took to Design an Interesting Cloud Text Effect in 3 Easy Steps in Photoshop. We will mainly use custom brushsets and utilise brush options to achieve this text effect. This is a beginner level tutorial, have a try :)
Note: The Photoshop tutorial is done in CS6 – therefore some screenshot may have slighting different layout as in the earlier version. Some brushes are exclusive to Photoshop CS6.
Here is a preview of the final effect I have for this tutorial: (click to enlarge)
cloud text flatten1 500x250 Design an Interesting Cloud Text Effect in Photoshop

PSD File Download

You can download the PSD File for this tutorial via the VIP Members Area for only $6.95/Month (or less)! You will not only get this PSD File, but also 100+ other PSD Files + Extra Goodies + Exclusive Photoshop tutorials there. Signup now and get exclusive :) Find out more about the VIP Members Areas
vip sign up 250 Design an Interesting Cloud Text Effect in Photoshop
OK Let’s get started!
To complete this tutorial, you will need the following stocks:

Step 1

Create a new document sized 1400px * 700px, grab the Gradient Tool and fill the background layer with a light blue gradient:
1 grad 500x159 Design an Interesting Cloud Text Effect in Photoshop
Click to enlarge the following screenshot to reveal the colour code:
1 fill 500x249 Design an Interesting Cloud Text Effect in Photoshop
Use the cloud brush set you downloaded, paint some white cloud on a new layer and we will use this as our background:
1 paint 500x249 Design an Interesting Cloud Text Effect in Photoshop

Step 2

We will type some texts onto our canvas, I used the “Lucida Handwriting” font that comes with Photoshop:
2 font 500x205 Design an Interesting Cloud Text Effect in Photoshop
Load the smoke brush into Photoshop and use the following set:
2 brush Design an Interesting Cloud Text Effect in Photoshop
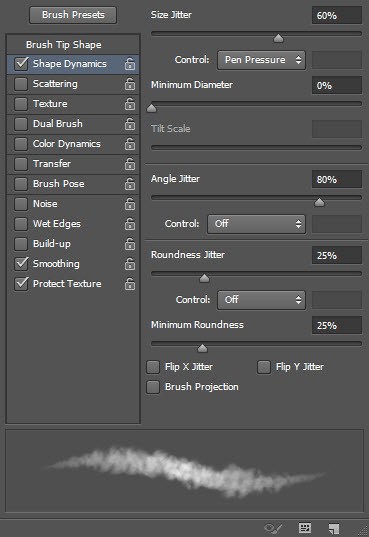
Press “F5″ to bring up the brush options window, apply the following setting:
Shape Dynamics
2 shape dyn Design an Interesting Cloud Text Effect in Photoshop
Make sure you tick the “Smoothing” and “Protect Texture” option.
Use the brush, gently paint over the text as shown below, adjust the brush size accordingly:
2 paint 500x424 Design an Interesting Cloud Text Effect in Photoshop
2 paint 2 500x243 Design an Interesting Cloud Text Effect in Photoshop
Turn off the original text layer, and you will have the following effect:
2 effect1 500x168 Design an Interesting Cloud Text Effect in Photoshop
Then on this newly painted cloud layer, apply the following “Bevel and Emboss” layer blending effect:
2 bevel 500x359 Design an Interesting Cloud Text Effect in Photoshop
and here is the effect so far:
2 effect 2 500x163 Design an Interesting Cloud Text Effect in Photoshop

Step 3

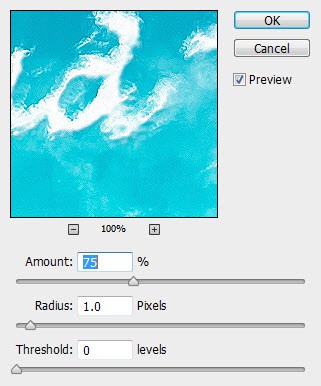
We will add some retouches to this effect. To make text slightly sharpen, we flatten the image and apply the following “Unsharpen Mask” filter (Filter > Sharpen > Unsharpen Mask):
3 unsharp Design an Interesting Cloud Text Effect in Photoshop
We can paint some cloud under the text, just to make the text look like floating above the cloud:
3 paint 500x202 Design an Interesting Cloud Text Effect in Photoshop
3 paint 2 500x239 Design an Interesting Cloud Text Effect in Photoshop
Load the hot air balloon PSD File into Photoshop and add some hot air balloons into the image:
3 balloon 500x233 Design an Interesting Cloud Text Effect in Photoshop
Finally we can use the same brush in step 2 to add some extra cloud texture around the text:
3 cloud over 500x152 Design an Interesting Cloud Text Effect in Photoshop
and here is my final effect: (click to enlarge)
cloud text flatten1 500x250 Design an Interesting Cloud Text Effect in Photoshop
That’s it for this tutorial! Hope you enjoy it and find it useful! Till next time, have a great day!