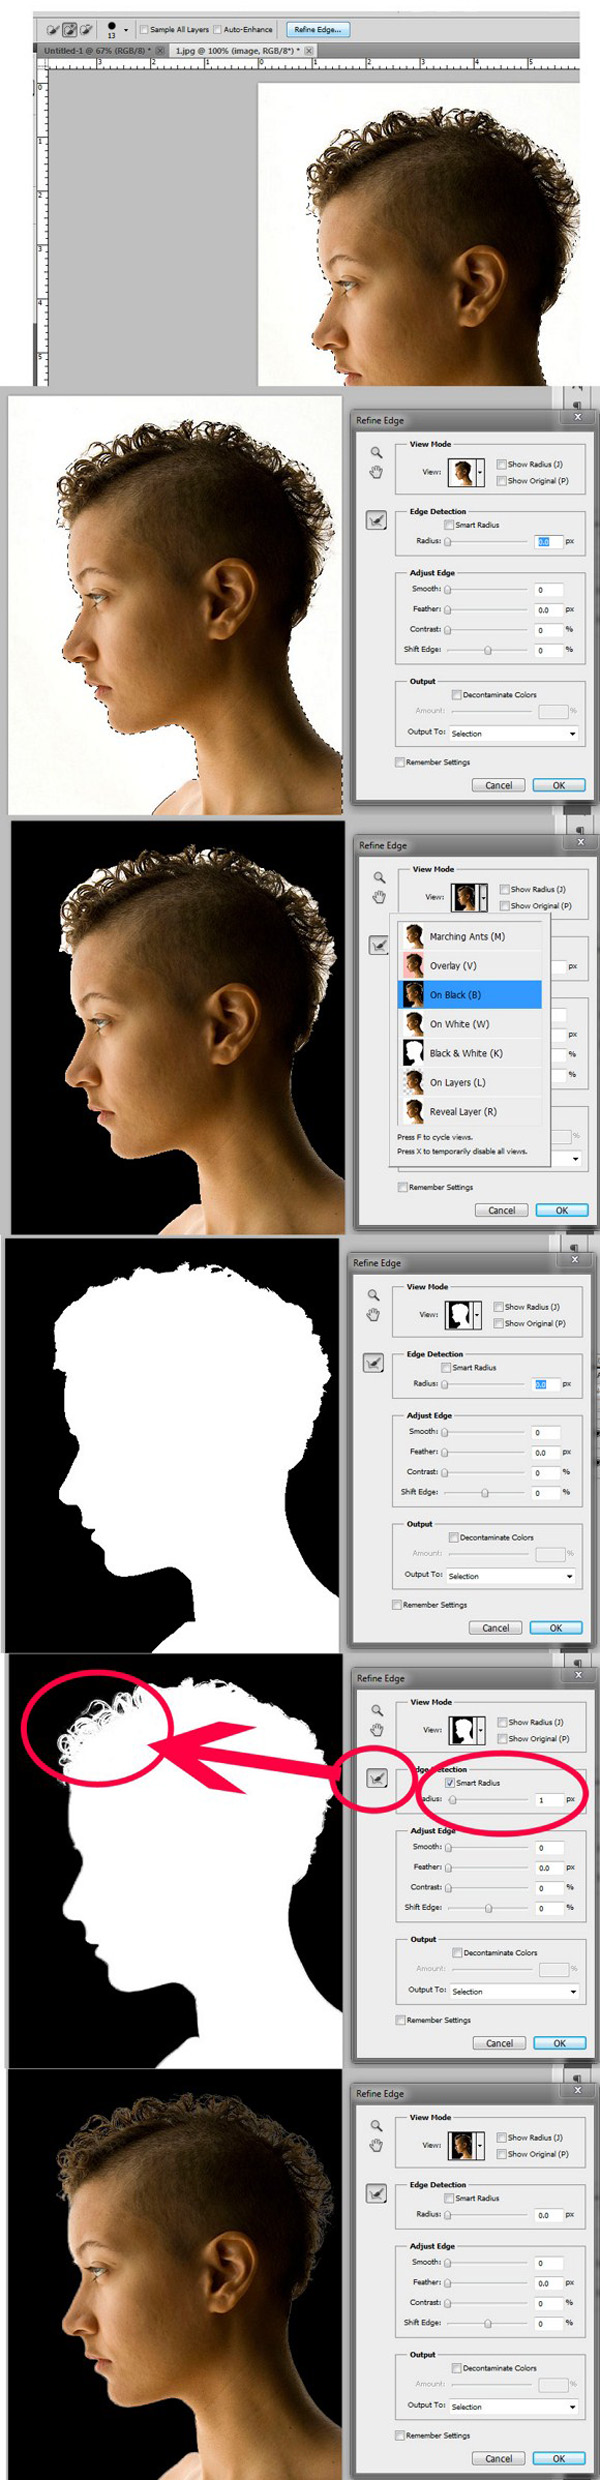
Making The Most Of Photoshop’s Selection Tool
A Few Cool Photoshop Tips And Tricks
Advanced Photoshop users are often familiar with all tools and have mastered most of the fundamental tutorials, tips, and tricks, such as creating a cloudy background. Some people are unaware of all of the cool tricks that Photoshop has to offer, especially when you’ve upgraded your version to CS. The power to create some of the most impressive works of digital art are only a few clicks away once you get a hang of advanced Photoshop shortcuts and tricks.
When it comes to entering the graphic design world, creating interesting pieces for a job or sharing artwork with family and friends, there are plenty of cool Photoshop tips and tricks to consider. Whether you are just experimenting with the tools or already know how to layout a magazine spread, there will always be a new shortcut or trick to make life much easier. Below, you will find a few tips to add to your repertoire or share with others:
Easy Photoshop Tips and Tricks
Have you ever wanted to easily create the image of Earth and dread using the circle tool? There is an easy way to design the world in six steps, which should take less than a minute to complete. First, you should select File/New from the menu bar and create a file size that measures about 200 pixels by 200 pixels. The RGB mode should be selected for this trick. Next, choose a light blue shade for the foreground color and a darker blue for the background color.
Under the Filters tab, select Render, and then choose Clouds. The scene that will greet you should look a lot like the sky. It is the clouds filter that utilizes the foreground and background colors needed to construct this image in your file. If you desire a different look, you can press Ctrl + F on Windows or Command + F for a Mac to reapply the filter. Each time this key combination is pressed, you will receive a somewhat different outcome.
Now, return to the Filter menu and select Render, and then choose Lighting Effects. Once you enter the Light Effects menu, you are able to alter the shape of the ellipse to a circle that becomes centered on your file. Changing the Narrow setting to 39 next follows choosing the Default Spotlight setting.
Sometimes a Photoshop project calls for texture. There are thousands of backgrounds to create that range from a grainy composition to a multi-faceted mess (depending on the look you are going for). To create a paper texture in Photoshop, you should start a new file that measures 60 x 60 pixels. The color should be in RGB. Next, select the following commands in this same order: Filter, Noise, Add Noise. Once completed, choose Gaussian, which is set to 80%.
The next step to create a paper texture is to select Filter, then Stylize, followed by Emboss. The angle should be set to -50, the Height to 2 pixels, and the Amount to 70%. The background will now resemble a gray embossed selection. To change the color, choose Image, then Adjust, followed by Hue-Saturation-Brightness. Once you select the Colorize checkbox, you should set the Hue to a different setting. To gain your personal preference, you can adjust the contrast.
To create the appearance that objects are glowing without using any filters, choose an object to work with that will be duplicated as a layer. First, select the color you'd like your glow to be. After choosing the lower duplicate, click on Edit from the menu, then Stroke. When the Stroke Options appear, the pixel width should be set between 1 and 16. It is important to remember that the larger number you choose, the thicker the glow will appear.
Before exiting, you should glance under Location to make sure that the Outside option is selected. The next step involves applying a Gaussian Blur to the layer, which can be found under the Blur option in Filters. This will soften the glow applied to the layer. Some individuals even repeat the process to create a double glow, which is some cases, can really make an image stand out.
What Can You Do With Advanced Photoshop Tips and Tricks?
Advanced Photoshop users are often familiar with all tools and have mastered most of the fundamental tutorials, tips, and tricks, such as creating a cloudy background. Some people are unaware of all of the cool tricks that Photoshop has to offer, especially when you've upgraded your version to CS. The power to create some of the most impressive works of digital art are only a few clicks away once you get a hang of advanced Photoshop shortcuts and tricks.
Some Photoshop tricks on the advanced level can help a more tedious project seem easier. The more you learn the tips and tricks of the trade, the better your overall creations will turn out. To get an idea of some of the advanced tricks associated with Photoshop, a few examples are mentioned below:
Photoshop allows advanced users to create digital comic coloring that looks just like the human hand penned it. The tricks and tips associated with this sort of higher-level design deals with the manipulation of various brush sets to achieve the look you desire. Photoshop also lets users create photomontages that can transform an original photograph into something much different.
There are also tips and tricks that can take your most unfavorite picture and alter it in any way you wish. Let's say you want to change a regular photograph into something dazzling. Advanced Photoshop tricks can beautify a face that displays a natural appearance. In regards to a photo, skin can be fixed, blemishes and wrinkles erased, teeth fixed and whitened, as well as changes made to the eyebrows, hair, and eyes.
When one is able to master advanced Photoshop techniques, the creative possibilities seem never-ending, including 3D glass balls, planet and star-studded skies, matte paintings, and airbrushed illustrations.
Some Photoshop tricks on the advanced level can help a more tedious project seem easier. The more you learn the tips and tricks of the trade, the better your overall creations will turn out. To get an idea of some of the advanced tricks associated with Photoshop, a few examples are mentioned below:
Photoshop allows advanced users to create digital comic coloring that looks just like the human hand penned it. The tricks and tips associated with this sort of higher-level design deals with the manipulation of various brush sets to achieve the look you desire. Photoshop also lets users create photomontages that can transform an original photograph into something much different.
There are also tips and tricks that can take your most unfavorite picture and alter it in any way you wish. Let’s say you want to change a regular photograph into something dazzling. Advanced Photoshop tricks can beautify a face that displays a natural appearance. In regards to a photo, skin can be fixed, blemishes and wrinkles erased, teeth fixed and whitened, as well as changes made to the eyebrows, hair, and eyes.
When one is able to master advanced Photoshop techniques, the creative possibilities seem never-ending, including 3D glass balls, planet and star-studded skies, matte paintings, and airbrushed illustrations.
Title:
Can You Learn Photoshop basics in 2 Hours or will the red eye removal be your tears flowing?
Word Count:
408
Summary:
A review of the siftware "Learn Photoshop In 2 Hours" and if it can live up to the advanced billing.
Keywords:
software, reviews, information, Photoshop, consumer, website, marketing, affiliate, free, risk, help, fraud, scam
Article Body:
Honesty in advertising. Wouldn’t it be a consumers dream to approach products with caution and not skepticism?
David Peters writes openly about his frustration the first time he opened Photoshop’s software and felt lost and dejected. The source of his dilemma was even wanted to know the basics seemed out of reach without a tutor sitting next to you. Hence the idea is born for “Learn Photoshop Now.”
After getting comfortable with the product he took action. He designed a system to show the most common tasks a Photoshop user would seek direction. On the product page he even gives video demonstrations on how these can be accomplished.
He illustrates for us how to remove red eye from digital photos, when resizing a picture how can the user avoid quality loss, and how graphics could benefit the final presentation. Click here for risk free information
Click Here For Risk Free Buying
http://1234dcba.lpnow.hop.clickbank.net/
As he gets into the nuts and bolts of the presentation such as learning the toolbox, or what is the Palette Well we are able to comprehend the training because the video brings it all to life and clarifies the blur often caused by text based learning. It is a hands on system for the consumer. If you have ever been distraught learning software by a manual, you can’t help but have fun as you encompass each step up the ladder.
David Peters shows us some of the tricks of the trade. The merging of photos so they look as one for example. It seems he anticipates our questions. Did you ever wonder if they could remove a blemish for an actresses photo or whiten the teeth of a tobacco user? These come with the software.
Although David Peters mentions about helping out with the “basics”, there is enough knowledge afforded to the user to feel anything like a beginner.
The one on one concept makes learning at your own speed stress free. It isn’t a content or an assignment. You don’t have to go on to the next topic until you have committed the information to memory and or notes.
With a money back guarantee what have you got to lose? Maybe some red-eye, acne, etc.
Click Here For Risk Free Buying
http://1234dcba.lpnow.hop.clickbank.net/
Thanks for the time,
Nu Man Saves Consuman Human
http://www.scamspamjamfree.com
http://scamspamjamfree.com/blog/
Title:
Tips For Using Photoshop When Creating A Web Site
Word Count:
434
Summary:
Photoshop is a wonderful tool for creating web sites. It allows even a novice the ability to create a fully functional web site without much knowledge of HTML or JavaScript. You can create an entire web page template with Photoshop, and then use Image Ready to slice up the image and create the HTML for you. Or you can use Photoshop to create just the navigation for your web site, or to optimize images on your web site. No matter how you use Photoshop, it will definitely make ...
Keywords:
Article Body:
Photoshop is a wonderful tool for creating web sites. It allows even a novice the ability to create a fully functional web site without much knowledge of HTML or JavaScript. You can create an entire web page template with Photoshop, and then use Image Ready to slice up the image and create the HTML for you. Or you can use Photoshop to create just the navigation for your web site, or to optimize images on your web site. No matter how you use Photoshop, it will definitely make your web site look much nicer, and also help it to run faster.
Photoshop can help you to create an entire web site without coding much HTML by hand. You can draw a complete web site in Photoshop, and then transfer your image into Image Ready so that you can slice up the image into smaller elements, and then save the images and the corresponding HTML to render the page very easily. Then all you have to do is use you’re newly created web site and entire content into the blank spaces that you have left in the template. After you have added the content to your pages, you will be ready to post your new web site to the web.
When I am creating web sites I use Photoshop to create the navigation for the web site and also to optimize all of the images, so that my web site will load faster. I usually create buttons for the navigation, and then create rollover effects from within Image Ready. This saves me quite a bit of time, because all of the JavaScript for the mouse over effects are done for me, which allows me to work on the more advanced coding of the pages. Even if you want to create all of the navigation and layout of your web site without Photoshop, then you should at least use Photoshop to optimize your images so that you web site loads within a reasonable amount of time.
Photoshop can give you 3 different optimized views of a particular image, and tell you how fast it will load on a particular connection speed. Then you can choose which optimized image you would like to use based on the ratio between how good the picture looks and how fast it loads. Without optimizing your images your web site will perform very slowly and visitors will be less likely to wait. You can create a web site on your own by hand coding the entire site, but using Photoshop will make creating your web site much easier and more appealing.
10 Tips For Using Adobe Photoshop
Like a brush is to a painter an essential skill in the field of graphic design is Photoshop. The software offers increased productivity as well as flexibility. The features include aspects like file browser, vanishing point tool, smart sharpen filter, noise reduction filter, smart objects, as well as camera workflow enhancements. Photoshop offers professional photo editing features, digital imaging, as well as non destructive editing.
There are so many hidden features and insights to software, that it is often impossible to know them all.
1. There is a hidden option using which you can simulate bold and italic formatting styles for fonts that do not have these options. Click the button on the type tool option to bring up the character palette. Then select text and click the arrow in the upper right hand corner of the palette menu where faux bold and italics are present. However you will not be able to warp type when formatting has been applied.
2. One can quickly flip through blend modes while trying out effects by using the keys “shift+ to change to next mode and shift- to go to the previous mode.” When a painting tool is active this shortcut will change the blend mode of the painting tool. However, if anything is highlighted then the shortcut will not work. You will have press esc and then use the shortcut keys again.
3. The photomerge feature can be used to seamlessly combine multiple images to create a panorama. This feature can be accessed from the Automate menu. You can even refine the composition using tools like rotate, zoom, pan, and set vanishing point.
4. When re-sampling images one can use either Bicubic Smoother or Bicubic Sharper. You can use Bicubic smoother for up sampling and Bicubic sharper for down sampling. You can actually specify which interpolation method is to be used by going to general preferences and setting a default.
5. There are two features for printing. You can use contact sheet II or picture package. Use contact sheet when you want all images in the same size and you want to print the name below the image. Use printer package when you want different image sizes on the same page, or multiple copies of the same image, or a text overlay.
6. If you want to remove a glare on the eyeglasses of an image you should use a part of the lens that does not have a glare and use it to layer the lens with a glare. Use tools like rotate and skew and soft-tip eraser to soften the edges. Ensure the glare does not show through from below. Or, do some careful work using the clone tool.
7. The online services enable you to connect to online photo printing and sharing sites.
8. The Web Photo gallery can generate hyperlink pages that can be uploaded to a server.
9. The Picture Package option will help you prepare photos in layout with multiple size prints on one page.
10. You will never forget how you achieved a certain result because the History Log will detail every step taken by you as well as time-tracking, and a legal record. There are three choices wherein, you can create a sessions only record where, it will record only when Photoshop is opened or closed; or a concise record which will record each action including the text that appears in the history palette; or the complete editing history including the text that appears in the actions palette.
Adobe Photoshop is a dream tool for every designer and one can over time master every subtlety of the tool and crop, rotate, resize, create shapes, add layers, change text, and play with colors. It is a hands on software where the more you use it the more you will learn.
Basic Photo Corrections In Photoshop Cs
Most of us, however, don’t really need a Masters in Photoshop. What most of us want is the flexibility, integrity and vast array of choices that Photoshop provides.
Let’s look briefly at some of the most basic photo corrections in Photoshop CD, the ones you’ll really need. Here are the first steps recommended by the experts, and they represent the process they apply to every photograph:
1- First and foremost, duplicate your original and work only on the copy.
That way, if something goes wrong, you’ll always have the original. This is a great habit to get into.
2- Next, assure the correct resolution. There are two basic categories of “resolution” in computer graphics: the monitor resolution and the image resolution.
Image resolution varies from low (about 72 pixels per inch, or “ppi”) to high (anything 300 ppi or larger). Of course, the higher the resolution, the bigger the file.
To change the resolution of your photo, click “Image,” then “Image Size.” On the bottom left of the box that comes up, type in the ppi you want, for example, 300 ppi. (You will probably want to change the size at this point. That’s fine, you will still retain the ppi you chose.)
3- Use your Crop tool ( ) from the toolbox to shape your picture the way you want it.
Many people don’t notice the width and height options underneath the top menu, but it’s a very handy feature.
At times you have an exact measurement you need to fill; rather than fiddling with the numbers after you crop, the proper way is to insert the width and height immediately after clicking the Crop tool, and then making the crop, dragging down diagonally with your mouse. You will notice the exact measurements appear without a struggle.
4- Experiment with your automatically adjusting features. Click on “Image” in your top menu, then “Adjustments.” You will see options for automatic levels, contrast and color. After you’ve tried them, you can go ahead and hone in to polish, if you like.
You can also try Image> Adjustments> Shadow/Highlight (or “Variations”). You’ll be astonished at the variety of preset options there.
As you gan imagine, there are endless variations on the themes represented by these basic steps and the choices made therein.
But Photoshop expands past them and out into the great beyond, offering an unlimited palette and a universe of options.
Your only problem will be how to tear yourself away.
You Could Learn Photoshop In Under 2 Hours?
Dozens of people want to know more about how to edit images, the easiest way is to use Adobe Photoshop. Thought it may seem complicated at first with the entire 10 hour video help book adobe provides, you can learn it under 2 hours. From tools like using the layers to setting Photoshop’s undo button for easier use, Adobe is full of wonderful surprises that will impress your family and friends. This article will cover how to use 2 selection tools.
The first selection tool is called the lasso tool. It is used to select irregular areas in a photo. There are three parts to the lasso tool, they are the Lasso Tool, the Polygonal Lasso Tool and the Magnetic Lasso Tool. The polygonal lasso tool is used to select specific polygon shapes inside of the photo. While the magnectic lasso tool is used to hook onto specific areas in the photo, it will automatically “attach” itself to areas. The regular lasso tool will just lasso onto whatever you tell it to. To use these tools all you have to do is select the tool and drag it over your photo.
The 2nd selection tool is called The Magic Wand. What this tool does is it selects areas based on color patterns instead of the outside. It is easy to use it because there are no specific parts to it. All you have to do is select it then click on an area in your picture that you want to edit, the magic wand will grab the area specific to the color and you will be able to edit it to your needs.
Adobe Photoshop is an interesting and in depth tool for editing photos. You can create masterpieces with just a simple picture. Changing backgrounds became easy, editing sizes, cutting out pieces just got easier to do with Adobe. Learning it in just a couple of hours is phenomenally good for the novice user. Friends and family will love the masterpieces you can create with just the touch of a button. I anticipate that Adobe will become a lot more user-friendly over the next couple of years so that more and more people will feel comfortable using it.
The Difference Between Canvas And Image Size in Photoshop
What happens if I change the canvas size? I want to print my photo as a 5x7 print. Should I change the image size or the canvas size?
These are common questions among beginners who are just learning to use Photoshop. Many who are just learning to use Adobe Photoshop often are confused by the differences in the canvas size and image size functions.
The ability to adjust the canvas size is just one of the many features available in Adobe Photoshop that puts the user in control of every aspect of the digital image editing process.
While there is much more too it, changing the canvas size essentially creates more work space by adding extra pixels to the total image. There are many ways you can use the canvas and image size functions to make your digital image editing work easier.
Not only can you change the size of the canvas but you can also change the canvas color. This function can be used to create frames or borders around your images. In addition, there are many other more advanced techniques for using the canvas size and image size functions.
As with all of the features and functions of Photoshop, the most important thing to keep in mind is that you take the time to learn how to properly use Photoshop’s image and canvas size functions before you jump into a photo-editing project.
Photoshop is not nearly as difficult to learn as many might think but it does require that you learn proper techniques. While with many lesser quality photo editing programs you can sometimes get by with trial and error, Photoshop is not that easy to just jump in and create professional quality graphic work without some knowledge.
With that being said, once you learn Photoshop there will be no limitations to what you can create.
Paint Like Monet Using Photoshop Paintbrush Tool
The Photoshop paintbrush has more uses than you might imagine. When you get good with the paintbrush you will be able to create some awesome graphics.
Photoshop has two types of paintbrushes you will be using.
Airbrush:
The first type of paintbrush available in Photoshop is the airbrush. This paintbrush tool is very much like using a can of spray paint. It virtually sprays the paint onto the image or canvas.
Photoshop gives the user maximum control by allowing you to adjust the diffusion or amount of pain being applied as well as the speed with which it is applied to the canvas. There are also many different brush sizes and shapes you can use.
Paintbrush:
The paintbrush tool is more like using an actual paintbrush and applying paint by hand. Much like using a real paintbrush the virtual paintbrush in Photoshop applies paint in much more even distribution compared with the airbrush tool.
You will have fun experimenting with the different options available for creating digital works of art using the paintbrush in Photoshop.
The best thing about it is that you don’t have to worry about mistakes as you would on a traditional canvas using real paint.
This is especially true if you are working in layers. If you don’t like your results simply delete that layer and try something else.
Check out Photoshop Newbie video Tutorials and learn how
to master the basics of Photoshop in just 2 hours with David Peters.
Sign up today and receive Free daily email tips on mastering Photoshop and also view a Free video photoshop tutorial online.
This is a a short video shows you how to remove "red-eye" from a photo.
Photoshop Layers Tutorials
Layers are a powerful feature of Photoshop that allow you to work on one part of an image without disturbing the rest of it. While the concept of layers may seem intimidating at first, once you get the hang of using layers you’ll wonder how you ever survived without them!
The transparent parts of any layer, shown by the checkered grid, allow the layers beneath that layer to show through. You can show and hide each layer in an image by clicking on its corresponding eye icon in the Layers palette.
To organize your layers, you can arrange them into layer groups by going to Layer > New > Group…. Each layer group displays in the same way as any ungrouped layers on the Layers palette. A layer group is signified by a folder icon. You can collapse or expand layer groups by clicking on the triangle to the left of the folder icon, and nest layer groups within each other by dragging one folder icon into another.
Here are 10 quick Layer Shortcuts.
1 - Rename layers by double-clicking on the layer name.
2 - Select a layer by using the keyboard shortcuts Alt-[ and Alt-] (Option-[ and Option-] on a Mac).
3 - Merge a layer into the one beneath it by pressing Ctrl- E (Command-E). If you have selected layers, this shortcut
will merge those selected layers together.
4 - Change the transparency of a layer by changing its opacity with the Opacity slider, or typing a value into the
Opacity box (which is visible when you have the Selection, Move, or Crop tools selected).
5 - Duplicate a selected layer by pressing Ctrl-J (Command-J on a Mac). You can also duplicate a layer by dragging it
while pressing the Alt (Option) key.
6 - Select multiple layers by holding down Ctrl (Command on a Mac) and clicking the layer names. This forms a temporary link between the selected layers that allows you to move them as one unit, delete them all, and so on.
7 - You can also link layers together. Select layers by clicking on them while holding down Shift or Ctrl (Command
on a Mac).
8 - To unlink all the layers, select one of the linked layers and go to Layer > Unlink Layers.
9 - To temporarily unlink a layer, hold down Shift and click on its link icon (a red “X” will appear over the link icon).
10 - Reactivate the link by holding down Shift and clicking the link icon again.
Photoshop Plug-ins: Making Photoshop Even More Powerful
The coolest thing about Photoshop is that even as powerful as it is out of the box, there are many different plug-ins to make Photoshop even more powerful. The Photoshop plug-ins can be grouped into a few major categories which include 3D, color management, digital asset management, photographic, retouching, and special effects.
The Photoshop plug-ins which are available can help perform tasks much faster and more efficiently than performing these tasks by hand. The 3D plug-ins are used to create 3D images and type very quickly and elegantly. The color management Photoshop plug-ins can create new colors to correspond to the printer that you are using, or the monitor that you are using to create your graphics. The digital asset management plug-ins are used to organize all of the digital images that you have created so that finding the correct image is much easier than without it. The photographic ones give many different professional lens techniques that you can apply to any picture to create amazing effects.
The retouching plug-ins can intelligently change the contrast, color, sharpness, and many other common filters to make a picture look as crisp as possible. The special effects plug-ins are my favorite, because they can make a rather plain image into something fantastic. If you use Photoshop on a regular basis, then you need to look at some of the plug-ins that are available, because they can make your life much easier, and your graphics look much better.
Adobe Photoshop
In the history of photography, there has never been a time that we can achieve such phenomenal results in editing as has happened in the digital age. And while there are a myriad of tools that the computer and internet have made available to us to enhance and change the images that come from a photo shoot, none can top the popularity and power of Adobe Photoshop. The program has become so synonymous with editing and creating effects that the term, “to Photoshop” has become a verb that means to enhance or alter an image.
We can “Photoshop in” new outfits, accessories or even people to a shot where it was just not possible before. So if you want a picture of you shaking hands with the president, you don’t have to go to Washington to get it, just “Photoshop” your image into the image of the president and it will look as real as if you had been there.
Similarly, we can “Photoshop” out things from a picture we don’t want to see there anymore. So if you have a physical flaw, that can be removed. You can even remove a distracting person from the background of the shot. The program is so sophisticated that these images are possible and you really cannot tell the alteration has been made.
Photoshop has become such a de facto standard for photo processing that if you are setting up a photography studio or business, a copy of the software is as necessary as Microsoft word or PowerPoint. The good thing about this software is that it is readily accessible and a lot of people know how to use it. So if you feel insecure about learning yet another computer application, you can probably find a college student, someone at the high school or maybe the junior high that knows Photoshop in and out and can help you jump start your use of the software as well.
But Photoshop has not always dominated this genre. The program was created in 1989 by two brothers, John Knoll and Thomas Knoll. While the brothers developed Photoshop for custom uses they had at the time, it wasn’t long before the market potential of this software became evident. So, being smart entrepreneurs, John and Thomas founded a little company called Adobe and began operations in 1990.
Adobe has been a shining example of how to achieve success in the age of the internet. Today few of us who use the internet are not aware of Adobe. You probably cannot find a personal computer that uses the internet that does not have a free copy of the Adobe reader on it to read PDF files. The PDF format is yet another example of how this little company has created and then taken over a particular market of online business.
To really become skilled at using Photoshop, the first thing to do is probably find a copy to play with. Like most computer applications, you can probably find a copy on a friend’s computer just to tinker with it and get a feel for the controls. Then if your friend is a wizard at Photoshop, let him or her show you some of the real “wiz-bang” things they can do with Photoshop using the same menus you were just tinkering with. This little Saturday afternoon experiment could turn you into a Photoshop addict forever.
After that, you would do well to download a copy for yourself. You can get an evaluation version that will give you most of the features. But you really only need that if you are not sure if you are going to buy a copy. Since Photoshop dominates this market, you almost certainly will buy a copy so you might save some frustration and purchase a licensed copy right away. Now, you will probably find yourself playing with the software for long hours just having fun and that’s great. But don’t overlook the value of taking some organized classes in photo editing using Adobe Photoshop. These classes can show you the shortcuts and how to get the most out of the software.
From there on out, your imagination is the only limit to how you will use this tool to make your photographs better for your customers. And you will be able to respond enthusiastically when someone says, “that’s ok, you can just Photoshop that and fix it right up.”
Adding Text To Images In Photoshop
The possibilities for creating images with text in Photoshop are exciting. By adding text to your photo projects you will be able to make your own postcards, add slogans to photo collages, create advertisements, web site graphics, logos, signs, color photo brochures, flyers, and much more.
The following are a few of the things you can do with text in Photoshop.
Moving Text
One of the benefits of Photoshop’s system of layers is that you can move text around. In fact, you can move each letter of a word independently of each other. This allows the user to perfectly position text for the best composition.
3D Text Effects
You can create shadows behind text, give it texture or make it glow.
Put Photos inside Text
With Photoshop it is easy to create text with photo image inside. In other words instead of creating a solid color or texture you can fill the text with a photographic image. This is only useful when you are working with very large fonts.
Curved Text
You can even create text that is curved or is in different shapes.
You can see that the possibilities for incorporating text into your images are limitless.
The most important thing to consider when working with text in Photoshop is to choose the right font for the job. Some fancy fonts may not be strong enough to show up or print well over a busy image.
Experiment with different fonts and font sizes for the best result. Also, if you plan on printing your project don’t assume that because it looks good on your monitor that it will print well.
Print your image to see how the text looks on paper. One way to make your text stand out is to use blending options including shadows and various filters.
Title:
Transform You Old, Worn Out Photos In Minutes With Adobe Photoshop
Word Count:
372
Summary:
Do you have old photographs that are faded, worn out, crinkled or even torn? Of course you do, everyone does. Many of these photos are likely very old family photographs that are simply irreplaceable should something happen to them. In the past it was very expensive and time consuming to have old damaged photographed restored. It usually required a photo restoration expert and sometimes the results were not really that great. +
Digital imaging, and more specifically Adobe ...
Keywords:
photoshop, adobe, photography, digital images, elements, tutorials,
Article Body:
Do you have old photographs that are faded, worn out, crinkled or even torn? Of course you do, everyone does. Many of these photos are likely very old family photographs that are simply irreplaceable should something happen to them. In the past it was very expensive and time consuming to have old damaged photographed restored. It usually required a photo restoration expert and sometimes the results were not really that great. +
Digital imaging, and more specifically Adobe Photoshop, has revolutionized the process of renewing and restoring old photographs. It is amazing the results you can achieve with Photoshop. Old and damaged, even torn, photographs can be restored and renewed to their original colors and vitality using the tools available in Photoshop.
Adobe’s Photoshop is the number one choice digital photo editing software application among today’s professional photographers, graphic artists and web designers. It is not only the best but easier to work with than you might think. Many shy away from Photoshop because there are intimidated by the complexity. With the help of a good Photoshop tutorial you can begin to learn Photoshop within minutes and be on your way to restoring those old photographs and preserving your family’s memories for year to come.
There are less expensive digital editing applications but the problem is that they often have very limited capabilities when it comes to doing high quality digital photo restoration. Those cheaper digital photo software packages often utilize a one size fits all approach to photo restoration and they just don’t have the functions to deal with all of the types of damage you may encounter in renewing your old photos.
The other benefit of using Photoshop to fix your old photographs it that you can work in layers. The layers function ensures that you won’t waste an hours work with one little mistake. As you work your photograph you can save each new change as a new layer. If you mess up simply delete that layer and try again. Photo restoration requires patience and attention to detail. Only Adobe Photoshop has the tools to do a quality job restoring your old photographs. Learn Photoshop now and start bringing those old photographs to new life.
Title: Adobe Photoshop Brushes Techniques
Adobe Photoshop Brushes Techniques
Damn, just in the morning tought about this kind of review about how to use brushes! Maybe that’s good because I really got interest to use my brushes better. Anyway – I like the post, because I will really learn from it!
Brushes are the core component of many tools in the toolbox, and confident brush handling is essential for the effective application of these. You need to master brushes because this gives you many ways in which you can use and edit brushes will equip you with a whole new set of skills, and give you access to a wide range of powerful and creative time-saving techniques.
The Brush Preset picker will help you to find the right brush fast so make the most of it
With some Photoshop tools, such as the Clone Stamp, the Brush Preset picker is used simply to edit the tool’s brush size, softness and opacity.
Because the Clone Stamp’s function is to subtly replace one area of pixels with another, you don’t need its brush tip to be shaped like a rubber duck, for example!
However you can use the Brush Preset picker to arm yourself with a variety of creatively-shaped brushes, should your project require them. Working smarter with the Brush Preset picker means maximising its potential. If you’re not already familiar with this interface.
The Brush Preset Picker
Click on the Brustic to open the Brush Preset picker, and scroll down to see the default set of brushes.
Towards the foot of the list of default brushes you’ll find a variety of unusually-shaped brush tips, including brushes shaped like stars and blobs.
Click on the picker’s menu icon to access other, specialised sets of brushes. You can use the picker’s menu to display a thumbnail of the brush stroke, or set it to show the brush tip and name.
The numerical value indicates the brush’s initial diameter in pixels. You can customise this to suit your requirements. When you select a new set of brushes, you can either replace the existing default set or append the new set to it so you can use both.
Brushes are the core component of many tools in the toolbox, and confident brush handling is essential for the effective application of these. You need to master brushes because this gives you many ways in which you can use and edit brushes will equip you with a whole new set of skills, and give you access to a wide range of powerful and creative time-saving techniques.
The Basic Photoshop Tools
You can find Photoshop tutorials on the Adobe site on abstracts, automation, animation, the basics of using Photoshop, buttons and brushes, using color effectively, digital art, drawing, creating desired effects with drawing or photos, retouching photos, photography in general, scripting, textual effects, Photoshop patterns and textures, graphics for the Web, and layouts for the Web.
One of the most basic of Photoshop tutorials is a complete explanation of all you’ll find on the Photoshop toolbar.
You’ll learn lessons that include the use of the marquee tools. There are several: the elliptical, the single row, the single column and the rectangular.
The rectangular and elliptical marquee tools lets you expand or reduce an area that is shaped as the tools indicate. You can use a tool to size one row or one column with the appropriate marquee tool.
These basic will be taught in this Photoshop tutorial, along with the use of the move tool which lets you create movement of a layer, the lasso tool which lets you capture a specific area, and the magnetic lasso tools, which lets you change the location of images with varying colors.
The polygonal lasso tool, in contrast, will go from point to point in a straight line or lines. You’ll even learn how to use a magic want with Adobe Photoshop tutorials. This magic want tool lets you click inside a one color area and move only that area.
The Photoshop crop tool, part of this tutorial, lets you delete parts of a photo.
Wit h this Photoshop tutorial you’ll learn other basic tools such as the spot healing tool, the healing brush tool, the red eye tool, the patch tool, the brush tool, the pencil tool, and the color replacement tool.
With the clone stamp tool, you’ll learn how to use Photoshop to copy only parts of a particular image, while the pattern stamp tool will teach you how to take an image and brush a pattern on to it.
The Photoshop tutorial will teach you the mechanics of history brush tool use, how it is used to undo what you’ve created by simply brushing over the image you’ve altered and taking it back to the image it was before.
It has an even more advance use, though, in that, you can actually undo the image change in only the specific parts from which you wish to remove your latest alteration.
The art history brush, another tool taught in Photoshop tutorials, is much the same as the history brush except that it also lets you style at the same time.
Photoshop tutorials teach three eraser tools – the standard eraser, the background eraser and the magic eraser tool. With the first you can do just as its name suggests – erase part of the image you’ve created with Photoshop.
With the background version you can erase only the image background, while the magic eraser which lets you make even more varied choices of what to eliminate from the image.