
12 Photoshop Tutorial Sites You Should Have Bookmarked
12 Photoshop Tutorial Sites You Should Have Bookmarked
Because there's so much to learn from Photoshop, having a decent and dependable online resource to show you the ropes is a must. Yet with the thousands of tutorial Web sites available on the web, finding a really reliable one can seem like a daunting task. Which ones have all the information you need to help you master the basics? Which ones can keep you abreast of all the hottest trends and techniques? And which ones, more importantly, offer tutorials that are genuinely unique and expand your skills in meaningful ways, rather than just teach you frivolous eye candy?
If you're currently looking for a good resource but are feeling overwhelmed by the process of wading through scores of Web sites to find the right one, you're in luck. Below is a list of 12 of the most helpful Photoshop tutorial sites and resources on the web. Not only do they offer a wide variety of tutorials geared towards everyone from beginners to experts, a few specialize in a few areas, such as illustration and template design. So whether you want to design web templates in Photoshop, fix image flaws, create cool artwork, or just learn the basics of working in this program, these sites on this list will give you all you could ever want and need-- and more.
THE LIST
1. BIORUST- Level: Beginner
User friendly and geared towards beginning Photoshoppers, this site has a great collection of easy to follow and fun tutorials in categories such as interface concepts, special effects, textures and backgrounds, digital artwork, and photographic FX. If you're just starting out in Photoshop, I highly recommend going to this site first and doing the tutorials in the basic principles section. If you do, you'll get a good head start in learning the basics.
2. TUTORIAL WIZ- Level: Beginner
With tutorials in categories such as text effects, photo effects, special effects, user interface and a few others, Tutorial Wiz is a great resource for beginning Photoshop users to cut their teeth on. What's especially great about this site is that although most of the tutorials are indeed basic, many of the graphics and image effects you'll be asked to create are amazingly high end, such as this realistic tap water and exploding planet tutorial. So not only will you be learning some basic techniques from this site, you'll also be learning how to do some great artwork in the process.
3. RNEL.NET- Level: Beginner
Rnel.net is a database of numerous Photoshop tutorials culled from across the web. Many of the tutorials are geared towards beginners, and unlike other sites quite a few deal with the art of drawing and illustration. This means that if you're a beginner who's more interested in how to paint things from scratch and less interested in photo manipulation and editing, this is a good place to check out.
4. PHOTOSHOP ROADMAP- Level: Beginner to Intermediate
Similar to Rnel.net, Photoshop Roadmap is a database of tutorials submitted by various web sites that is updated on a frequent basis. There are many types of tutorials here; however the emphasis is on photo manipulation and image enhancing techniques. So if you're looking for how to create simple, yet useful and effective enhancement tricks (such as whitening teeth or fixing skin), this is the site for you. As a bonus, Photoshop Roadmap also offers free handy downloads for Photoshop users, such as patterns and plug-ins.
5. GOOD-TUTORIALS- Level: Beginner to Intermediate
Probably one of the most comprehensive of its kind, this hugely popular database has thousands of user-submitted Photoshop tutorials in such categories as animation, basics, textures, web graphics, and many others. Countless tutorials are added daily, not only making this site fresh, but filled to the brim with content.
6. PIXEL 2 LIFE- Level: Beginner to Intermediate
Pixel 2 Life is yet another Photoshop database of tutorials ranging in a wide variety of categories and geared towards everyone from beginners to intermediates wanting to know all the latest text effect, web layout, special effects, and photo manipulation techniques. It, much like Good-Tutorials.com is huge, so you'll never be for want of new tutorials to discover and try out.
7. PHOTOSHOP ESSENTIALS- Level: Intermediate
Photo editing, text effects, and basics are a few of the categories that this site offers in terms of tutorials. The "special effects" tutorials leave much to be desired; however, the more practical ones (such as in the basics and photo editing sections) are excellent ways of expanding your skills beyond the fundamentals.
8. ABSOLUTE CROSS- Level: Intermediate
If you've ever wanted to create web interfaces, buttons, orbs, and lettering, you can do no better than visit this site, which is one of the few to focus on creating cool web graphics, especially in a 3 dimensional and sci-fi style.
9. TALK MANIA- Level: Beginner to Intermediate
Although it has tutorials in many categories, Talk Mania's best tutorials are in its web layouts section. In this section, you'll learn how to create templates based on a wide variety of themes such as gaming, business, portfolio and ecommerce, making it the perfect resource if you're the type that wants to make templates in Photoshop.
10. HV DESIGNS- Level: Intermediate to Expert
When it comes to tutorials about web template creation, HV Designs is bar none the best resource you can turn to. Visit this site to learn how to create many high end business, Wordpress, and portfolio web sites in the currently popular Web 2.0 style! As an added bonus, some tutorials will teach you how to convert the finished designs into CSS.
11. ABUZEEDO- Level: Intermediate to Expert
If you're more about image editing and photo manipulation, you might want to pass on Abuzeedo, but if you're an aspiring graphic artist who's a fan of the type of art as seen in magazines like Computer Arts this web site will be right up your alley. Here you will learn the art of creating glowing lines, grungy posters, retro graphics, and interesting artistic effects that are currently hip in the graphic design and illustration world.
12. PSD TUTS+- Level: Intermediate to Expert
With an emphasis on graphic design and illustration, this blog is the ultimate resource for burgeoning artists and illustrators who want to learn how to create all types of professional, high end artwork in Photoshop. Although some tutorials require a paid membership, most are free. Even if they weren't, in my opinion the fee is worth it as the lessons here are top of the line, on par with what you'd get in a college course.
Photoshop Tutorial: How to Create a Rustic Border
Photoshop Tutorial: How to Create a Rustic Border
Photoshop is an extremely diverse program that allows you to do many different things within it. You can use Photoshop to edit pictures, create logos and web graphics, and even create complete pictures from scratch. Many people use Photoshop to edit pictures and photography. Both amateurs and professional photographers alike use Photoshop for the same reason. Even if you're a beginner to Photoshop, there are many different ways to learn how to use the program. There are two main ways to learn Photoshop though, by trial and error, and ultimately experimenting with all the different tools, and through tutorials. Because there are so many things you can do in Photoshop, tutorials work extremely well if you just search for what you want to do.
Since Photoshop is mainly used to edit pictures, I will show you a really cool way to edit pictures in the program, and that is by adding a rustic border. A rustic border is different than a regular border because it has sort of a grungy, vintage effect to it. There are other borders you can add to your pictures, but I will just show you an example of one border (the rustic border) in this Photoshop tutorial.
Before we begin, make sure you have a picture you want to work with. You want to make sure it is a picture that would look good with a rustic border, but for the sake of this tutorial, you can use any picture you want. If you don't have your own picture, you can use one off morguefile.com or sxc.hu. Both are free picture websites that you can search for any picture you want.
So let's begin!
Step 1) Open up your picture in Photoshop by going to File > Open and searching for the file like you would any document. If you're copying and pasting off the Internet, go to File > New instead. The canvas size will automatically adjust to the size of the picture on your clipboard. After the blank canvas is open in the program, go to Edit > Paste.
Step 2) Open a new blank canvas that is the same size as your picture by going to File > New and adjusting the pixel sizes of both width and height.
Step 3) On the vertical menu bar, make sure the black and white color swatches are on the bottom with black on top. On the new blank document go to Filter > Render > Difference Clouds.
Step 4) Then go to Filter > Artistic > Palette Knife to apply the filter. Repeat this step only with the Filter > Artistic > Poster Edges.
Step 5) Now go to Filter > Sharpen > Unsharp Mask and boost the sharpening by changing the Amount to 50 and the Radius to 1.0.
Step 6) After step 5, go to Filter > Distort > Glass.
Step 7) Save the image you just made and name it whatever you like by going to File > Save.
Step 8) Next, open up another blank canvas of the same size and create a border by going to Select > Select all, then Edit > Stroke and 25 pixels on the inside.
Step 9) Then go to Filter > Distort > Displace and select the scales and 10. When the open file box comes up, find your first image to displace it with. As soon as you do this step, you'll automatically see your rustic border.
Step 10) While the picture is still selected, go to Edit > Copy and paste it on your picture you want to apply the border to and click Edit > Paste.
Step 11) Change the Overlay of the new pasted layer to Darken and you'll now notice the border is around your image.
Step 12) To bring down the sharpness of the border, we'll use the Gaussian Blur. Go to Filter > Blur > Gaussian Blur and set it to 0.3.
Then you're done!
Photoshop is an extremely diverse program that allows you to do many different things within it. You can use Photoshop to edit pictures, create logos and web graphics, and even create complete pictures from scratch. Many people use Photoshop to edit pictures and photography. Both amateurs and professional photographers alike use Photoshop for the same reason. Even if you're a beginner to Photoshop, there are many different ways to learn how to use the program. There are two main ways to learn Photoshop though, by trial and error, and ultimately experimenting with all the different tools, and through tutorials. Because there are so many things you can do in Photoshop, tutorials work extremely well if you just search for what you want to do.
Since Photoshop is mainly used to edit pictures, I will show you a really cool way to edit pictures in the program, and that is by adding a rustic border. A rustic border is different than a regular border because it has sort of a grungy, vintage effect to it. There are other borders you can add to your pictures, but I will just show you an example of one border (the rustic border) in this Photoshop tutorial.
Before we begin, make sure you have a picture you want to work with. You want to make sure it is a picture that would look good with a rustic border, but for the sake of this tutorial, you can use any picture you want. If you don't have your own picture, you can use one off morguefile.com or sxc.hu. Both are free picture websites that you can search for any picture you want.
So let's begin!
Step 1) Open up your picture in Photoshop by going to File > Open and searching for the file like you would any document. If you're copying and pasting off the Internet, go to File > New instead. The canvas size will automatically adjust to the size of the picture on your clipboard. After the blank canvas is open in the program, go to Edit > Paste.
Step 2) Open a new blank canvas that is the same size as your picture by going to File > New and adjusting the pixel sizes of both width and height.
Step 3) On the vertical menu bar, make sure the black and white color swatches are on the bottom with black on top. On the new blank document go to Filter > Render > Difference Clouds.
Step 4) Then go to Filter > Artistic > Palette Knife to apply the filter. Repeat this step only with the Filter > Artistic > Poster Edges.
Step 5) Now go to Filter > Sharpen > Unsharp Mask and boost the sharpening by changing the Amount to 50 and the Radius to 1.0.
Step 6) After step 5, go to Filter > Distort > Glass.
Step 7) Save the image you just made and name it whatever you like by going to File > Save.
Step 8) Next, open up another blank canvas of the same size and create a border by going to Select > Select all, then Edit > Stroke and 25 pixels on the inside.
Step 9) Then go to Filter > Distort > Displace and select the scales and 10. When the open file box comes up, find your first image to displace it with. As soon as you do this step, you'll automatically see your rustic border.
Step 10) While the picture is still selected, go to Edit > Copy and paste it on your picture you want to apply the border to and click Edit > Paste.
Step 11) Change the Overlay of the new pasted layer to Darken and you'll now notice the border is around your image.
Step 12) To bring down the sharpness of the border, we'll use the Gaussian Blur. Go to Filter > Blur > Gaussian Blur and set it to 0.3.
Then you're done!
Photoshop Tutorial: How to Digitally Create Beautiful White Teeth
Photoshop Tutorial: How to Digitally Create Beautiful White Teeth
 Not all photos turn out perfect, even ask the experts. This is only one aspect of photo editing, and a simple one at that, perfect for any Photoshop beginner, or if you want to learn more techniques and tricks in this program. In this Photoshop tutorial, you'll learn how to brighten and whiten teeth to create the perfect, bright, and white smile on any portrait.
Step One: Open up your photo that you want to work on as a canvas in Photoshop. It's best to open it up as JPEG format usually. You can use a photo that's in color or in black and white. Make sure that enough of the teeth in the photo are clearly visible, otherwise you'll end up editing wrong areas. It's best to work with a portrait usually since the teeth can be a main focal point.
Step Two: Locate the dodge tool on the vertical menu bar. This is the main tool you'll use to create the perfect and beautiful smile on your photo. The dodge tool simply makes any part of the photo brighter.
Step Three: On the brush drop down menu, choose a "fuzzy" brush, if you work with a solid brush, the edges of where the brush didn' go over will be clearly visible, which isn't a good thing. Choose one that is an accurate size to work with. If your photo is larger, you'll need a larger brush. My image was originally 600x800 and I worked with a 14 pixel brush because it's size worked best for my photo.
Step Four: Select Midtones and a 50% exposure. This will be bright, but not too bright. Never start out with 100% exposure.
Step Five: Now go over the teeth with the dodge tool nice and evenly. If the teeth start to look too white, go back a step and drop down the exposure to about 30% or so. If you need to adjust the setting again, do so appropriately.
Step Six: After you've gone over the teeth, make sure they look even without any awkward spots or uneven areas.
Step Seven: Use the desaturation tool to edit out any highly saturated spots. Use a fuzzy brush with a 2 pixel radius and at about 25%. Saturated areas are speckles of bright colors.
After that you're done! Sometimes it takes a few tries to get the whiteness and brightness just right. Remember, the teeth should not be freakishly bright, but natural.
12 Photoshop Tutorial Sites You Should Have Bookmarked
12 Photoshop Tutorial Sites You Should Have Bookmarked
Because there's so much to learn from Photoshop, having a decent and dependable online resource to show you the ropes is a must. Yet with the thousands of tutorial Web sites available on the web, finding a really reliable one can seem like a daunting task. Which ones have all the information you need to help you master the basics? Which ones can keep you abreast of all the hottest trends and techniques? And which ones, more importantly, offer tutorials that are genuinely unique and expand your skills in meaningful ways, rather than just teach you frivolous eye candy?
If you're currently looking for a good resource but are feeling overwhelmed by the process of wading through scores of Web sites to find the right one, you're in luck. Below is a list of 12 of the most helpful Photoshop tutorial sites and resources on the web. Not only do they offer a wide variety of tutorials geared towards everyone from beginners to experts, a few specialize in a few areas, such as illustration and template design. So whether you want to design web templates in Photoshop, fix image flaws, create cool artwork, or just learn the basics of working in this program, these sites on this list will give you all you could ever want and need-- and more.
THE LIST
1. BIORUST- Level: Beginner
User friendly and geared towards beginning Photoshoppers, this site has a great collection of easy to follow and fun tutorials in categories such as interface concepts, special effects, textures and backgrounds, digital artwork, and photographic FX. If you're just starting out in Photoshop, I highly recommend going to this site first and doing the tutorials in the basic principles section. If you do, you'll get a good head start in learning the basics.
2. TUTORIAL WIZ- Level: Beginner
With tutorials in categories such as text effects, photo effects, special effects, user interface and a few others, Tutorial Wiz is a great resource for beginning Photoshop users to cut their teeth on. What's especially great about this site is that although most of the tutorials are indeed basic, many of the graphics and image effects you'll be asked to create are amazingly high end, such as this realistic tap water and exploding planet tutorial. So not only will you be learning some basic techniques from this site, you'll also be learning how to do some great artwork in the process.
3. RNEL.NET- Level: Beginner
Rnel.net is a database of numerous Photoshop tutorials culled from across the web. Many of the tutorials are geared towards beginners, and unlike other sites quite a few deal with the art of drawing and illustration. This means that if you're a beginner who's more interested in how to paint things from scratch and less interested in photo manipulation and editing, this is a good place to check out.
4. PHOTOSHOP ROADMAP- Level: Beginner to Intermediate
Similar to Rnel.net, Photoshop Roadmap is a database of tutorials submitted by various web sites that is updated on a frequent basis. There are many types of tutorials here; however the emphasis is on photo manipulation and image enhancing techniques. So if you're looking for how to create simple, yet useful and effective enhancement tricks (such as whitening teeth or fixing skin), this is the site for you. As a bonus, Photoshop Roadmap also offers free handy downloads for Photoshop users, such as patterns and plug-ins.
5. GOOD-TUTORIALS- Level: Beginner to Intermediate
Probably one of the most comprehensive of its kind, this hugely popular database has thousands of user-submitted Photoshop tutorials in such categories as animation, basics, textures, web graphics, and many others. Countless tutorials are added daily, not only making this site fresh, but filled to the brim with content.
6. PIXEL 2 LIFE- Level: Beginner to Intermediate
Pixel 2 Life is yet another Photoshop database of tutorials ranging in a wide variety of categories and geared towards everyone from beginners to intermediates wanting to know all the latest text effect, web layout, special effects, and photo manipulation techniques. It, much like Good-Tutorials.com is huge, so you'll never be for want of new tutorials to discover and try out.
7. PHOTOSHOP ESSENTIALS- Level: Intermediate
Photo editing, text effects, and basics are a few of the categories that this site offers in terms of tutorials. The "special effects" tutorials leave much to be desired; however, the more practical ones (such as in the basics and photo editing sections) are excellent ways of expanding your skills beyond the fundamentals.
8. ABSOLUTE CROSS- Level: Intermediate
If you've ever wanted to create web interfaces, buttons, orbs, and lettering, you can do no better than visit this site, which is one of the few to focus on creating cool web graphics, especially in a 3 dimensional and sci-fi style.
9. TALK MANIA- Level: Beginner to Intermediate
Although it has tutorials in many categories, Talk Mania's best tutorials are in its web layouts section. In this section, you'll learn how to create templates based on a wide variety of themes such as gaming, business, portfolio and ecommerce, making it the perfect resource if you're the type that wants to make templates in Photoshop.
10. HV DESIGNS- Level: Intermediate to Expert
When it comes to tutorials about web template creation, HV Designs is bar none the best resource you can turn to. Visit this site to learn how to create many high end business, Wordpress, and portfolio web sites in the currently popular Web 2.0 style! As an added bonus, some tutorials will teach you how to convert the finished designs into CSS.
11. ABUZEEDO- Level: Intermediate to Expert
If you're more about image editing and photo manipulation, you might want to pass on Abuzeedo, but if you're an aspiring graphic artist who's a fan of the type of art as seen in magazines like Computer Arts this web site will be right up your alley. Here you will learn the art of creating glowing lines, grungy posters, retro graphics, and interesting artistic effects that are currently hip in the graphic design and illustration world.
12. PSD TUTS+- Level: Intermediate to Expert
With an emphasis on graphic design and illustration, this blog is the ultimate resource for burgeoning artists and illustrators who want to learn how to create all types of professional, high end artwork in Photoshop. Although some tutorials require a paid membership, most are free. Even if they weren't, in my opinion the fee is worth it as the lessons here are top of the line, on par with what you'd get in a college course.
Photoshop Tutorial: How to Create a Rustic Border
Photoshop Tutorial: How to Create a Rustic Border
Photoshop is an extremely diverse program that allows you to do many different things within it. You can use Photoshop to edit pictures, create logos and web graphics, and even create complete pictures from scratch. Many people use Photoshop to edit pictures and photography. Both amateurs and professional photographers alike use Photoshop for the same reason. Even if you're a beginner to Photoshop, there are many different ways to learn how to use the program. There are two main ways to learn Photoshop though, by trial and error, and ultimately experimenting with all the different tools, and through tutorials. Because there are so many things you can do in Photoshop, tutorials work extremely well if you just search for what you want to do.
Since Photoshop is mainly used to edit pictures, I will show you a really cool way to edit pictures in the program, and that is by adding a rustic border. A rustic border is different than a regular border because it has sort of a grungy, vintage effect to it. There are other borders you can add to your pictures, but I will just show you an example of one border (the rustic border) in this Photoshop tutorial.
Before we begin, make sure you have a picture you want to work with. You want to make sure it is a picture that would look good with a rustic border, but for the sake of this tutorial, you can use any picture you want. If you don't have your own picture, you can use one off morguefile.com or sxc.hu. Both are free picture websites that you can search for any picture you want.
So let's begin!
Step 1) Open up your picture in Photoshop by going to File > Open and searching for the file like you would any document. If you're copying and pasting off the Internet, go to File > New instead. The canvas size will automatically adjust to the size of the picture on your clipboard. After the blank canvas is open in the program, go to Edit > Paste.
Step 2) Open a new blank canvas that is the same size as your picture by going to File > New and adjusting the pixel sizes of both width and height.
Step 3) On the vertical menu bar, make sure the black and white color swatches are on the bottom with black on top. On the new blank document go to Filter > Render > Difference Clouds.
Step 4) Then go to Filter > Artistic > Palette Knife to apply the filter. Repeat this step only with the Filter > Artistic > Poster Edges.
Step 5) Now go to Filter > Sharpen > Unsharp Mask and boost the sharpening by changing the Amount to 50 and the Radius to 1.0.
Step 6) After step 5, go to Filter > Distort > Glass.
Step 7) Save the image you just made and name it whatever you like by going to File > Save.
Step 8) Next, open up another blank canvas of the same size and create a border by going to Select > Select all, then Edit > Stroke and 25 pixels on the inside.
Step 9) Then go to Filter > Distort > Displace and select the scales and 10. When the open file box comes up, find your first image to displace it with. As soon as you do this step, you'll automatically see your rustic border.
Step 10) While the picture is still selected, go to Edit > Copy and paste it on your picture you want to apply the border to and click Edit > Paste.
Step 11) Change the Overlay of the new pasted layer to Darken and you'll now notice the border is around your image.
Step 12) To bring down the sharpness of the border, we'll use the Gaussian Blur. Go to Filter > Blur > Gaussian Blur and set it to 0.3.
Then you're done!
Photoshop is an extremely diverse program that allows you to do many different things within it. You can use Photoshop to edit pictures, create logos and web graphics, and even create complete pictures from scratch. Many people use Photoshop to edit pictures and photography. Both amateurs and professional photographers alike use Photoshop for the same reason. Even if you're a beginner to Photoshop, there are many different ways to learn how to use the program. There are two main ways to learn Photoshop though, by trial and error, and ultimately experimenting with all the different tools, and through tutorials. Because there are so many things you can do in Photoshop, tutorials work extremely well if you just search for what you want to do.
Since Photoshop is mainly used to edit pictures, I will show you a really cool way to edit pictures in the program, and that is by adding a rustic border. A rustic border is different than a regular border because it has sort of a grungy, vintage effect to it. There are other borders you can add to your pictures, but I will just show you an example of one border (the rustic border) in this Photoshop tutorial.
Before we begin, make sure you have a picture you want to work with. You want to make sure it is a picture that would look good with a rustic border, but for the sake of this tutorial, you can use any picture you want. If you don't have your own picture, you can use one off morguefile.com or sxc.hu. Both are free picture websites that you can search for any picture you want.
So let's begin!
Step 1) Open up your picture in Photoshop by going to File > Open and searching for the file like you would any document. If you're copying and pasting off the Internet, go to File > New instead. The canvas size will automatically adjust to the size of the picture on your clipboard. After the blank canvas is open in the program, go to Edit > Paste.
Step 2) Open a new blank canvas that is the same size as your picture by going to File > New and adjusting the pixel sizes of both width and height.
Step 3) On the vertical menu bar, make sure the black and white color swatches are on the bottom with black on top. On the new blank document go to Filter > Render > Difference Clouds.
Step 4) Then go to Filter > Artistic > Palette Knife to apply the filter. Repeat this step only with the Filter > Artistic > Poster Edges.
Step 5) Now go to Filter > Sharpen > Unsharp Mask and boost the sharpening by changing the Amount to 50 and the Radius to 1.0.
Step 6) After step 5, go to Filter > Distort > Glass.
Step 7) Save the image you just made and name it whatever you like by going to File > Save.
Step 8) Next, open up another blank canvas of the same size and create a border by going to Select > Select all, then Edit > Stroke and 25 pixels on the inside.
Step 9) Then go to Filter > Distort > Displace and select the scales and 10. When the open file box comes up, find your first image to displace it with. As soon as you do this step, you'll automatically see your rustic border.
Step 10) While the picture is still selected, go to Edit > Copy and paste it on your picture you want to apply the border to and click Edit > Paste.
Step 11) Change the Overlay of the new pasted layer to Darken and you'll now notice the border is around your image.
Step 12) To bring down the sharpness of the border, we'll use the Gaussian Blur. Go to Filter > Blur > Gaussian Blur and set it to 0.3.
Then you're done!
Adobe Photoshop File Formats Specification
Adobe Photoshop File Formats
The information in this document is furnished for informational use only, is subject to change without notice, and should not be construed as a commitment by Adobe Systems Incorporated. Adobe Systems Incorporated assumes no responsibility or liability for any errors or inaccuracies that may appear in this document. The software described in this document is furnished under license and may only be used or copied in accordance with the terms of such license.
Adobe, After Effects, PhotoDeluxe, Adobe Premiere, Photoshop, Adobe Illustrator, Adobe Type Manager, ATM and PostScript are either trademarks or registered trademarks of Adobe Systems Incorporated in the United States and/or other countries. Apple, Macintosh, and Mac are trademarks of Apple Computer, Inc. registered in the United States and other countries. Microsoft and Windows are either registered trademarks or trademarks of Microsoft Corporation in the United States and/or other countries. All other products are the property of their respective owners.
Preface
Welcome to the Adobe Photoshop® File Format Specification!
This document is the detailed specification of the Adobe Photoshop file format and other pertinent file formats that Adobe Photoshop reads and writes.
Audience
This document is provided for 3rd parties to read and write the Photoshop native file format. This document does not explain how to interpret the data. This document describes the format of the data only.
What Is In This Document
This document has three chapters:
The Photoshop File Format describes the Photoshop PSD and PSB native file format in detail.
Other Document File Formats discusses Photoshop's handling of the EPS and TIFF file formats, which Photoshop can also create and read.
Additional File Formats describes the formats of other files used by Photoshop to store information about such items as colors, contours, curves, levels and so forth.
For more information about file formats, you may wish to consult the Encyclopedia of Graphics File Formats by James D. Murray & William vanRyper (1994, O'Reilly & Associates, Inc., Sebastopol, CA, ISBN 1-56592-058-9).
The Photoshop File Format
This chapter discusses the Photoshop native file format
OS
|
Filetype/extension
|
|---|---|
Mac OS
|
8BPS
|
Windows
|
.PSD
|
Large Document Format
The Large Document Format (8BPB/PSB) supports documents up to 300,000 pixels in any dimension. All Photoshop features, such as layers, effects, and filters, are supported by the PSB format. The PSB format is identical to the Photoshop native format in many ways. This document will cover the differences found in the PSB format by donating a **PSB** marker.
Windows
All data is stored in big endian byte order. On the Windows platform, you must byte swap short and long integers when reading or writing.
Mac OS
For cross-platform compatibility, all information needed by Photoshop is stored in the data fork. For interoperability with other Macintosh applications, however, some information is duplicated in resources stored in the resource fork of the file:
For compatibility with image cataloging applications, the 'pnot' resource id 0 contains references to thumbnail, keywords, and caption information stored in other resources.
The thumbnail picture is stored in a 'PICT' resource, the keywords are stored in 'STR#' resource 128 and the caption text is stored in 'TEXT' resource 128. For more information on the format of these resources see Inside Macintosh: QuickTime Components and the Extensis Fetch Awareness Developer's Toolkit .
Photoshop also creates 'icl8' -16455 and 'ICN#' -16455 resources containing thumbnail images which will be shown in the Mac OS Finder.
All of the data from Photoshop's File Info dialog is stored in 'ANPA' resource 10000. The data in this resource is stored as an IPTC-NAA record 2.For more information on the format of this resource, see the documents in the IPTC folder of the Documentation folder.
Photoshop Essential File Formats Quick Guide
Photoshop Essential File Formats Quick Guide
Written by Steve Patterson. If you’re one of the many, many people who have found themselves overwhelmed by the sheer number of file formats that Photoshoppresents us with when trying to save an image, good news! You can safely ignore most of them!
That’s right, out of the 25 file types found in Photoshop’s "Save As" dialog box, there’s really only a handful of them that most of us will ever use. In this quick guide, we’ll look briefly at the essential formats we need to know, or at least be aware of, including the pros and cons of each one and the situations where it makes the most sense to use it!
Photoshop .PSD
Of all the file formats that Photoshop supports, the PSD format is probably the most important. PSD stands for "Photoshop Document", and as the name implies, it’s Photoshop’s native file format. PSD is one of the few file types that fully support all of the powerful features that Photoshop gives us, like layers, layer masks, adjustment layers, channels, paths, and so on. It also serves as your working file. When we open an image in Photoshop, regardless of which file type the image was originally using, Photoshop temporarily converts it into a PSD file behind the scenes so we can work on it with all of Photoshop’s tools, commands and features at our disposal.
PSD files are your best choice to serve as your master files and for archiving to CD, DVD or an external hard drive for safe keeping. If you’ve done any sort of editing work on an image and there’s even the slightest chance you’ll need to come back to it again at some point in the future, save your work as a Photoshop PSD file. There’s no loss in image quality no matter how many times you re-open and re-save a PSD, and all of your layers, layer masks, adjustment layers and so on will be saved as part of the file, allowing you to go back at any time and make changes to the image or continue working from where you left off.
You can easily print your images at home with Photoshop directly from the PSD file, and many commercial printers are now able to accept PSDs as well, although some may still require an EPS or TIFF version of the file instead, so it’s always best to check with your printer to make sure you’re giving them the format they need. One of the newer advantages with PSD files is that they can now be imported directly into Adobe InDesign, giving you complete access to the individual layers in the file as you’re designing your page layouts. You can even re-open a PSD file in Photoshop directly from InDesign, make changes to the file, save it, and have the changes immediately update in your layout!
The only real disadvantage to PSD files is that the file size can get very large, especially if you’re working on an image with hundreds or even thousands of layers. But with computer hard drives and memory being so cheap these days, it’s a small price to pay for the creative freedom that Photoshop and its native PSD file format give us. Bottom line, your PSD file is the most important file you can have, so be sure to save yourself a master copy of your work as a PSD file so you can always return to it in Photoshop when you need it!
JPEG
The JPEG (Joint Photographic Expert Group) format has been around for nearly 20 years now and has become the most popular and widely used file format for viewing and sharing digital photos. It supports 24-bit color, which means it can reproduce roughly 16.7 million colors, and even the cheapest digital cameras can capture images as JPEG files. Most high end digital SLR cameras give you the option of capturing images in either the JPEG or RAW format.
It’s important, though, not to confuse "popular" and "widely used" with "professional quality". JPEG is what’s called a lossy file format because it compresses the images, which essentially means it takes some of your image information and tosses it out the virtual window, never to be seen again. It does this to reduce file size, but the more compression you use, the worse your images look. You control the amount of compression being applied to the file using the Quality setting that appears in Photoshop when you go to save it. A high enough Quality setting can still produce great looking images but your file size will be larger. Lower Quality settings can produce very small file sizes, but set too low and you’ll introduce ugly and obvious compression artifacts.
The biggest strength of JPEG files is convenience. They’re usually small enough that they can easily be uploaded and displayed on web pages, or on photo sharing sites like Facebook and Flickr, and emailed to family and friends. Online printing services usually require your photos to be uploaded as JPEG files. The downside to JPEGs is that the reduced quality caused by image compression means they’re not a good choice for printing when image quality is your primary concern, and they’re also not a good choice for archiving your originals.
If you’re capturing JPEG files in your camera, make sure you’re capturing the largest, highest quality images possible. Check your camera’s instruction manual to find out where the image quality option is in your camera’s menu system. The highest quality setting is usually labelled "Large".
One thing you want to avoid doing whenever possible is re-saving JPEG files repeatedly. Each time to open and re-save it, you’ll add even more compression to the image, and it doesn’t take long for things to get ugly. Once the image detail is gone, you can never get it back (unless of course you read the first part of this article and saved a master copy of the original as a Photoshop PSD file).
GIF
The GIF file format, which stands for Graphics Interchange Format, has been around even longer than JPEG, and it’s the format of choice for web graphics. Notice I said web graphics, not web photos. GIF files can only display up to 256 colors, far less than the thousands of colors needed to convincingly reproduce a photographic image (and far less still than the millions of colors supported by the JPEG format).
When it comes to web design, though, the GIF format is indispensable. The files are well suited for web page layouts, banners and buttons, especially if they contain large areas of solid color. All major web browsers support GIF files and their small file sizes load quickly on the screen. GIF also allows web designers to create simple animations. One major advantage GIF has over the JPEG format, and another reason why it’s so important for web designers, is that it supports transparency, although it supports only one level of transparency, meaning a pixel is either transparent or it’s not. This can result in harsh edges around graphics if the edge color differs from the color of the background it’s placed over. For higher quality transparency effects, a better choice is the PNG format.
PNG
PNG (Portable Network Graphics) was originally meant to replace the GIF format (PNG also stands for “PNG not GIF”). That never happened and GIF files are still in wide use today, yet the PNG format improves upon the GIF format in nearly every way. It even improves on the JPEG format. While JPEG files support 24-bit color (16.7 million colors), PNG files support up to 48-bit color, giving us more than 1 billion possible colors! That may sound impressive, but even JPEG files support more colors than the human eye can see, so any real world differences between 24 and 48-bit color are minimal at best.
The biggest advantage over JPEG is that PNG is a lossless file format, meaning that even though it still compresses images to reduce file size, the compression method it uses does not result in a loss of image quality. You can even re-save the same PNG file multiple times without degrading its quality, whereas JPEG files look worse each time you re-save them. With over a billion possible colors and lossless compression, PNG is a great choice for saving digital photos as high quality originals. The downside, though, is that PNG is not as widely supported as the JPEG format, and PNG does not support CMYK color, which means commercial printers can’t use them. For everyday viewing and sharing of your digital photos, the JPEG format is still more useful and convenient, even if the image quality isn’t as good.
PNG’s main advantage over GIF files, besides far exceeding GIF’s 256 color limit, is that it can reproduce a full 256 levels of transparency compared with GIF’s single level, giving us smooth transitions around edges without having to worry about matching the edges with the background color. PNG files are also usually smaller than GIF files, so they’ll load even faster in a web browser. Unfortunately, older web browsers may not support the PNG format, which means GIF is still the safest choice when browser compatibility is your main concern. Also, while GIF supports animations, PNG does not. PNG files are most often used in multimedia programs like Flash as well as Keynote and PowerPoint presentations.
TIFF
Like PSD files, TIFF (Tagged Image File Format) is one of the few file types that support all of Photoshop’s features and is another great choice for archiving your images, with lossless compression that allows you to save photos with the highest possible image quality. The quality comes at a price though, as TIFF files can be very large, especially when compared with JPEG files. TIFF is the universally accepted standard for images destined for commercial printing and is compatible with virtually all page layout programs like QuarkXPress and InDesign.
Even though TIFF files are capable of storing all of the layers, adjustment layers and other elements you’ve added in Photoshop, it’s generally recommended that you save all those elements in your master PSD file, then use the TIFF format to save a flattened version of the image for print. This makes it easy to tell just from looking at the file extension which version of your image is the master working file (.psd) and which is the flattened, print-ready version (.tif). Also, many commercial printers will ask for a flattened version of your TIFF file.
With InDesign now being able to import and work directly with layered Photoshop PSD files, and both the PSD and PDF formats gaining popularity in the print community, TIFF isn’t quite as important as it once was, but it remains the print industry standard and enjoys widespread support.
EPS
EPS (Encapsulated PostScript) is another print industry standard format that’s been around for quite a while, but its use has been in decline over the years. EPS files are not really image files in the traditional sense. Instead, they contain a series of instructions for how a printer should reproduce the image. They can be imported into most page layout programs, but the “encapsulated” part means the files are essentially locked and can no longer be modified unless they’re re-opened in Photoshop. A preview image must be embedded in the EPS file when you save it in Photoshop if you want it to be viewable onscreen when working in your page layout program, otherwise you won’t be able to see it until the layout is printed. While EPS remains an industry standard format, you probably won’t use it very often unless it’s the format specifically requested by your commercial printer.
PDF
Finally, while most people are familiar with PDF files for viewing, sharing and printing electronic documents (hence the name Portable Document Format), PDF is also gaining in popularity as a great choice for saving images destined for print. Like the PSD and TIFF formats, PDF supports and preserves all of Photoshop’s features, including the ability to use spot colors, something the EPS format does not support. PDF gives you the choice of either JPEG compression, complete with a Quality setting to balance image quality with file size, or lossless ZIP compression. And the PDF format benefits from the fact that anyone with the free Adobe Reader installed on their computer can view the image.
The most important thing to remember is to save your working Photoshop file as an unflattened PSD file to use as your master copy, which will preserve all of your layers, channels and so on in Photoshop’s native file format, allowing you to return to your work at any time. From there, you can save a copy of your image in one of the other six formats depending on where the image is headed (print, the web, or a multimedia program) or which format your printer has requested.
And there we have it!
Adobe Photoshop
Adobe Photoshop
Adobe Photoshop is a graphics editing program developed and published by Adobe Systems.
Adobe's 2003 "Creative Suite" rebranding led to Adobe Photoshop 8's renaming to Adobe Photoshop CS. Thus, Adobe Photoshop CS6 is the 13th major release of Adobe Photoshop. The CS rebranding also resulted in Adobe offering numerous software packages containing multiple Adobe programs for a reduced price. Adobe Photoshop is released in two editions: Adobe Photoshop, and Adobe Photoshop Extended, with the Extended having extra 3D image creation, motion graphics editing, and advanced image analysis features. Adobe Photoshop Extended is included in all of Adobe's Creative Suite offerings except Design Standard, which includes the Adobe Photoshop edition.
Alongside Photoshop and Photoshop Extended, Adobe also publishes Photoshop Elements and Photoshop Lightroom, collectively called "The Adobe Photoshop Family". In 2008, Adobe released Adobe Photoshop Express, a free web-based image editing tool to edit photos directly on blogs and social networking sites; in 2011 a version was released for the Android operating system and the iOS operating system.
Adobe distributes Photoshop in both Windows and Macintosh versions.
Adobe Photoshop: The Best Image Editing Software
Adobe Photoshop is a graphics editing program developed and published by Adobe Systems.
Adobe's 2003 "Creative Suite" rebranding led to Adobe Photoshop 8's renaming to Adobe Photoshop CS. Thus, Adobe Photoshop CS6 is the 13th major release of Adobe Photoshop. The CS rebranding also resulted in Adobe offering numerous software packages containing multiple Adobe programs for a reduced price. Adobe Photoshop is released in two editions: Adobe Photoshop, and Adobe Photoshop Extended, with the Extended having extra 3D image creation, motion graphics editing, and advanced image analysis features. Adobe Photoshop Extended is included in all of Adobe's Creative Suite offerings except Design Standard, which includes the Adobe Photoshop edition.
Alongside Photoshop and Photoshop Extended, Adobe also publishes Photoshop Elements and Photoshop Lightroom, collectively called "The Adobe Photoshop Family". In 2008, Adobe released Adobe Photoshop Express, a free web-based image editing tool to edit photos directly on blogs and social networking sites; in 2011 a version was released for the Android operating system and the iOS operating system.
Adobe distributes Photoshop in both Windows and Macintosh versions.
Adobe Photoshop: The Best Image Editing Software
Having a good photo editing software is one of the essentials on a computer, and having one you are comfortable with is very important. For me, there is no comparison to Adobe Photoshop as it is capable of doing the most complex manipulations possible.
Usually when you purchase a new computer, it will come with a pre-installed image editing software that is able to do your basics, such as cropping or red-eye removal. This turns out to be all that is needed for the average user, so they become very comfortable using their basic software and have no need to upgrade to something more complex.
But for those of you that want to take it a step further, you will need software that will accommodate your needs. Adobe Photoshop can do anything that you could ever want to do to a photo. The only hang up to some people might be its ease of use. If you are opening Photoshop for the first time, you may be overwhelmed by all the options and tools, and have absolutely no idea where to begin. After all, there are many college courses devoted solely to this one software.
For me personally, I have always used Photoshop, so the tasks that may be confusing to some are pretty simple. For any questions I might have, there are tons of online resources to answer any questions at all. A specific search will yield lots of results including step-by-step tutorials, as well as video lessons that can teach you anything you need to know.
It is much pricier to buy Photoshop than to just be content using the software that comes on your computer. There are many options of how you can purchase it, with many package deals that include other premium Adobe software. Starting at around $200, you can get a package that will take care of all your multimedia needs. The Adobe Master Collection includes a wide range of software that will keep you occupied for quite some time while learning the ins-and-outs of each.
I highly recommend upgrading to Adobe Photoshop. After you get comfortable using it, the sky is the limit to what you can create. You can use it for all of your simple tasks, like cropping your ex out of a picture on vacation, or the more complex stuff like placing the same picture of you in front of the Taj Mahal.
After you buy Photoshop and learn the basics, trust me, you won't be disappointed.
File format of Photoshop
File format of Photoshop
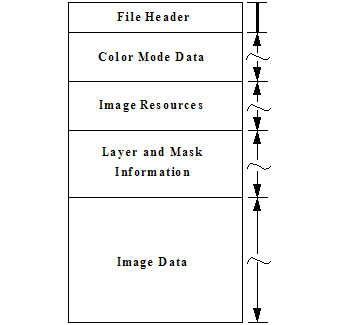
Photoshop files have default file extension as .PSD, which stands for "Photoshop Document." A PSD file stores an image with support for most imaging options available in Photoshop. These include layers with masks, color spaces, ICC profiles, CMYK Mode (used for commercial printing), transparency, text, alpha channels and spot colors, clipping paths, and duotone settings. This is in contrast to many other file formats (e.g. .JPG or .GIF) that restrict content to provide streamlined, predictable functionality. A PSD file has a maximum height and width of 30,000 pixels, and a length limit of 2 Gigabytes.
Photoshop files sometimes have the file extension .PSB, which stands for "Photoshop Big" (also known as "large document format"). A PSB file extends the PSD file format, increasing the maximum height and width to 300,000 pixels and the length limit to around 4 Exabytes. The dimension limit was apparently chosen arbitrarily by Adobe, not based on computer arithmetic constraints (it is not close to a power of two, as is 30,000) but for ease of software testing. PSD and PSB formats are documented.
Because of Photoshop's popularity, PSD files are widely used and supported to some extent by most competing software. The .PSD file format can be exported to and from Adobe's other apps like Adobe Illustrator, Adobe Premiere Pro, and After Effects, to make professional standard DVDs and provide non-linear editing and special effects services, such as backgrounds, textures, and so on, for television, film, and the web. Photoshop's primary strength is as a pixel-based image editor, unlike vector-based image editors. Photoshop also enables vector graphics editing through its Paths, Pen tools, Shape tools, Shape Layers, Type tools, Import command, and Smart Object functions. These tools and commands are convenient to combine pixel-based and vector-based images in one Photoshop document, because it may not be necessary to use more than one program. To create very complex vector graphics with numerous shapes and colors, it may be easier to use software that was created primarily for that purpose, such as Adobe Illustrator or CorelDRAW. Photoshop's non-destructive Smart Objects can also import complex vector shapes.
Adobe Photoshop Touch for iPhone, Android
App Name: Adobe Photoshop Touch for Phone
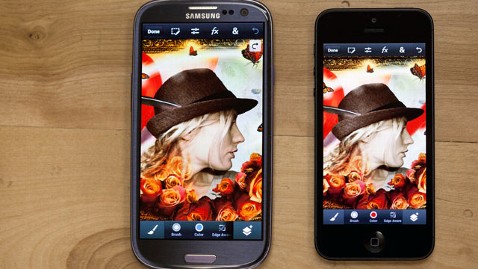 |
| Adobe Photoshop Touch for Phone provides many of the same image editing features users are familiar with in Adobe's popular Photoshop software. |
Price: $4.99
Available Platforms: iPhone 4s and 5, iPod Touch (5th generation) and Android (4.0)
What does this app do?: It was just about a year ago that Adobe, the maker of digital content tools such as Adobe Illustrator and InDesign, released its popular Photoshop Touch application for the iPad. This week, the California-based company made the application available for mobile users taking the functionality of the photo editing application and packing it into an app for a smaller screen.
What does this app do?: It was just about a year ago that Adobe, the maker of digital content tools such as Adobe Illustrator and InDesign, released its popular Photoshop Touch application for the iPad. This week, the California-based company made the application available for mobile users taking the functionality of the photo editing application and packing it into an app for a smaller screen.
Photoshop’s product manager, Stephen Nielson, says part of the impetus for developing the app for the phone stems from the way photography has changed with the proliferation of smartphones. Take, for example, the recent emergence of iPhotography. With many people now snapping images with their mobile devices, Neilson said it made sense to offer the advanced tools of Photoshop in an app tailored to the small screen of a phone.
“My phone is the device I always have on me,” he said. “I can be creative anywhere, even when I don’t have my tablet with me.”
The app allows users to create and edit a project, add layers and filters, and share across multiple platforms such as Facebook, Google +, Twitter, and Dropbox, depending on the type of file. The veteran Photoshop user will find many of the same editing features already available to them in the desktop software, such as the ability to crop and extract images, add warps and lens flares, and adjust colors and blending. A row of buttons across the top allows users to add adjustments, such as curves and effects. From the bottom of the screen, select and swipe to apply tools, such as paint and camera fill. The app’s Scribble Selection feature allows users to etch out selections and to continue to refine as they go.
The app also syncs with Adobe Creative Cloud, a monthly fee-based service that allows users to create, store and share projects across the Web. Users can access and sync up to 2 GB of content to the cloud for free.
Is it easy to install: Yes. You’ll find the 32.2 MB file easy to download and install.
Should I try it?: Adobe Photoshop Touch for phone manages to cram in most of the features available in the desktop version while still giving users enough screen real estate to play. To accomplish this, however, Adobe sacrificed the help and tutorial content, hiding some basic how-to information under the menu button leaving out the rest.
This shouldn’t stop experienced Photoshop users. In fact, the app seems better suited to someone who is already accustomed to the software. For the uninitiated, you might try learning the application on a desktop first, or sticking to a simpler photo editing app, such as Adobe’s Photoshop Express or Instagram.
Cool Photoshop Tips And Tricks
What Can You Do With Advanced Photoshop Tips and Tricks?
Advanced Photoshop users are often familiar with all tools and have mastered most of the fundamental tutorials, tips, and tricks, such as creating a cloudy background. Some people are unaware of all of the cool tricks that Photoshop has to offer, especially when you've upgraded your version to CS. The power to create some of the most impressive works of digital art are only a few clicks away once you get a hang of advanced Photoshop shortcuts and tricks.
Some Photoshop tricks on the advanced level can help a more tedious project seem easier. The more you learn the tips and tricks of the trade, the better your overall creations will turn out. To get an idea of some of the advanced tricks associated with Photoshop, a few examples are mentioned below:
Photoshop allows advanced users to create digital comic coloring that looks just like the human hand penned it. The tricks and tips associated with this sort of higher-level design deals with the manipulation of various brush sets to achieve the look you desire. Photoshop also lets users create photomontages that can transform an original photograph into something much different.
There are also tips and tricks that can take your most unfavorite picture and alter it in any way you wish. Let's say you want to change a regular photograph into something dazzling. Advanced Photoshop tricks can beautify a face that displays a natural appearance. In regards to a photo, skin can be fixed, blemishes and wrinkles erased, teeth fixed and whitened, as well as changes made
Cool Photoshop Tips And Tricks
What Can You Do With Advanced Photoshop Tips and Tricks?
Advanced Photoshop users are often familiar with all tools and have mastered most of the fundamental tutorials, tips, and tricks, such as creating a cloudy background. Some people are unaware of all of the cool tricks that Photoshop has to offer, especially when you've upgraded your version to CS. The power to create some of the most impressive works of digital art are only a few clicks away once you get a hang of advanced Photoshop shortcuts and tricks.
Some Photoshop tricks on the advanced level can help a more tedious project seem easier. The more you learn the tips and tricks of the trade, the better your overall creations will turn out. To get an idea of some of the advanced tricks associated with Photoshop, a few examples are mentioned below:
Photoshop allows advanced users to create digital comic coloring that looks just like the human hand penned it. The tricks and tips associated with this sort of higher-level design deals with the manipulation of various brush sets to achieve the look you desire. Photoshop also lets users create photomontages that can transform an original photograph into something much different.
There are also tips and tricks that can take your most unfavorite picture and alter it in any way you wish. Let's say you want to change a regular photograph into something dazzling. Advanced Photoshop tricks can beautify a face that displays a natural appearance. In regards to a photo, skin can be fixed, blemishes and wrinkles erased, teeth fixed and whitened, as well as changes made
Adobe Photoshop CS6: Standout New Features
My Top 3 Favorite Features in Photoshop CS6

I have to say CS6 is not yet perfect. Even with the huge step on content-awareness, it still only works best on simpler backgrounds. And the video editing tool is cool, but its functions are pretty basic. It’s a good start though.
I still use Photoshop CS4 in the office at my day job as a graphic designer, and every time I go home to CS6, I can definitely feel the world of difference. Of the years that I’ve used Photoshop, I can say that CS6 is one of the largest leap forward in terms of features and usability. A lot of it’s new features are definitely geared towards making your work faster and easier, allowing you to focus more on creativity.
Upon first digging into Adobe Photoshop CS6, a few features have really popped out at me as incredibly useful. I would like to offer a brief overview of some of these new ways of attacking your creative challenges using the latest version of Adobe's flagship app. Ps CS6 will run you about $649 to buy it outright if you do not own any previous versions. If you own Photoshop 7, CS, or CS5, you are eligible for upgrade pricing - looks like $199 for the upgrade. Check Adobe's store on their website for more info. For more information about what comes in the different versions of CS6, and what your suite configuration options are, see my previous post.
My current favorite five new PsCS6 features in order are:
1. Nondestructive Smart Filters
2. Quick Selection Tool & Refine Edge
3. Photomerge with advanced alignment and blending
4. Automatic layer alignment and blending
5. Vanishing Point with adjustable angle
Feature Overviews:
* Nondestructive Smart Filters
Adobe has finally given us non-linear, nondestructive filters. Can I just say "HOORAY!" In the past, you applied filters and effects in a linear order: one filter would alter your image, and the second filter would alter your now altered image, and a third filter would alter the altered altered image. The problem with that workflow is that if you decide you want to slightly tweak the second filter, you'd have to either undo back to that point (losing your subsequent edits), or use the history palette to step directly "back in time" to the point before you added the second filter, add your "revised" second filter and then add your third manually. All too often, you don't quite remember what exact parameters you had set on that third one - or worse, your real world project involved applying 20 filters instead of the 3 in my example and changing the second filter would mean redoing the 18 that follow it. What a drag. Because of this issue, people developed many work arounds (often involving saving off multiple "partially completed" versions of files all over your hard drive with iterative file names, hoping that if you needed to go back to a certain point in time you'd be able to figure out where you needed to be), and while these workarounds were clever and well-conceived in many cases, there was a perfect, real solution, waiting to happen.
The real solution to all this is what we have been given in CS6: Nondestructive Smart Filters. In this new version, each filter and effect that you apply to a layer, remains live and continually re-editable, in real time, and the parameters that you adjust will all cascade down through whatever subsequent filters or effects you might have added to your layer. These are savable, movable, copy and pastable, and most importantly scalable.
* Quick Selection tool & Refine Edge
A design mentor of mine once told me "Photoshop is all about the selection. You select something, and then you do something with the selection. Nothing more, nothing less. Remember that, and you'll never go wrong using this app." Almost 10 years later, I must say she was absolutely correct. Using Photoshop is all about "the selection." There are more tools in Photoshop for selecting than for any other single task.
As in just about every version of Photoshop that has ever been released, CS6 has made even greater strides in the area of "making your selection" than comes to memory in recent years. The new Quick Selection Tool used in combination with the Refine Edge palette is about the most helpful and clean way of selecting the edges of an object in your image that I have ever seen. This new revised Quick Selection tool is so smooth. You basically set the parameters of your Quick Selection tool - as if it were a brush - and paint the general area of your image edges (like trying to select just a kid and his soccer ball out of the photo of the big game) and Photoshop is watching what you do, and interpreting what you consider to be the general edges of what you are wanting to select and it figures out what's kid and ball and what's grass and goal posts and sky and crowd and selects just what you want it to. It's VERY fast and clean. Then, you can invoke the Refine Edge palette, and you have seemingly infinite control over exactly how the edges of that selection behave. Check out the palette to the right to get an idea of what you could do to "refine" that edge. With radius, feathering, smoothing, and various display settings, I believe this new combo will cut down on my masking and selecting time in a quantifiable way.
* Photomerge with advanced alignment and blending
Ever tried to stitch together a series of images that you took, that you intended to "put together" into a panorama? Even with some of the stand alone tools that have been available over the years—even those for doing quicktime VR's—are clunky and difficult to use - with mixed results at times. I have always wanted something built into Photoshop to let me do these "photo merges" - I never expected that Photoshop would actually be able to automatically do it for me. This feature floored me. The technologies involved in my number four choice "Automatic layer alignment and blending" are at work here in this feature as well, and the new auto layer alignment features in CS6 are far-reaching and crop up again and again in different areas of the application. It's really one of the revolutionary things about this new version.
All of the things that have made making panoramas a difficult task in the past are all done automatically. The primary among these being 1. those times when you have to actually distort, rotate, skew or transform one of your elements because the perspective is screwy, 2. those times when the sun or lighting or a window made the white balance, color space or over all wash of brightness and contrast different from one image to the next (especially when doing 360's) and of course 3. actually finding and aligning those overlapping areas of consecutive elements. Photoshop CS6 does these all for you and with surprisingly amazing results. It's not just about the typical "panorama" either... I saw a demo of someone standing "too close" to a building, and taking pictures zoomed all the way out, of the front door, windows and window-boxes, front brick walk way, tilting upward and taking a picture of the balcony and roof line of the second floor - in other words, many elements that were WAY out of whack in terms of perspective, lighting and color space, and these 4 or 5 images were distorted, tweaked, rotated, matched, blended, lighting and color density matched... and I was amazed in like 5 seconds, there was this "wide angle" almost "fisheye" photomerge of the front of the building, from brick walkway to roof-line, and it looked incredible.
* Automatic layer alignment and blending
Another powerful application of this new alignment and blending technology is with a series or stack of images of the same subject. Let's say you wanted to take a picture of a statue in a park somewhere, or a huge fountain, or the front of a monument or building. There are always people walking through the frame - if you can't close down the area and still need a picture of the statue, in the park, in it's beautiful setting, but with no people or birds or random elements - what are you to do? In the past, it was a painstaking process of shooting a bunch of images, selecting the "closest" one to your vision of a nice, clean, tourist-less frame, and begin the hours and hours of painting, cloning, healing, brushing etc., to remove all of your "randoms." There are artists who are very good at this process, but I'm fairly certain they would agree that if there was a way to not have to spend all that time, they'd take it. Well, it's here. Photoshop CS6 can take your stack of images and by analyzing all of them, figure out which things are permanent (things that appear in all the images like that building in the distance, the big tree, the sidewalk, and which parts of the image are obscured in one of the frames but not all of them, are healed automatically by borrowing pixels from other images in the stack and building an advanced composite of all the images and doing 90% or more of the work for you. There's even a set of "fuzziness" sliders letting you say "eleminate things that are in X% of the images in the stack or less." This is so impressive to see in action. You have to try it on some of your own images. It's really hard to believe that it's this easy to do this sort of process now. This is one of those new areas that I'm sure we'll see artists finding incredibly creative ways to utilize this feature. Again, this one floored me when I first saw it.
* Vanishing Point with adjustable angle
One of the most powerful new features of Adobe CS5 was the vanishing point feature. One limitation it had was that you only had one set of right angles to work with in the vanishing point interface. Adobe took it one exponential step further by adding multiple, adjustable angle perspective planes to this vanishing point feature. What this enables you to do is copy, paste and clone in far more complex image planes than just the "clone parts of a building in perspective" job that the first iteration of this feature offered (impressive and powerful, but not very flexible). One of the big examples Adobe is pushing with this feature is to simulate 3D packaging and work on multiple planes at various angles in the same image. Like an open box for a new product, or even for experimenting with your final package art by seeing it in its real-world context. Again I think this feature has so many far reaching implications for inventors, prototypers, 3D modelers, visual effects artists... and can give Photoshop artists the ability to render full blown mockups of product packaging art for clients in a whole new way - getting us to sign-off, green-light and on to the next project at hand much more quickly. I like that a lot.


There are numerous new features in the application, especially when you dig down deep into the Photoshop Extended editions (sounds like a Peter Jackson DVD...) and as the week progresses here, I'd like to look into some of what PsCS3 Extended has to offer. The versions of PsCS3 that are available are the Film & Video, Medical & Science, AEC (Architecture, Engineering & Construction), and Manufacturing editions.

I have to say CS6 is not yet perfect. Even with the huge step on content-awareness, it still only works best on simpler backgrounds. And the video editing tool is cool, but its functions are pretty basic. It’s a good start though.
I still use Photoshop CS4 in the office at my day job as a graphic designer, and every time I go home to CS6, I can definitely feel the world of difference. Of the years that I’ve used Photoshop, I can say that CS6 is one of the largest leap forward in terms of features and usability. A lot of it’s new features are definitely geared towards making your work faster and easier, allowing you to focus more on creativity.
Upon first digging into Adobe Photoshop CS6, a few features have really popped out at me as incredibly useful. I would like to offer a brief overview of some of these new ways of attacking your creative challenges using the latest version of Adobe's flagship app. Ps CS6 will run you about $649 to buy it outright if you do not own any previous versions. If you own Photoshop 7, CS, or CS5, you are eligible for upgrade pricing - looks like $199 for the upgrade. Check Adobe's store on their website for more info. For more information about what comes in the different versions of CS6, and what your suite configuration options are, see my previous post.
My current favorite five new PsCS6 features in order are:
1. Nondestructive Smart Filters
2. Quick Selection Tool & Refine Edge
3. Photomerge with advanced alignment and blending
4. Automatic layer alignment and blending
5. Vanishing Point with adjustable angle
Feature Overviews:
* Nondestructive Smart Filters
Adobe has finally given us non-linear, nondestructive filters. Can I just say "HOORAY!" In the past, you applied filters and effects in a linear order: one filter would alter your image, and the second filter would alter your now altered image, and a third filter would alter the altered altered image. The problem with that workflow is that if you decide you want to slightly tweak the second filter, you'd have to either undo back to that point (losing your subsequent edits), or use the history palette to step directly "back in time" to the point before you added the second filter, add your "revised" second filter and then add your third manually. All too often, you don't quite remember what exact parameters you had set on that third one - or worse, your real world project involved applying 20 filters instead of the 3 in my example and changing the second filter would mean redoing the 18 that follow it. What a drag. Because of this issue, people developed many work arounds (often involving saving off multiple "partially completed" versions of files all over your hard drive with iterative file names, hoping that if you needed to go back to a certain point in time you'd be able to figure out where you needed to be), and while these workarounds were clever and well-conceived in many cases, there was a perfect, real solution, waiting to happen.
The real solution to all this is what we have been given in CS6: Nondestructive Smart Filters. In this new version, each filter and effect that you apply to a layer, remains live and continually re-editable, in real time, and the parameters that you adjust will all cascade down through whatever subsequent filters or effects you might have added to your layer. These are savable, movable, copy and pastable, and most importantly scalable.
* Quick Selection tool & Refine Edge
A design mentor of mine once told me "Photoshop is all about the selection. You select something, and then you do something with the selection. Nothing more, nothing less. Remember that, and you'll never go wrong using this app." Almost 10 years later, I must say she was absolutely correct. Using Photoshop is all about "the selection." There are more tools in Photoshop for selecting than for any other single task.
As in just about every version of Photoshop that has ever been released, CS6 has made even greater strides in the area of "making your selection" than comes to memory in recent years. The new Quick Selection Tool used in combination with the Refine Edge palette is about the most helpful and clean way of selecting the edges of an object in your image that I have ever seen. This new revised Quick Selection tool is so smooth. You basically set the parameters of your Quick Selection tool - as if it were a brush - and paint the general area of your image edges (like trying to select just a kid and his soccer ball out of the photo of the big game) and Photoshop is watching what you do, and interpreting what you consider to be the general edges of what you are wanting to select and it figures out what's kid and ball and what's grass and goal posts and sky and crowd and selects just what you want it to. It's VERY fast and clean. Then, you can invoke the Refine Edge palette, and you have seemingly infinite control over exactly how the edges of that selection behave. Check out the palette to the right to get an idea of what you could do to "refine" that edge. With radius, feathering, smoothing, and various display settings, I believe this new combo will cut down on my masking and selecting time in a quantifiable way.
* Photomerge with advanced alignment and blending
Ever tried to stitch together a series of images that you took, that you intended to "put together" into a panorama? Even with some of the stand alone tools that have been available over the years—even those for doing quicktime VR's—are clunky and difficult to use - with mixed results at times. I have always wanted something built into Photoshop to let me do these "photo merges" - I never expected that Photoshop would actually be able to automatically do it for me. This feature floored me. The technologies involved in my number four choice "Automatic layer alignment and blending" are at work here in this feature as well, and the new auto layer alignment features in CS6 are far-reaching and crop up again and again in different areas of the application. It's really one of the revolutionary things about this new version.
All of the things that have made making panoramas a difficult task in the past are all done automatically. The primary among these being 1. those times when you have to actually distort, rotate, skew or transform one of your elements because the perspective is screwy, 2. those times when the sun or lighting or a window made the white balance, color space or over all wash of brightness and contrast different from one image to the next (especially when doing 360's) and of course 3. actually finding and aligning those overlapping areas of consecutive elements. Photoshop CS6 does these all for you and with surprisingly amazing results. It's not just about the typical "panorama" either... I saw a demo of someone standing "too close" to a building, and taking pictures zoomed all the way out, of the front door, windows and window-boxes, front brick walk way, tilting upward and taking a picture of the balcony and roof line of the second floor - in other words, many elements that were WAY out of whack in terms of perspective, lighting and color space, and these 4 or 5 images were distorted, tweaked, rotated, matched, blended, lighting and color density matched... and I was amazed in like 5 seconds, there was this "wide angle" almost "fisheye" photomerge of the front of the building, from brick walkway to roof-line, and it looked incredible.
* Automatic layer alignment and blending
Another powerful application of this new alignment and blending technology is with a series or stack of images of the same subject. Let's say you wanted to take a picture of a statue in a park somewhere, or a huge fountain, or the front of a monument or building. There are always people walking through the frame - if you can't close down the area and still need a picture of the statue, in the park, in it's beautiful setting, but with no people or birds or random elements - what are you to do? In the past, it was a painstaking process of shooting a bunch of images, selecting the "closest" one to your vision of a nice, clean, tourist-less frame, and begin the hours and hours of painting, cloning, healing, brushing etc., to remove all of your "randoms." There are artists who are very good at this process, but I'm fairly certain they would agree that if there was a way to not have to spend all that time, they'd take it. Well, it's here. Photoshop CS6 can take your stack of images and by analyzing all of them, figure out which things are permanent (things that appear in all the images like that building in the distance, the big tree, the sidewalk, and which parts of the image are obscured in one of the frames but not all of them, are healed automatically by borrowing pixels from other images in the stack and building an advanced composite of all the images and doing 90% or more of the work for you. There's even a set of "fuzziness" sliders letting you say "eleminate things that are in X% of the images in the stack or less." This is so impressive to see in action. You have to try it on some of your own images. It's really hard to believe that it's this easy to do this sort of process now. This is one of those new areas that I'm sure we'll see artists finding incredibly creative ways to utilize this feature. Again, this one floored me when I first saw it.
* Vanishing Point with adjustable angle
One of the most powerful new features of Adobe CS5 was the vanishing point feature. One limitation it had was that you only had one set of right angles to work with in the vanishing point interface. Adobe took it one exponential step further by adding multiple, adjustable angle perspective planes to this vanishing point feature. What this enables you to do is copy, paste and clone in far more complex image planes than just the "clone parts of a building in perspective" job that the first iteration of this feature offered (impressive and powerful, but not very flexible). One of the big examples Adobe is pushing with this feature is to simulate 3D packaging and work on multiple planes at various angles in the same image. Like an open box for a new product, or even for experimenting with your final package art by seeing it in its real-world context. Again I think this feature has so many far reaching implications for inventors, prototypers, 3D modelers, visual effects artists... and can give Photoshop artists the ability to render full blown mockups of product packaging art for clients in a whole new way - getting us to sign-off, green-light and on to the next project at hand much more quickly. I like that a lot.
1) CONTENT-AWARE MOVE
One of the most impressive features in this version is the content-aware move. I shot this photo (below) in a recent project, and I remember the client wanted me to move the girls closer together. With content-aware move, all I have to do was select the object… and well, move.
I have to admit, this was one of the features in my wishlist that I didn’t really expect to materialize. I do have to mention though that it works best on photos with simpler backgrounds. And if you’re one to pixel peep, you will find some warped textures resulting from the move, but this is easily remedied by the heal tool.
2) ADOBE CAMERA RAW 7
I was wandering around an area in Chinatown beside a Hindu temple filled with loitering pigeons… when suddenly, this old man walked in the middle of the street and threw a handful of rice grains. The pigeons went crazy.. and with no regard to my camera’s settings, I just tried to snap as much photos and as quickly as I could. Unfortunately, the photos came out totally under exposed:
Fortunately, with extended controls in Adobe Camera Raw 7.0 on highlights and shadows, I’m able to bring out the details in the shot.
So now you can worry less about getting the exposure right in sudden unexpected situations like this… just focus on composing and capturing the moment.
Oh and yeah, this is the main reason why I prefer shooting in RAW.
3) SELECTIVE BLURRING
I’m not a big fan of simulating bokeh or background blur in photoshop because it never comes out right. But with the new ‘Field Blur’ function, you can select multiple points from an image and dictate the amount of blur or (non-blur) for each point. If you have a good understanding on how bokeh works, with careful analysis, you can simulate better background blur thus making your portrait subject stand out more naturally.
This is a portrait I took on a past client project. For this shot, I used a 24mm lense wide open at f1.4. Although I’m happy with the shot, I sort of wished there was a bit more blur in the background to make the subject stand out more.
I used photoshop CS6′s field blur function to select several points to blur and points to not blur.
This is a preview of the blur mask. Areas in white are in blur, areas in black are not.
Although this is not perfect, and I still prefer bokeh straight out of the camera, it’s nice to know this kind of feature exist in case you’ll need it for some few quick tweaks.
OTHER COOL FEATURES:
The features I listed above are only some of the new features and upgrades in Adobe’s latest Photoshop release. There’s a whole slew of new stuff which I think make this upgrade probably the most significant one so far through the years.
The features I listed above are only some of the new features and upgrades in Adobe’s latest Photoshop release. There’s a whole slew of new stuff which I think make this upgrade probably the most significant one so far through the years.
New User Interface – This was the very first thing I noticed… and I instantly fell in love with it. I love the dark background, I think it gives focus to the image in hand.
Adaptive Wide Angle – Another awesome new feature. It’s not a personal fave though, since I don’t do landscapes. But photographers who use an ultra-wide angle or fisheye lens will get a kick out of these.
New Cropping Workflow – This is another pretty significant upgrade. The previous workflow makes it hard to preview your angled crops… now, they’ve applied the same cropping workflow as with Lightroom. Plus, they introduced the option to not delete the cropped pixels. Which means cropping is not non-destructive!
Edit Video – This is not meant to replace video editing software like Adobe Premier or After Effects. In fact, the controls are pretty basic. But I’ve played around with it and it’s a pretty nifty feature for some quick editing. And it’s a good start.
Auto-Save – I’ve been burned so many times for not saving more often than I should. I’ve had my share of recreating complicated digital work because of system failures – auto save is a potential hero.
I have to say CS6 is not yet perfect. Even with the huge step on content-awareness, it still only works best on simpler backgrounds. And the video editing tool is cool, but its functions are pretty basic. It’s a good start though.
I still use Photoshop CS4 in the office at my day job as a graphic designer, and every time I go home to CS6, I can definitely feel the world of difference. Of the years that I’ve used Photoshop, I can say that CS6 is one of the largest leap forward in terms of features and usability. A lot of it’s new features are definitely geared towards making your work faster and easier, allowing you to focus more on creativity.
There are numerous new features in the application, especially when you dig down deep into the Photoshop Extended editions (sounds like a Peter Jackson DVD...) and as the week progresses here, I'd like to look into some of what PsCS3 Extended has to offer. The versions of PsCS3 that are available are the Film & Video, Medical & Science, AEC (Architecture, Engineering & Construction), and Manufacturing editions.
Advanced Artistry Photoshop Tutorials
Advanced Artistry Photoshop Tutorials
Photoshop CS6 One-on-One: Intermediate. Weighing in at 9 hours and 25 minutes, it represents everything I have to say (for the time being, anyway) on the topics of Content-Aware, sharpening, text, shapes, layer effects, styles, Liquify, black-and-white, and output.
 Oh, and I also discuss how to use the Levels command. The attached movie serves as the introduction. I'm really proud of it. Have you ever seen a guy interact with a histogram like that? It's like Minority Report. Except that my gut and man boobs are bigger than Tom Cruise's. Kudos to Will Frazier, Andrew Brown, and the whole graphics and live-action teams at lynda.com. Love you guys!
To view the entire course, mosey on over to lynda.com. Specifically, you'll want to go to Photoshop CS6 One-on-One: Intermediate, which contains the usual 10% free movies, not to mention the 100% available to beloved members of the Online Training Library.
Photoshop CS6 One-on-One: Fundamentals precedes this course. Two more, Advanced (which I'm working on now) and Mastery will follow.

If you’re a Photoshop user with a working knowledge of the basics, you may well enjoy the Advanced Artistry Photoshop tutorials. With this intermediate level training package you can hone some very advanced Photoshop skills. Here is what you’ll learn.
The Introductory CD will tell you all about the course and the instructor, including some tips on how best to learn from the Photoshop tutorials. You’ll learn about the technical aspects of the presentation and its variations from Mac to PC.
The next of the Photoshop tutorial CDS is called Utilities. Machine basics are included in this lesson plan, as well as PS preference and essential shortcuts. You’ll learn navigation shortcuts, as well as those for imaging, tools, and workspace.
You’ll get a quick review of all the keystroke and Photoshop super shortcut techniques and help setting up your own workspace.
The next of the Photoshop tutorials tackles the subject of retouching. In this CD you’ll learn the professional retouching techniques, how to assess the Photoshop image, how to analyze the histogram, as well as the contrast, lighting and texture.
You learn how to do an analysis of the focus and to manage the contrast controls. You’ll learn the ins and outs of contrast levels, and the use of each level. You’ll learn to use curves, to enhance color and the advanced techniques to avoid saturation.
These Photoshop tutorials will also teach you to use the patch tool and the healing brush, and to burn and dodge demos without destruction. You’ll also master the technique of red eye reduction.
Advanced artistry tutorials in this Photoshop lesson package will also include a CD that teaches how to adjust for focus and the center of interest, how to sharpen the focus, how to enhance the field depth and how to fish or burn edges.
In the fine art toning CD you learn intermediate and advanced techniques of producing black and white photos from color originals, how to work with and create sepia tones, selenium tones, digital cyanotypes and maps with gradients.
Fine art photograph effects lessons include soft focusing, angelic and dramatic posing, high contrast and high keys and cross processing.
Including in this Photoshop tutorial is mastery of fine techniques for people’s skin, giving them the look of perfect skin, of radiant and dramatically glowing skin, advanced techniques in metal skin looks, infrared and translucent skin, and the use of maps for displacement.
Natural media and landscape techniques are taught in Photoshop advanced artistry tutorials as well.
Enhancing the skies and adding sky from other photos are techniques taught, as well as using the history and art history brushes, and burning and dodging without being destructive.
If you want to create a professional hand drawn look you can master that technique through Photoshop tutorials, and can also learn watercolor, logos, and vector illustration too. Hand tinting lessons are varied and include painting in a color mode and adjusting of layers.
Grid and Tech glows, TV scan lines, pixel drags, and edges and borders that are soft, painted, beveled or burned are all advanced artistry Photoshop tutorial lessons.
Photoshop CS6 One-on-One: Intermediate. Weighing in at 9 hours and 25 minutes, it represents everything I have to say (for the time being, anyway) on the topics of Content-Aware, sharpening, text, shapes, layer effects, styles, Liquify, black-and-white, and output.
Oh, and I also discuss how to use the Levels command. The attached movie serves as the introduction. I'm really proud of it. Have you ever seen a guy interact with a histogram like that? It's like Minority Report. Except that my gut and man boobs are bigger than Tom Cruise's. Kudos to Will Frazier, Andrew Brown, and the whole graphics and live-action teams at lynda.com. Love you guys!To view the entire course, mosey on over to lynda.com. Specifically, you'll want to go to Photoshop CS6 One-on-One: Intermediate, which contains the usual 10% free movies, not to mention the 100% available to beloved members of the Online Training Library.
Photoshop CS6 One-on-One: Fundamentals precedes this course. Two more, Advanced (which I'm working on now) and Mastery will follow.

If you’re a Photoshop user with a working knowledge of the basics, you may well enjoy the Advanced Artistry Photoshop tutorials. With this intermediate level training package you can hone some very advanced Photoshop skills. Here is what you’ll learn.
The Introductory CD will tell you all about the course and the instructor, including some tips on how best to learn from the Photoshop tutorials. You’ll learn about the technical aspects of the presentation and its variations from Mac to PC.
The next of the Photoshop tutorial CDS is called Utilities. Machine basics are included in this lesson plan, as well as PS preference and essential shortcuts. You’ll learn navigation shortcuts, as well as those for imaging, tools, and workspace.
You’ll get a quick review of all the keystroke and Photoshop super shortcut techniques and help setting up your own workspace.
The next of the Photoshop tutorials tackles the subject of retouching. In this CD you’ll learn the professional retouching techniques, how to assess the Photoshop image, how to analyze the histogram, as well as the contrast, lighting and texture.
You learn how to do an analysis of the focus and to manage the contrast controls. You’ll learn the ins and outs of contrast levels, and the use of each level. You’ll learn to use curves, to enhance color and the advanced techniques to avoid saturation.
These Photoshop tutorials will also teach you to use the patch tool and the healing brush, and to burn and dodge demos without destruction. You’ll also master the technique of red eye reduction.
Advanced artistry tutorials in this Photoshop lesson package will also include a CD that teaches how to adjust for focus and the center of interest, how to sharpen the focus, how to enhance the field depth and how to fish or burn edges.
In the fine art toning CD you learn intermediate and advanced techniques of producing black and white photos from color originals, how to work with and create sepia tones, selenium tones, digital cyanotypes and maps with gradients.
Fine art photograph effects lessons include soft focusing, angelic and dramatic posing, high contrast and high keys and cross processing.
Including in this Photoshop tutorial is mastery of fine techniques for people’s skin, giving them the look of perfect skin, of radiant and dramatically glowing skin, advanced techniques in metal skin looks, infrared and translucent skin, and the use of maps for displacement.
Natural media and landscape techniques are taught in Photoshop advanced artistry tutorials as well.
Enhancing the skies and adding sky from other photos are techniques taught, as well as using the history and art history brushes, and burning and dodging without being destructive.
If you want to create a professional hand drawn look you can master that technique through Photoshop tutorials, and can also learn watercolor, logos, and vector illustration too. Hand tinting lessons are varied and include painting in a color mode and adjusting of layers.
Grid and Tech glows, TV scan lines, pixel drags, and edges and borders that are soft, painted, beveled or burned are all advanced artistry Photoshop tutorial lessons.
Subscribe to:
Posts (Atom)