Easter Bunny Party and Spring Party Flyers PSD Templates


Easter Bunny Party and Spring Party Flyers PSD Templates New, Cool, Stylish flyers for night clubs, parties and other events. The PSD file is set up at 1275×1875 pixels (4×6” with .25” bleeds), CMYK , 300 DPI . The PSD file is well-organized, with color coded groups and layers named appropriately. You can modify each element easily and quick! Detailed video instruction: Club House Party Flyer Template Club House Party Flyer Template
http://youtu.be/dT9bGdNyM_M Fonts used: Grobold 
http://www.dafont.com/harabara.font ) Myriad Pro ( Standard Widows font )
Attention: You can easy change girl image. But you must keep in mind that this image is not included in download. The image of the girl was used as demonstration!
You can buy the bunny girl image following this address: 
and buy the girl in a long red dress image here:
I hope you’ll be satisfied. Thanks!

Creating A Locked Credit Card In Photoshop

Creating A Locked Credit Card In Photoshop


Locked card tutorial in Photoshop. In this Photoshop tutorial, we are going to be creating a locked credit/ debit card. We will be working with two different objects, a credit card and a lock, and using Photoshop techniques we shall arrange them in place to make it look like they belong together.
This locked credit card tutorial was requested by Sailesh.
1. Create a new document with width 600, height 340 and white as the background content. These are the settings we will be using for our locked credit card tutorial.
2. Open the image of your card in Photoshop.
3. Select the whole card using any of the selection tools available to you.
(The Quick selection tool works great)
3. Use the Move Tool to drag and drop the image of your card onto your document.
4. Open the image of your lock in Photoshop.
5. Select the lock using any of the selection tools available to you.
6. Drag and drop the image of your card onto your document.
7. Press CTRL + T and adjust the size of lock.
8. Go back to the card layer.
9. Now add a layer mask to the card layer.
10. Using the Elliptical Marquee Tool, create a selection on the card layer for the card hole as shown below:
11. Set the Foreground and Background colors as Black and White, respectively.
12. Select the Brush Tool and modify its settings as shown in the image below:
(The brush settings such as brush size are variable. You may adjust these slight details according to your needs.)
13. Next, apply the Brush Tool.
14. To deselect the selection, press CTRL + D
15. Go on to the lock layer.
16. Now add a layer mask to the lock layer.
17. Set the Foreground and Background colors as Black and White, respectively.
18. Select the Brush Tool and modify its settings as shown in the image below:
19. Next, apply the Brush Tool on the lock image so as to get the effect shown below:
You will see that some part of the lock appears to be behind the card.
20. Double click the lock layer thumbnail to open the Layer style.
Make the following changes:
21. Open the image of your key in Photoshop.
22. Select the key using any of the selection tools available to you.
23. Drag and drop the image of your key onto your document.
24. Press CTRL + T to adjust the size of key.
25. Now add a layer mask to the key layer.
26. Set the Foreground and Background colors as Black and White, respectively.
27. Select the Brush Tool and modify its settings as shown in the image below:
28. Next, apply the Brush Tool onto the key ring so as to get the effect as shown below:
Now the key seems to be inside the lock.
29. Press CTRL and click on the card layer thumbnail. A selection will be made around the card.
30. Create a new layer. Fill this with 50% gray color.
31. This will be the card’s shadow layer. So make sure that the shadow layer lies below the card layer in the layer panel.
32. To deselect the selection, press CTRL + D
33. Press CTRL + and right click to select Skew.
34. Now move the shadow layer down a little bit.
35. Go to: Filter > Blur > Gaussian Blur
36. Set the Radius as 3%.
37. As you can see, the card hole is filled with gray too. Make a small selection around the hole and delete this part.
(You may repeat the same steps for the lock shadow.)
38. Again press CTRL and click on the card layer thumbnail. A selection will be made around the card.
39. Create a new layer.
40. Right click on selection and choose stroke.
Make the following changes.
41. To deselect the selection, press CTRL + D
That’s it, babe.
Final picture:
Voila.

Photoshop CS6 by the numbers

Photoshop CS6 by the numbers
The team celebrates reaching 5 million Facebook fans via this little 1-minute video. (The 601 cases of beer sounds about right, but I can’t believe they omitted a stat about all the Don Julio consumption.)
what are you trying to do? What steps did you go through which don't seem to work? Import to what, Photoshop, a program you made? What does the iphone have to do with this? What is 'GeniusButton_1only_.png?' what is the file-format module? Why can't it parse the file? I have no idea what you are asking, I assume others are also confused, please elaborate further, or no one will help you, simply because they don't understand how to help..

Creating The Tilt Shift Effect In Photoshop

Creating The Tilt Shift Effect In Photoshop 

Tilt shift effect tutorial in Photoshop. In this tutorial you will learn tilt shift effect in photoshop. A fast and clever scheme used to produce the famous fake miniature effects that have for so long been observed only in photography, now achievable with near brilliant results in Photoshop. Hurrah.
1. Open an image in Photoshop. Width 600 and Height 340.
2. Go to: Image > Adjustments > HDR Toning
Make the following changes:
3. Go to: Image > Adjustments > Color Balance
Make the following changes:
4. Press Edit in Quick Mask Mode.
5. Open Gradient Tool and choose Reflected Gradient.
6. Draw in a straight line in the area that you’d like to see in focus.
7. Press Edit in Quick Mask Mode once again.
The red color will disappear and a selection will appear instead.
8. Go to: Filter > Blur Lens Blur
Make the following changes:
9.Press CTRL + to deselect the selection.
That’s it, babe.
Final picture:
Voila.

Colorful Computer Background Video Tutorial

Colorful Computer Background Video Tutorial


Today we are going to be using Adobe Photoshop CS5 to make a colorful computer background.


Colorful Computer Background | Photoshop Video Tutorial

1 vote, 4.00 avg. rating (80% score

)
Today we’re going to be using Adobe Photoshop CS5 to make a colorful computer background.


Creating Rounded Corners Photo In Photoshop CS6

Creating Rounded Corners Photo In Photoshop CS6


Creating Rounded Corners Photo in Photoshop CS6. In this Photoshop tutorial, you are going to learn how easy it is to create a Rounded corners photo. You’re going to work with filters and the rounded rectangular tool of course to make this possible.
1. Open whatever image you would like to work on in Adobe Photoshop. This is the image we will be using in this tutorial:
2. Duplicate the background layer. Name this layer as ‘Rounded Corners.’
3. Turn off the duplicate layer.
4. Go back to the background layer.
5. Go to: Filter > Blur Radial blur.
Make the following changes:
6. Turn on the Rounded corner layer.
7. Using Rounded Rectangle Tool, draw the rounded corners rectangle shape around the part of the image you want to include in this rounded corners rectangle.
When you’ve drawn the rounded corners rectangle shape, you’ll notice that all the tabs are on.
8. Click the Mask tab. Your wanted part of the image is now within the boundaries of the rounded corners rectangular shape.
9. Now click the Selection tab. This changes the shape into a selection.
10. Create a new layer. Name it as ‘Border.’ Ensure that this layer is placed below the Rounded Corners layer in the layer panel.
11. Go to: Select Modify > Expand 
Make the following changes:
12. Fill the Border layer with white color.
13. Deselect the selection.
14. Double click the border layer to open Layer Style. 
Make the following changes:
That’s it, babe.
Final Result:
Voila.

Photoshop CS6 Image Import


Photoshop CS6 Image Import
Could not place the document ‘GeniusButton_1only_.png’ because the file-format module cannot parse the file. I need to know how to fix this problem I can import pictures fine if they are saved from the internet but when I pull them off of my iPhone and try to edit them with Photoshop I get that error. I'm on Mac dragging the image from my desktop into Photoshop it worked fine before until now.what are you trying to do? What steps did you go through which don't seem to work? Import to what, Photoshop, a program you made? What does the iphone have to do with this? What is 'GeniusButton_1only_.png?' what is the file-format module? Why can't it parse the file? I have no idea what you are asking, I assume others are also confused, please elaborate further, or no one will help you, simply because they don't understand how to help..

Test Your Photoshop CS6 Knowledge #8

Test Your Photoshop CS6 Knowledge #8

In recognition of Adobe’s release of Photoshop CS6, we decided to publish a series of quizzes to help you make the transition to the newest version of Photoshop. In this quiz we included a few questions that require a bit of Photoshop CS6 knowledge to answer correctly. Please take a moment to complete this 10-question quiz and see if you have what it takes to pass our test! Good luck!


How about not pricing Adobe Cloud 60% higher in Europe than the US.
You would say there are greater costs with hiring people. Yes, maybe in Germany and others. What about Easter European countries, like Romania. It's clear that Adobe differentiates prices around the world, but when it comes to Eastern Europe you consider it should also be 60% higher than the US, or even 100% like with the older pricing model.
I hope for an inquiry as in Australia!I was so shocked about when Photoshop CS6 finished on Friday the 13TH. Anyways, for me, the best CS update is CS6 the updates from CS4-5.5 aren't really that much well... "interesting" to call it. When I found out about CS6 coming out and all the new features, it really gave me that 1000000% of doing art! It's like you want to try ALL of the new features in Photoshop CS6! Great job Adobe! Keep moving forward! (Also with your other products, they are very nice!)

Photoshop CS6′s Creation Was Powered By 601 Cases Of Beer


Photoshop CS6′s Creation Was Powered By 601 Cases Of Beer

Photoshop CS6′s Creation Was Powered By 601 Cases Of Beer
To celebrate Photoshop reaching 5 million Facebook fans, Adobe has put together a short video that compiles all the work that went into making Photoshop CS6. Some of the stats – like Photoshop’s 4.5 million lines of code – are rather impressive. Other stats – like the number of beer cases consumed during production – show that Adobe must be a fun to place to work at.

Looking beyond the numbers, the video gives a small glimpse at how software like Photoshop is made. It’s not open source so its users can’t directly influence its development, but the team does take ideas and suggestions from users to make Photoshop the best it can be.
If the above video has coerced you into wanting to enshrine a physical copy of Photoshop CS6 in your closet; you have until April 30 to do so. After that, the software will leave for the Cloud and digital orders only. You could set up a computer running Photoshop CS6 in your makeshift closet shrine, but it just wouldn’t have the same effect.

Photoshop CS6 Retina Display Support Coming on December 11?


Photoshop CS6 Retina Display Support Coming on December 11?
Macotakara notes that Adobe's promotional materials for its upcoming Create Now Liveevent on December 11 appear to show a 15-inch Retina MacBook Pro running Photoshop CS6 in high-resolution Retina mode. 

Adobe announced in late August that it would be bringing Retina display support to Photoshop CS6 "this Fall", with the company's other applications also receiving updates "over the next few months". Several of those updates have already appeared, but Photoshop will be the most popular of the company's applications to receive the upgrade to Retina resolution. 

A Legal Copy of Photoshop CS6 Is Your Deal of the Day


A Legal Copy of Photoshop CS6 Is Your Deal of the Day
Adobe Photoshop CS6 is the industry-standard image editing software. It's a verb. For some projects — say, making unbelievable hi-res versions of scenes from Metroid — there's no substitute. But like most professional software, it's crazy expensive.

If you're a bona fide student, you can pick up a student version of Photoshop CS6 for $320. But for the rest of us, if you want a legal copy, you're looking at software that could very well cost more than your laptop. It makes sense to buy CS6 on sale. Right now, Officemax has a 20% off code that — surprise! — even works on expensive software, including Photoshop CS6. The code SAVE20 knocks the price of a retail copy down to $560, which is a historically notable price. Pick it up, and get shoopin'. [Officemax via Fatwallet]

Note: The Officemax code works on a lot more than just Photoshop, including the whole Adobe Creative Suite, Office, and Windows.

Photoshop CS6 improvements


Photoshop CS6 improvements
The Photoshop CS6 beta is includes a ton of big and small improvements over previous versions. Here are the ones that matter to me, as an interface designer.
Layer searching
Search for layers by layer type, name, effect (layer style), blending mode, colour or by large range of attributes. Want to find all layers that have a pattern overlay layer style? Just search for effect and overlay. CS6’s improved searching should make traversing 1000+ layer documents a whole lot easier.

Vector pixel snapping
Pixel snapping behaviour has been drastically improved in Photoshop CS6, negating the need for some of the janky workflows required when editing vector points in CS5.
There’s two main settings to control everything, Align Edges and Snap Vector Tools and Transforms to Pixel Grid.
Align Edges snaps the edge of entire objects to the pixel boundary, while maintaining the relationship of non-edge points. This means crisp edges, without rounding any of the inner points. It can be found in the Options Bar and is enabled on a per-layer basis. If my description doesn’t make sense, don’t worry. It’s easier to use than it is to explain.
Snap Vector Tools and Transforms to Pixel Grid controls all vector creation and editing. All vector tools can now snap to pixel boundaries, including the pen and ellipse tools (yep, pixel snapped circles). For me, these changes alone are worth the upgrade price. Snap Vector Tools and Transforms to Pixel Grid can be found in Preferences under the General tab. My only complaint would be that the setting is pretty well hidden. It’s actionable though, so that’s exactly what I’ve done. If you’d like to enable and disable it via a keyboard shortcut, download our Bjango Actions and use F15 to enable snapping and shift-F15 to disable it.

Layer Styles on Groups -Group Clipping Masks


Layer Styles on Groups
Layer styles can now be applied to groups in the same way they can be applied to bitmap, vector and type layers. There’s many reasons why this is an awesome feature, but my main use for it will probably be to apply more layer styles to objects — you can now have two or more drop shadows by nesting layers inside groups and applying layer styles to the groups. In my opinion, this is a far better technique than using Smart Objects for the same purpose, because this will allow documents to scale and maintain quality (Smart Objects don’t, depending on how you’ve created them).

Group Clipping Masks
Layers can now be clipped to groups, allowing for some pretty wild masking possibilities. Use in abundance and in combination with group layer styles to impress and confuse your CS5-using friends.


Photoshop CS6: Restoring & Blending Images


Photoshop CS6: Restoring & Blending Images

This workshop is especially for people who want to learn to create photo collages and for those who are interested in refurbishing digital images of aging photographs. Designed for people with some experience using Photoshop, this workshop delves more deeply into Photoshop image-editing strategies and practices. Participants will learn the most beneficial way to modify images, using channels and masks to preserve and edit their work. While doing the exercises, participants will save and re-use complex pixel selections, colorize grayscale photographs, learn the best method to create collages, and explore the ways Photoshop digitizes color.

The North Korean being an epic Photoshop fake


It is a picture which was supposed to show the might of the North Korean army; one problem – it has been accused of being an epic Photoshop fake.

The North Korean propaganda campaign has become increasing aggressive over the last couple of weeks.

Earlier this week it repeated threats to target US military bases, a move dismissed as designed to raise tensions and intimidate.

And an image of hovercrafts landing on a beach during a military exercise was released by the North Korean Central News Agency [KCNA} and picked up by other news agencies this week, reports The Telegraph.


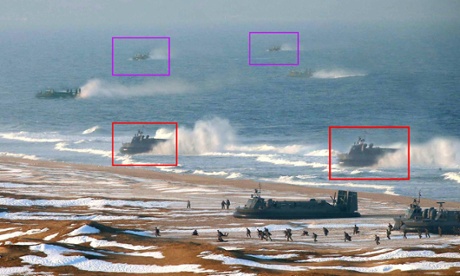
The image released by North Korean news agency, KCNA, which appears to show hovercraft have been copied and pasted.

However, news agencies killed off distribution of the image with the respected Agence France-Presse insisting ‘excessive digital alteration’ had taken place.

The AFP photo editor, Eric Baradat, told The Telegraph "various anomalies" had taken place.

“Usually a very simple examination with our software dismisses KCNA pictures but they tend to be better with Photoshop recently,” he said.

Writing in Atlantic magazine, Alan Taylor believes at least two and possibly three of the hovercraft have been copied and pasted on. While another craft was suspicious because of its "soft edges, lack of visible wake, and color oddities".

Did North Korea photoshop its hovercraft?


Did North Korea photoshop its hovercraft?
It appears North Korea has doctored pictures of its military to make it look more impressive than it is – and not for the first time


The images of North Korean military hovercraft landing on a desolate beach were supposed to portray a disciplined, combat-ready army ready to launch or repel an attack at a moment's notice.
As South Korea and the US continued their controversial joint military exercises in the region, the North's official news agency this week distributed photographs showing the communist state playing war games of its own.
The hovercraft image, however, may have been doctored to make the exercise appear more menacing than it really was.
The photo, which was widely carried in the international media on Tuesday, shows several hovercraft coming ashore at an undisclosed location on North Korea's east coast the previous day.
A couple of dozen troops units of the Korean people's army and navy can be seen running ahead of one of the craft, apparently to be "repelled" by soldiers positioned behind a bank at the edge of the beach.
Writing in the Atlantic magazine's In Focus section, Alan Taylor said he believed the photo, issued by the Korean Central News Agency and distributed to media organisations by Getty Images, had been digitally manipulated.
Taylor said several of the eight hovercraft in the photo appear to be digital clones, speculating that at least two of them had simply been copied and pasted elsewhere. Another craft raised suspicions due to its "soft edges, lack of visible wake, and color oddities".
North Korea hovercraft 1
Two of the near hovercraft, boxed in red, appear to be the same hovercraft, digitally manipulated. It appears that two in the distance, boxed in purple, are also unnaturally similar
North Korea hovercraft 2
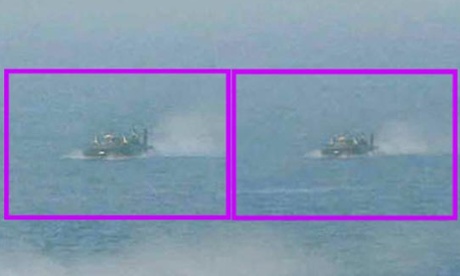
Resizing one of the hovercraft so they are the same size, the similarities become even more evident
North Korea hovercraft 3
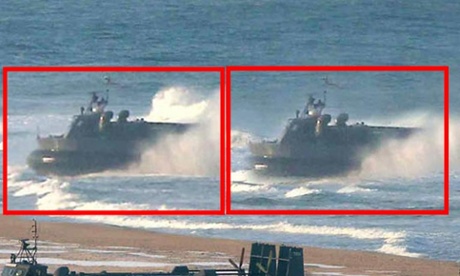
Again resizing the hovercraft that are in the foreground, the similarities are obvious. On the right hand image, at the front of the hovercraft missing pixels are clearly visible
This isn't the first time that North Korea has been accused of doctoring images for propaganda effect.
A photograph taken at the December 2011 funeral of the state's previous leader, Kim Jong-il, was allegedly altered after the original showed half a dozen men, who appear to be TV journalists, looking away from the main spectacle.
In the manipulated version, the errant men, their camera and footprints had been digitally removed, giving the impression that all eyes were on Kim's funeral cortege as it passed ranks of mourners in the capital, Pyongyang.
The discrepancy was only noticed because the men were clearly visible in a photo taken at almost exactly the same moment by Japan's Kyodo news agency.