The wacom pen and touch installing

The wacom pen and touch installing
Since we're giving away two Wacom Bamboo Pen and Touch tablets , it's the prime time to do a series of posts about the tablet and how install it. This is post #2 in our series and will be covering how to install the pen and touch to Mac or PC.

Watch this video to learn how to easily install your new Wacom Bamboo Pen and Touch Tablet!


We hope this helps you to install and start enjoying your Wacom Pen and Touch Tablet! 

No it's actually really easy to install. You can plug and play. The only issue I ever had with it was that with my new laptop, whatever USB port I plugged it into to start with, that was the USB port I had to use from then on to plug it into. It didn't do that on my old laptop so I'm thinking it's just this laptop or maybe a Windows 7 thing. Works great though and it usually installs the software straight from the tablet. I would recommend using the install CD though but it's a step by step thing. I also just wanted to include these videos to show you how easy it was and help anyone who had one of these to install.
Is it essential to read the whole "installation packet"? I've heard that someone said they just plugged in theirs with the USB and then set it up by themselves really simply, or could I use this video in replacement of it? Thanks :)

With Photoshop a Click Away, Can Photography Be Trusted?


With Photoshop a Click Away, Can Photography Be Trusted?


We're entering an interesting time in the reporting world, when what was just news is now -- questionable. It used to be that if you could lead your story with a photo of its subject, then that was all the proof you needed. Now, though, in a world of Photoshop tweaks and rather more blatant modifications, that's no longer the case. Newsweek is asking the question whether anyone will ever trust news photography again.

Newsweek spoke with highly regarded photojournalist John Long, who said: "With technology, you can make the moment anything you want it to be. Our credibility has been stretched in so many ways, so I don't think the public has a great deal of faith in us." It's hard to argue that point, with tales of the so-called Montauk Monster being picked up by major news sites everywhere. The supposed beast was spotted on a Long Island beach earlier in the month, photographed by a sun-seeker, then posted online by gossip portal Gawker. From there it was picked up by the big news sites and got plenty of TV time. Many speculated it was a dog carcass, others that it was something totally new. Now a movie director has said it was just a prop from his movie and that this is all a viral marketing campaign, though that's a claim that many believe is itself a hoax.

We've also got those UFOs that popped up all over the newswires last year, but seemingly nowhere in the real world. We've also seen a growing trend of digital slicing and dicing of celebrities, most recently Mariah Carey, but no shortage of predecessors, making this a trend that's not going away anytime soon.

So, the question is: do you trust news photographs any longer?
TAGS: MONTAUK, NEWS, PHOTOSHOP

BP Badly Photoshops Command Center


BP Badly Photoshops Command Center, Denies Responsibility


Thanks to one investigative blogger, BP has proven itself to be just as unethical as ever. Monday, John Aravosis at AmericaBlog demonstrated that a promotional photo, which allegedly depicts BP employees poring over video feeds of the leaking oil well, had been photoshopped -- and poorly at that. Not only was the photo clearly doctored, the blog claimed, but it wasn't even current. The image's information, as one reader found, strongly suggested that it had been created in 2001.

After the news spread across the Web like oil across the Gulf, BP finally (sort of) addressed the situation. The Washington Post reported yesterday:
Scott Dean, a spokesman for BP, said that there was nothing sinister in the photo alteration and provided the original unaltered version. He said that a photographer working for the company had inserted three images in spots where the video screens were blank.
Although BP has taken down the doctored photo, Dean has not acknowledged its problematic 2001 date, nor has he agreed to post a high-res copy of the "original unaltered version. There's also the slight problem of this other doctored promotional photo.


TAGS: BP, BUSINESS, GULF OIL SPILL, GULFOILSPILL, OILSPILL, PHOTOSHOP, PHOTOSHOPDISASTERS, PHOTOSHOPPED, TOP, TRUTHINADVERTISING

Free Photoshop Express Gets Updated


Free Photoshop Express Gets Updated

Adobe has launched a new version of its free, online version of Photoshop, which is called Express. When we reviewed it earlier, we were impressed with the app's ease of use and speed, considering the program runs within a Web page. Also, the two-gigabytes (GB) of storage and integration with Picasa and Facebook was handy.

This new revision adds the ability to interact directly with photo-sharing community Flickr, letting you pull photos from your account into Express, tweak them a bit, and then export them back over in a jiffy. Also, the new version enables the creation of animated slide shows such as the one pictured above, which you can then embed anywhere you like. And, finally, you can now easily save a copy of any photo you edit, making it easier to get the original back should you mess with it a little too much -- a feature that was curiously missing from the first version.

Here's the beauty part: Since it's all online, there's no patch or software update to download or install. Just log in and you automatically have the latest version. And, while the enhancements aren't exactly mind-blowing, you can't argue with the price -- it's free! [Source: USA Today]
TAGS: BREAKING NEWS, BREAKINGNEWS, FACEBOOK, FLICKR, FREE, PHOTO EDITING, PHOTOEDITING, PHOTOSHOP, PHOTOSHOP EXPRESS, PHOTOSHOPEXPRESS, PICASA, WEB APPS, WEBAPPS

Facebook Photoshop Scam Spreading Like Wildfire


Facebook Photoshop Scam Spreading Like Wildfire


Clicking on Facebook links is dangerous business. At least a few of aren't aware of this sad fact; otherwise, the latest scam Facebook app wouldn't be spreading at the alarming rate of almost 90,000 clicks per hour.

M86 Security labs reported the latest link hoax, which spreads quickly via Facebook Chat. It starts with a message from a friend that reads, "hey, I just made a photoshop of you, check it out :p" with a link attached. Clicking the link brings up a prompt, which asks you to install a Facebook app that requests access to Chat. Of course, it then immediately begins spamming your friends with the same message. It keeps you distracted by redirecting you to a blog featuring "45 Strange and Funny Photoshop Manipulations" such as a person's face on a dog. Needless to say, none of them feature your face.

The ultimate purpose of the scam is unclear at the moment. The destination site doesn't install any malware or lead to more traditional scams, such as surveys used to mine your personal data. It's possible that the rogue app is just the initial stage of a larger scam, but it could also be the work of pranksters simply proving that Facebook Chat is vulnerable to attack.

If you've mistakenly installed the rogue app, called 'millium,' simply head to your privacy settings page and click on 'Edit Your Settings' under 'Applications and Websites.' Find the entry for 'millium' and click 'Remove App.' Then send your friends and family a note of apology for being so gullible.


TAGS: APPS, FACEBOOK, FACEBOOK PHOTOSHOP SCAM, FACEBOOK+PHOTOSHOP+SCAM, FACEBOOKPHOTOSHOPSCAM, PHOTOSHOP, SCAM, SCAMS, SECURITY, TOP, WEB

Microsoft Apologizes for Offensive (and Botched) Photoshop Job


Microsoft Apologizes for Offensive (and Botched) Photoshop Job


This morning, we relayed an Engadget report about Microsoft Poland's embarrassing Photoshop hack-job on an ad featuring three business people sitting at a conference table. The Photoshop fiasco was immediately met with heated criticism, specifically because the photo manipulators replaced the head of the black man, who appeared whole in the U.S. ad, with the head of a white man.

MSNBC is reporting that Microsoft has now apologized for the racially insensitive and incredibly awkward switch (particularly awkward since they didn't alter the color of the man's hand). In a statement, spokesperson Lou Gellos said, "We are looking into the details of this situation. We apologize and are in the process of pulling down the image." Hopefully, even though the Photoshop job is offensive, Microsoft won't pull the ridiculous thing down too soon (check it out after the break). It's inspiring some seriously hilarious commentary.


ADVERTISING, FUNNY, MICROSOFT, MICROSOFT POLAND, MICROSOFTPOLAND, PHOTOSHOP, PHOTOSHOPPED, TOP

Palin Calls Photoshopped Images 'Atrocious'


Palin Calls Photoshopped Images 'Atrocious'


Sarah Palin may have bid adieu to the national political spotlight last November, but she doesn't seem to have any intention of leaving the media spotlight behind. The former vice-presidential candidate's camp has launched accusations of intolerance at an Alaskan political blogger over a photoshopped image featuring Palin, a conservative talk show host, and Palin's youngest son Trig, a special needs child with Down Syndrome.

For the past several months, Linda Kellen Biegel, the author of the Democratic Alaskan political blog Blue Oasis, has covered conservative Alaskan radio personality Eddie Burke's treatment of fellow Alaskan Andree McLeod, a self-described political watchdog who has vocally and consistently criticized Palin. As Biegel's coverage wore on, she came to suspect that the Governor's office had directly assisted what she has called the Republican Burke's "smear campaign" against McLeod.

Moved to investigate the validity of her suspicions, Biegel requested that the Office of the Governor provide her with whatever e-mails might be pertinent to her investigation (i.e. any e-mails between the Governor's office, Burke, and anti-McLeod writer Sheila Toomey). After corresponding with the Governor's staff, Biegel found out that copies of the aforementioned documents could be hers -- after she paid administrative fees amounting to $5,552.64.

Undeterred, Biegel began to raise money on her blog, which she then started to festoon with satirical, altered images featuring Palin and Burke. And therein began the problem. On the fourth day of her fund raising, Biegel posted the above image. In a smiling Palin's arms squirms her infant son Trig -- with Burke's face photoshopped into the place of the boy's.

Wasting no time, Palin spokesperson Meghan Stapleton launched this diatribe, published today by Politico:
The mere idea of someone doctoring the photo of a special needs baby is appalling. To learn that two Alaskans did it is absolutely sickening. Linda Kellen Biegel, the official Democrat Party blogger for Alaska, should be ashamed of herself and the Democratic National Committee should be ashamed for promoting this website and encouraging this atrocious behavior.

Babies and children are off limits. It is past time to restore decency in politics and real tolerance for all Americans. The Obama Administration sets the moral compass for its party. We ask that special needs children be loved, respected and accepted and that this type of degeneracy be condemned.
According to Politico, Blieger offered this statement in response:
It's called 'Baby Burke' because it's Eddie Burke...basically his probable second-biggest fantasy about the Governor. So, connecting the dots for you...WE'RE MAKING FUN OF EDDIE BURKE!!!!!!
Still unwavering in her desire to ascertain whatever pertinent e-mails may sit in the Governor's inbox or deleted folder, Biegel is continuing her fundraiser. At the time of this writing, she reports that it has yielded $4,646.

Even though it's hard to argue with the Palin camp's statement that special needs children should be "loved, respected, and accepted," it's doubtful that Biegel even had Trig's disability in mind when she altered the image.

But, here's the rub.

If Palin wanted to preserve the dignity of her son by truly making him "off limits," she's gone and messed up. By binding her world-famous name to such a narrowly read, provincial blog, Palin has in fact -- intentionally or no -- taken this image from the mini-blogosphere of what may be the most secluded state in the Union and brought it to the attention of the world. So, now, instead of a debatably malicious image of her son appearing on thousands of Anchorage laptops, it is appearing on millions of monitors around the world. That, dear readers, we cannot stand behind.

Using Photoshop to Find Missing Children


Using Photoshop to Find Missing Children


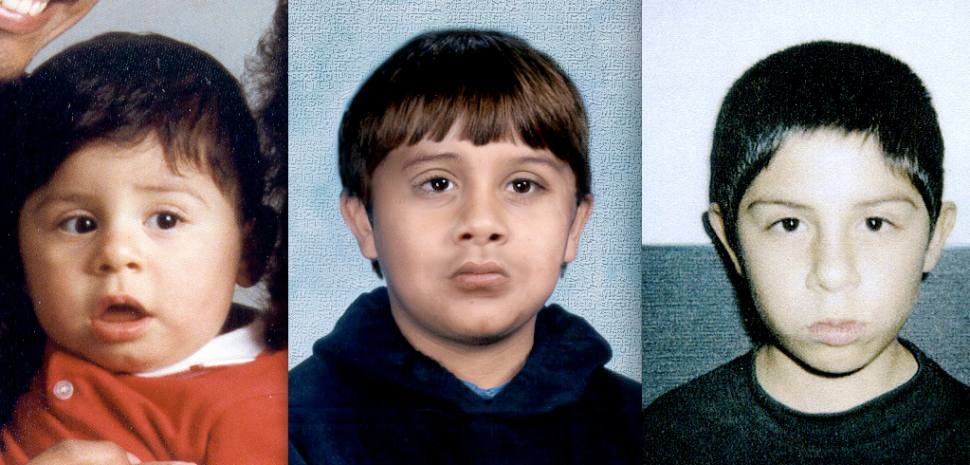
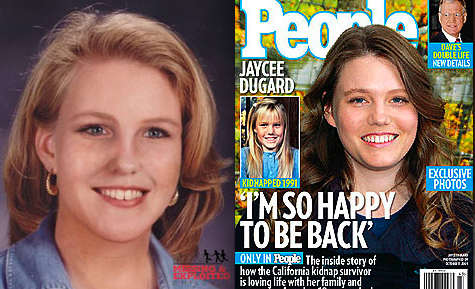
With over 2,000 children reported missing every day, police authorities have had to develop new techniques to more effectively disseminate information about those who disappear. Among the most basic and traditional techniques, of course, is distributing a simple photo across everything from milk cartons to post offices. The terrain becomes trickier, though, when a child goes missing for several years, and the accuracy of photos become dulled as the missing child ages. To mitigate this effect, forensic experts have developed something called "age progression" which uses an original photo to project what the child would look like today. Interestingly, behind this seemingly complex process is an everyday tool: Photoshop.

At the National Center for Missing and Exploited Children (NCMEC), a non-profit resource for families with missing children, the task of age progression is delegated to a group of retired forensic detectives who use Adobe Photoshop CS4 to craft time-adjusted photos. The process, it seems, is equal parts intuition and software savoir-faire. The former detectives start by examining photos of the missing child's parents when they were the age of the child. According to Glenn Miller of the NCMEC, "Eighty-percent of likeness is recognizable in the eyes." He says that an accurate portrayal of a child's present-day facial composition requires that he take into account "the subtleties of aging," while "holding onto the unique facial qualities" that distinguish the individual.

Once all these factors have been taken into consideration, the former detectives turn to their Macs and Photoshop software to manipulate the photos. Much of the work consists of stretching a child's face, mixing in parental photos, and even updating the hairstyle and clothes to more contemporary norms. A single progression takes about three hours, according to Miller.

As Miller puts it, "The only way we really know we're successful is by having results." And it seems they've been getting them. The NCMEC has an impressive 97-percent recovery rate of all children referred to them, including over 900 whose photos were age progressed and widely broadcast. In a world where technologies like Photoshop are often reduced to the sphere of dorm room jokes, we're reassured to see that the software can do a much greater good. With the help of this technology, Miller and his team are not only giving parents hope, but "giving people their identity back," as well.

Jobs in forensics


Jobs in forensics
As a few readers already know, I'm a PhD candidate working on a problem in the forensic sciences that I've illustrated here from time to time. A few years ago, the National Academy of Sciences declared the state of police (law enforcement staffed) forensic sciences to be quite dismal. Essentially, cops with nothing more than a driver's license and some vendor training on their tools were calling themselves forensic scientists - and coming to some troubling conclusions along the way.

Senator Leahy came along later can wrote a bill that put the NAS report into legislation - declaring that folks should have at least a masters degree to practice forensic science. The problem: no schools confer degrees for many of the CSI type tasks - latent prints, multimedia (video/image/audio), cell phones, tool marks, fire arms, and etc.

Along comes the Obama DOJ to say, it's sad that Leahy got no sponsors to his bill, but we like the idea. We'll do it within the construct of the DOJ's funding priorities - in other words, if you want federal money or you want to bring evidence in federal court, then you'll need to do X, Y, and Z (the work was done in the Executive Office - Subcommittee on Forensic Sciences).

So, schools are being created to confer this type of education. My area in this in multimedia. Part of my PhD dissertation deliverable is the creation of a school of media forensics - a school in a box deliverable that can be given to colleges in any city to start their own programs. In that way, local practitioners do not have to move away from their local areas to UC Denver in order to pursue the degree that they will now need.

Here's the dilemma. Some of the best candidates for this type of work moving forward (forensics) are autistic people. They may fall under one or many of the diagnosis given to autistics - high functioning autism, Aspergers Disorder, Sensory Processing Disorder, PDD-NOS, and so on. But an initial survey has found that there are many people involved in this industry are either non-diagnosed or diagnosed on the autism spectrum (high functioning side). But while their brains are perfectly wired for forensics - the other characteristics of the autism spectrum cause a problem for entering LE.

Many LE agencies polygraph applicants - not only sworn staff, but all staff - or staff who will handing sensitive cases like anti-terror, narcotics, vice, or internal affairs. Thus, many of the potential forensic scientists will face a polygraph exam.

If you believe the marketing on the polygraph - that the instrument measures the biorhythms, these are not going to read the same for autistics as in a neuro-typical subject. To put it another way, taking the polygraph industry at their word that the instrument shows the readings and the examiner interprets the results - how will the examiner interpret the results of an non neuro-typical person?

Here's some examples:
• One of the characteristics of Aspergers is no eye contact. Another is flapping, or the inability to sit still or some other wild body movement - like a fidget.
• Autistic people may be claustrophobic in terms of things touching them. How will their body react to the blood pressure cuff? How will their body react to the neumo tubes? Sitting still, strapped to a chair generally doesn't work for autistic people.
• Autistic people generally do not like bright lights, flickering fluorescents, or loud sounds. Sitting still, strapped to a chair in a room with bright fluorescent lighting?

Hopefully, you can see where this is going. Many of our best candidates will fail a polygraph exam simply because it is not geared to accommodate the characteristics of autistic people. In failing the exam, they will necessarily be excluded from on the industries uniquely suited to their strengths.

I am hoping to interview both polygraph professionals and other experts in the field on a series of questions related to the premise, how do you effectively polygraph an autistic person.

All interview subjects will be treated with dignity and respect. Results will be kept confidential. Data will be used to support my research and no names will be used. Please feel free to direct message me if you are interested. Also feel free to respond with additional questions or requests for clarification.

Understanding Photoshops Image Size


Understanding Photoshops Image Size

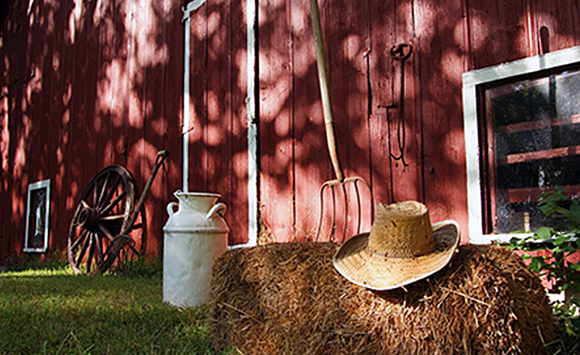
I've long wondered why Photoshop displays a much larger size of an image than it really is. For example, I opened this barn photo which is in a .jpg format and is just over 2 MB in size.
However, Photoshop is telling me that the photograph is just over 6 MB under the Image Size. I didn't understand why Photoshop displays a much larger size for the image than it actually is.
I learned that Photoshop is showing me how large the image would be if I saved it again in an uncompressed native .psd file. Photoshop adds a lot of additional information/overhead in its native format that I wouldn't need when saving it as a .jpg file.
Now, finally this is making a little more sense when I see such a variation in file size! I hope this helps you too.

New in Photoshop CS6 - Content Aware move


New in Photoshop CS6 - Content Aware move

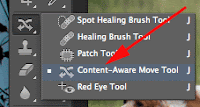
One of my favorite new tools in Photoshop CS 6 is the "Content Aware move tool".

Photoshop has added it to my favorite tool area where you'll find the "Spot Healing Brush", "Patch Tool" and others.
This new tool is mostly a time saver allowing me to accomplish a task of moving something in an image with less steps involved. Let's take a look at how it works.


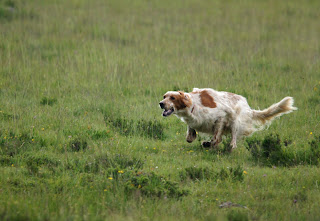
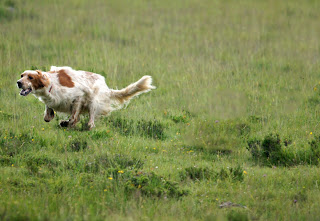
I'd like to move this dog to the left side of the photograph.  In the past I would have had to select the dog, copy the selection, paste it onto a new layer and then go back to the original layer to remove the dog that was still on the right side.

Now, I can use the new "Content-Aware Move Tool" and save a lot of time. Here is all you need to do.

Make a selection around the object you want to move with the "Content-Aware Move" tool. Take a look at the option bar where you will see some choices like strict, very strict, loose, and very loose. Strict and very strict won't alter your image as much as loose an very loose. Try the first time using a medium setting. When your selection is complete, drag and drop your selection into the area you want to move your object. If the results you want look good you're done! If not, try adjusting the selection with the other options.

Now moving an object can be easier and faster than ever!

What is Metadata?


What is Metadata?


Lets take a simple look at what metadata is and where you can find it.
EXIF data (Exchangeable Image File) is the metadata that comes from your camera and is attached to your image file.

Where Can I See the EXIF Data?

Camera: There are a number of places to view EXIF data, starting with right on your own camera. In general, when previewing your images on your camera, pressing the “Info” button will lead to the EXIF data for the photo you are previewing. Each camera may have a slightly different method for viewing the EXIF data, so if you are having trouble the information will be available in your camera’s user manual under EXIF.

On Your Computer: For JPEG and TIFF images, you can right click on the image icon on your hard drive, and scroll to “Properties” (PC) or “Get Info” (Mac). You may have to explore the dialog box which pops up when you select either of these options. For example, in Windows you would click on the Summary Tab, then click on the “Advanced” button.

In Photoshop – File - Info - Camera data (shown above) note I can see what kind of camera took the photo, and even if the flash fired.

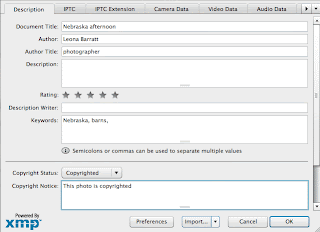
Adding your own copyright metadata
Go to File - Info - Description (see photo at left)
You can add your name, keywords and copyright information here.

What if you decide you want to remove metadata from your photograph. Let's take a look how to do this.
Photoshop - Removing metadata
File - Save for web and devices - Metadata - none
Or, copy and paste the image into a new document window.


I hope this short tutorial makes metadata a little easy to understand. Now you'll be able to add copyright information right inside any of your photographs.

Instant color information


Instant color information
When browsing the Web or looking at photos, you may find a certain color that you like. If you only knew the color code you could duplicate that exact color in your own designs, images or website.

In the past I had to download the graphic or image and open it in Photoshop so that I could use the eyedropper tool to get the color information I wanted.

Now there is an easier way. Instant Eyedropper is a free program that will help you find that code. It works just like the eye-dropper tool in Photoshop, except it works with anything that you can see on your screen.

Just click and hold the eyedropper icon in your system tray and drag it over a color. The code will pop up and automatically copy onto your clipboard. Instant Eyedropper supports HTML, HEX, RGB and several other color formats.
With the information, I can create whatever I need with the exact color information I want.

Upsizing an image


Upsizing an image
Recently I had the challenge of trying to make an image larger. This is never a good idea. Here is why.
It's easy enough in Photoshop to go to Image > Image Size and put in larger numbers. However, your image editing program has to interpolate and do it's best to guess at making the image larger by filling in blanks.
If at all possible the best bet is to rescan the image at a larger resolution. Instead of scanning in at 72dpi try150dpi for example. If you can re-shoot the photo this could give you a larger file too. However, this isn't always possible and you have to work with the image you have.
Here are a couple of tricks that might make your results a little better.


In Photoshop, go to Image > Image Size. From the drop-down menu provided select "Bicubic Smoother (best for enlargement).
The next thing to do is to increase the size by small increments instead of all at once. For example try increasing the size by 10% twice than by 20% once. This seems to get better results. And of course, you'll only be able to increase the file so much before it's totally unusable.

If you don't like the results Photoshop gives you for increasing the image size there are a few other options to try.

Try upsizing in Photoshop and if you don't like the results, it doesn't cost a thing to try reshade.

What's new in Photoshop CS 6?


What's new in Photoshop CS 6?
Here's a neat trick to quickly see the new features in Adobe Photoshop CS 6.
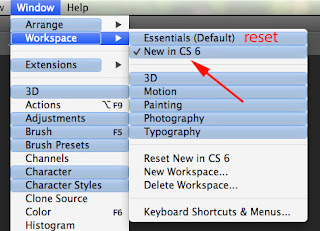
Under Window select Workspace, then click on "New in CS 6".
Instantly every menu item that may contain a change is highlighted in blue. Some of the new features might be hidden in sub-menus but at least you'll know there is something there that has changed in some way.
When you get tired of looking at the blue highlights simply click on the "Essentials (Default)" to reset back to the original menu colors.
I'll be sharing several new features in CS 6 in my upcoming posts. You won't want to miss them.
Enjoy exploring in Photoshop CS 6!

Photoshop - Create your own custom brushes

Photoshop - Create your own custom brushes

Did you know you can create your own custom brush in Photoshop? This brush could be of any shape or even a photo of something allowing you to let your creative juices flow.
How about creating a brush with your logo or signature? Then, with just a click of the mouse you could digitally sign any of your copyrighted work or even add your logo to anything you've created.
Here are the steps to do this. 
Open a shape or image that you want to become a brush (larger images better so that your image doesn't pixelate when increasing your brush size. You can always make your brush size smaller)
Edit > Define Brush Set
Give your brush a descriptive name
Open your brush pallet then scroll to the bottom of the brush selections
Your new custom brush will be the last option available
It's that simple!
Want to see how I made an awesome brush and signature brush? Check out my video below.


Photoshop New Auto Save feature in CS 6


Photoshop New Auto Save feature in CS 6
Here's another reason to love the new Photoshop CS 6.

Have you ever had your computer crash while working in Photoshop or have Photoshop lockup on you in the middle of a project?

There is a new feature in CS 6 to help save the day.

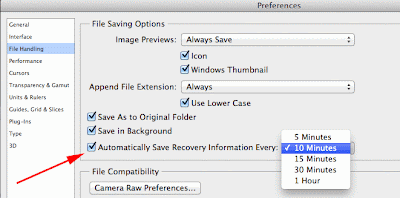
Open up the Preferences in Photoshop and take a look at "File Handling". Here you will see a new feature to automatically save and recover your work. I have mine set for every 10 minutes but you can set it for 5 minutes. I don't see a reason to have it wait to save for any longer than that.

If your computer happens to crash just reopen Photoshop. Photoshop will open a recovered file of the last saved state with the word "Recovered" in the file name. The original file doesn't get touched.
Great save Photoshop!

Vintage Photo Effects


Vintage Photo Effects
Remember the good old days? I've got a box full of old Polaroid photographs that have faded and curled with time. However, this aged effect makes the photographs have even more character!

I've found a site that lets up upload your favorite photos then select from a fantastic array of special vintage photograph effects.


Here is a photograph of my sleeping kitty named Echo.
I uploaded the file and choose from several special effects including the edging. After a few mouse clicks the image looked like something right out of the 50's!
One more thing I didn't mention is that the interface is this site is FUN! You can drag a little camera around and look through the view finder as you make the changes. So, not only is the site effective, it's a lot of fun to interact with.

Photoshop CS 6 Golden Spiral Cropping Tool


Photoshop CS 6 Golden Spiral Cropping Tool

There are some new features in the cropping tool in Photoshop.  Photoshop had the nice "Rule of Thirds" grid for cropping in the last version that was really handy. A new addition is the Golden Spiral Cropping tool.
The Golden Spiral grid is designed to lead the eye to the center of an object or area in a photograph. Let's take a look at how it works. 
In this photograph I want to draw the eye to the hat.
In the View drop down box I selected the new "Golden Spiral" grid. As I adjusted the size of the crop I moved the center of the spiral to the center of the hat.  (The spiral grid is a light gray so I've enhanced the line so you can see it easier.)
You can see my bounding box for my crop.
By the way, you now move the picture to adjust the crop and it takes a little getting used to.
I cropped out the part of the picture I wanted making sure the spiral focused on the hat. Below is my results. A new photograph that really draws the eye right to the hat on the bale.
Pretty neat Photoshop!


Photoshop CS 6 - Changing the Dark Interface


Photoshop CS 6 - Changing the Dark Interface
The first thing you'll notice on the new Photoshop CS 6 is the dark interface around the menu and tools. I didn't like it at first but now I'm starting to get used to it.
Photoshops reasoning is to keep the tools in the background so that you can focus on the image.
If you don't like this new color you can change it in the Preferences.
To do this go to Photoshop's preferences - Interface
Here you will see 4 shades to select from. You can select anything from a light gray to black.
But, if you're like me, you might like the new darker interface. I've decided on the black.
Want to change the canvas color? This too can be customized by simply right clicking and selecting one of Photoshop's shades or even customizing your own canvas color.


Photoshop CS 6 - Where are the artistic filters?


Photoshop CS 6 - Where are the artistic filters?
One of my favorite filters in Photoshop are the artistic filters. You can image my panic when opening Photoshop CS 6 and I didn't see Artistic under the Filters menu!

Photoshop hasn't gotten rid of these wonderful filters. You can still find them in the Filter Gallery.

Just go to Filter Gallery and all those wonderful filters like water color, dry brush and all the others are still there.

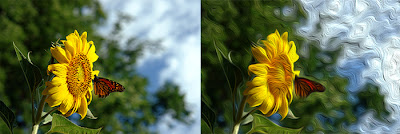
Photoshop has added a new filter to play with. (As if there weren't enough). This new filter is called Oil Paint. You'll find it just above the usual list of filters under the Filter menu.

Below you'll see an example of some testing I did with this new filter. The jury is still out on it becoming my new favorite yet. However, give it a try, you may love the results.
Enjoy!


Sizing Digital Images


Sizing Digital Images


TIP
Start Out Right:
Digital Cameras


to make lots of choices, but they should be based on where the
image needs to end up. Do not make assumptions when starting a
project. Know the destination of your image so you’ll know which
path to take.

If you’re acquiring a digital image,

be sure to capture enough pixels.

If you want a 5 × 7 inch print and
need 300 dpi, do the math before

Resampling

shooting. Take the inch size and
multiply it by the print resolution.
In this example: 5 × 300 = 1500 and
7× 300 = 2100. Therefore, 1500 ×
2100 = 3,150,000, which is about 3.1

The process of resampling allows you to change the pixel dimen-
sions of your image. This will affect the display and print size
of your image. This part of the resizing process is important for
several reasons:

megapixels. To allow for cropping,
you may want to shoot at an even
higher resolution.


Images will print faster when they are sized properly for your
output device.
Images will print clearer when you size them to a target size,
and then run a sharpening filter to enhance the edge detail.


Images appear crisper when they are displayed at 100 percent
on a computer screen (such as for a PowerPoint presentation).

The process of resampling is often identified based on whether you
are scaling the image smaller (downsampling) or larger (upsampling):


Downsampling: If you decrease the number of pixels in an im-
age, you are downsampling the image. When you downsample
an image, you permanently discard data. You can specify an in-
terpolation method (discussed in the next section) to determine
how pixels are deleted. After an image has been downsampled
and saved, you cannot restore the discarded data.


TIP
Avoiding Upsampling


Upsampling: If you increase the number of pixels in an im-
age, you are upsampling the image. When upsampling, you
create new pixels to expand the image. Again, you can specify

You can avoid the need for up-

an interpolation method to determine how pixels are added.

sampling by scanning or creating
the image at a sufficiently high
resolution. If you want to preview
the effects of changing pixel dimen-

When upsampling, you add information that did not previ-
ously exist, which generally just makes a larger image that is
not any sharper than the original.

sions on-screen or to print proofs

at different resolutions, resample a
duplicate of your image.

Choose an Interpolation Method

When you resample an image, Photoshop creates new pixels.
Those new pixels are created based on the neighboring pixels.
How those new pixels are formed is determined by the interpola-


Resampling   41


tion method you specify. Photoshop offers up to five methods to

resample your image.

Choose one of the following methods:


Nearest Neighbor: This method is fast but not very precise.
It is useful for resizing illustrations. However, it can produce

jagged edges.


Bilinear: This approach uses pixel averaging. It is a balance
of speed and quality, and produces medium-quality results.


Bicubic: This method is slower but more precise than the
first two (and more desirable). Photoshop spends more time

examining surrounding pixels before interpolating new ones.

The math at work is very complex, so this method will produce

smoother results than Nearest Neighbor or Bilinear.


Bicubic Smoother: This method is a refinement of Bicubic.
It is specifically designed for upsampling (enlarging images).


Bicubic Sharper: This method is also a refinement of Bicubic.
It is useful for downsampling (shrinking images). It does a bet-

ter job of maintaining sharpness than the other methods.


Setting the Default Method

Photoshop allows you to choose

a default interpolation method.

This will be used when you

invoke a sizing command, such

as the Free Transform or Image

Size commands (more on both

in the pages ahead). Choose

the method that best matches

your workflow.

1. Choose Edit > Preferences

or press Command/Ctrl+K

to call up the Preferences

dialog box.

2. From the Image Interpolation drop-down menu, choose your

default method (Bicubic is the most flexible method and is

recommended).

3. Click OK.


42 Chapter 4 Sizing Digital Images


Resizing an Image
Many of your images will probably not be sized to the exact di-
mensions you need. You have several options at your disposal. To
change the size of an image, you can use the Image Size or Canvas
Size commands. You can also use the Crop tool or Free Transform
command to make an adjustment. You can use these choices indi-
vidually or in combination to achieve the desired results.


Image Size
The Image Size command lets you permanently reassign the total
pixel count, as well as resolution, for a particular image. You can
also use this command to upsample or downsample an image.
This is an easy way to size an image to a specific height or width.
Let’s put the command into action:
1. Open the file Ch04_Flower.tif from the
Chapter 4 folder.
2. Choose Image > Image Size.
The Image Size dialog box offers several
choices. You can choose to manipulate the
pixel dimensions of the image (measured in
pixels or percent). You can also modify the
print size, which is the size of the image when
printed. You can modify the print size based
on percent, inches, centimeters, millimeters,
points, picas, or columns. The most common
choices are percent, inches, or centimeters,
because most users easily understand these

RETURN OF FOCUS

When upsampling an image, you may notice visi-
ble softening. The more you enlarge the image, the
more noticeable it will be. Enlargements greater
than 30 percent can be particularly problematic.
One approach to solving this issue is to sharpen the
image. Applying the Smart Sharpen filter to a re-
sampled image can help clarify the image details.
You can find out more about sharpening images in
Chapter 11, “Repairing and Improving Photos.”

units of measure.
3. Set the Document Size to measure in inches.
Specify a new height of 4 inches.
4. Be sure to select the Resample Image option
if you want to change the pixel dimensions.
Choose the method to Resample Image that
is most appropriate for your image. Bicubic
is the most common method, but you may
have special circumstances. See “Choose an
Interpolation Method” earlier in this chapter.


Resizing an Image  43


5. Leave the Constrain Pro-

portions box selected, or

you will introduce distor-

tion. You generally want to

keep the width and height

constrained to the same

ratio so the image resembles

its original appearance.

6. Click OK.


Canvas Size

The canvas size is your work

area. When you create a new

document, you can specify the
size of your canvas. When you
scan a photo or import a digital

This photo was resized from a height of 6 inches to 4 inches. The reso-
lution of 300 ppi did not change. The image on the right is smaller
because it has fewer total pixels.

image, the canvas size is set to

the edge of the image. You may need to change the canvas size to

crop or extend the canvas of your image to work on specific areas

of the image. Let’s try it out:

1. Open the file Ch04_Beach.tif from the Chapter 4 folder.

2. Choose Image > Canvas Size.

When you launch the Canvas Size command,

you’ll see the pixel dimensions of your cur-

rent canvas. You can specify a new canvas

size using a variety of measurements. Pixels

is a useful measurement if you’re creating

screen graphics, whereas inches or centime-

ters is easier to understand for print work.

Let’s place a uniform border around the image.

3. Select the Relative check box. This disre-

gards the numerical values of the current

canvas size and allows you to specify a new

amount to be added to the existing image.

4. Set the anchor point for the image to be centered. This will

expand the border in all directions around the center of the

current image.


44 Chapter 4 Sizing Digital Images


5. Add a quarter-inch border
on all sides. Type .25 inches
into the Width and Height
fields.
6. Specify a Canvas extension
color. This is the color that
Photoshop places around the
image when you change the
canvas size. You can choose
to use the foreground or
background colors that are
loaded in the toolbox. You
can also use white, black,
gray, or other, which can be
any color you specify. In this
case, choose white.
7. Click OK.


Crop Tool
With the Crop tool you can change a viewer’s
perception of an image. You can choose to
tighten the area of interest of an image, which
allows you to de-emphasize (or even eliminate) parts of a photo
and improve the image by better framing the subject.
You can invoke cropping in two ways. The first method involves
making a selection with the Rectangular Marquee tool, and then
choosing Image > Crop. While this works fine, it does not offer as
much control as using the second method, the Crop tool. Let’s put
method two into action:


TIP

1. Open the image Ch04_Riders.tif from the Chapter 4 folder.

Cropping Keyboard Shortcuts

2. Choose the Crop tool from the Tools panel or press C.


To toggle the shielded area off,
press the forward slash key (/).
To hide the selection border,
press Command/Ctrl+H.

3. With the Crop tool, make a selection to crop the image. In this
case, removing the rider on the far left (who is chopped off)
will improve the composition of the image. Additionally, re-
ducing the headroom (space above the riders’ heads) will also

improve the image’s appearance.


Resizing an Image  45


4. You can refine the crop selection after it is

made. Mouse over an edge of the crop until

the pointer changes to a double-headed ar-

row, then click and drag on the crop selection

border to pull the crop tighter or expand it

looser. Additionally, you can click a corner of

the crop border to expand two sides at once.

5. Examine the crop. Make sure you’ve selected

the Shield check box in the Options bar.

This gives you a better idea of the area to

be cropped.

6. When satisfied with the crop, press Return/Enter or click the

Commit button (check mark) in the Options bar. The shielded

(darkened) areas will be cropped. To cancel, press the Esc key.


Power crop


It is possible to crop and resize an image at the same time. I refer
to this technique as a power crop, and it is a huge time-saver. Before
cropping, you can type the desired size of your final image into


TIP
Restoring Hidden Pixels

the Options bar. When you drag to crop the image, your box will
constrain to the proper aspect ratio. This allows you to resize and
crop in one step.

With Photoshop CS4, you can
choose Image > Reveal All to restore
all hidden pixels if you’ve used the
Hide method for cropping.

Let’s crop an image to a 4-inch

by 4-inch square at 200 ppi.

1. Open the file Ch04_Night_

Street.tif.

2. In the Options bar, type 4

in (as in inches ) into both the

Width and Height fields.

3. In the resolution field, type

200 and set it to pixels/inch.

4. Drag to crop the image.

Your crop selection is con-

strained to the shape you

specified in the Options bar.


46 Chapter 4 Sizing Digital Images


9


10


VIDEO
TRAINING
Power Crop


VIDEO
TRAINING
Nondestructive Cropping


5. Click the Commit button or press Return/Enter. When fin-
ished cropping, you may want to click Clear to reset the tool’s
default settings.

Nondestructive cropping
Cropping is very important, but it’s also permanent. When you
crop an image, you permanently discard data. Nondestructive
editing is a workaround that allows you to crop an image and keep
the cropped pixels available for future use. Nondestructive editing
provides you with flexibility throughout the design process. Let’s
put the technique to the test:


1. Open the image Ch04_Nondestructive.tif
from the Chapter 4 folder.
2. To crop nondestructively, you must convert
the Background into a standard layer. You’ll
explore layers in depth in Chapter 8, “Com-
positing with Layers.” For now, double-click
the word Background in the Layers panel.
Name the layer Car and click OK.
3. Select the Crop tool by pressing C.
4. Mark out an area to crop.
5. In the Options bar, change the Cropped Area
to Hide (Delete is selected by default).


Resizing an Image  47


6. Click the Commit button or press Return/

Enter.

7. Select the Move tool by pressing V (as in

moVe, the letter M is used by the Marquee

tool). Drag in the image and reposition it; the

original pixels are still available, allowing

you to modify the crop in the future.


Perspective cropping

Some images will have visible distortion, which

is often caused by the camera not being square

with the subject. If the photographer was higher

(or lower) than the image or if the photo was tak-

Because the cropped pixels were hidden (instead of deleted),

en at an angle, you will see distortion. In some
cases, this distortion is part of the shot composi-
tion and is desirable. In others, the distortion can

details were preserved outside the cropped area. This allows
for the image to be repositioned within the frame. Be sure
to save the image as a PSD file or Layered TIFF to preserve
future flexibility.

be distracting. Let’s square off an image:

1. Open the file Ch04_Per-

spective.tif from the Chap-

ter 4 folder.

2. Select the Crop tool by

pressing C.

3. Crop around the window

in the photo as tight as you

can to frame it.

4. In the Options bar, set the

Crop to Delete, not Hide.

Then select the Perspective

check box.

5. Click the Shield Color to

select a new color. In the

Color Picker, select a bright

red to make it easier to see the cropped area.

6. Drag the upper-right and upper-left corners in toward the
center. You are trying to line up the crop borders parallel to
the edge of the window. The crop selection will no longer look


11

VIDEO
TRAINING
Perspective Cropping

rectangular.


48 Chapter 4 Sizing Digital Images


7. Click the Commit button or press Return/
Enter. The resulting image should appear
as if the photo was squared and the camera
was level.


Rotate Canvas Command
Sometimes your image will need to be rotated or
flipped. Loading your image upside down on the
scanner, loading a slide backwards into a slide
scanner, or turning the camera on its side when
taking a portrait often causes inverted or reverse
images. You may also want to make a change to
your image for compositional purposes.
The Rotate Canvas command offers several
choices. You can choose to rotate the image 180˚
(half a rotation), 90˚ clockwise or counterclock-
wise, or an arbitrary amount (the user types in a
number of degrees). Additionally, the entire can-
vas can be flipped (creating a mirrored image).
You can choose to flip the canvas horizontally
or vertically:
1. Open the image Ch04_Ro-
tate.tif from the Chapter 4
folder.
2. Choose Image > Rotate
Canvas 90˚ CCW (coun-
terclockwise). The image is
now properly oriented.


Free Transform Command
The Free Transform command is another useful way to rotate
and size an image. It works best when you have an object located
on its own layer or if you have an active selection. You’ll explore
selections and layers in much greater detail in future chapters.
For now, let’s work with a simple layered image that has already
been prepped.


Resizing an Image  49


1. Open the file Ch04_Free_Transform_

Basic.psd.

2. This image has two layers: a background,

which is a gradient, and a vector shape layer.

A vector layer is a special layer in Photoshop.

It can be resized and transformed repeatedly

with no degradation in quality. Vector layers

use math to describe curves and can be freely

manipulated.

3. If it’s not visible, call up the Layers panel by

selecting Windows > Layers.

4. Select the Vector Shape layer so it is active.

5. Choose Edit > Free Transform or press Command/Ctrl+T.

You can access several controls for the Free Transform command

by right-clicking/Control-clicking. Try the following transforma-

tions on the Vector Shape layer. You can press the Esc key to

cancel the transformation or Return/Enter to apply it.


Scale: You can scale by dragging a handle. Hold down the
Shift key as you drag a corner handle to scale proportionately.
Hold down the Option/Alt key to scale in both directions


12

VIDEO
TRAINING
Free Transform Command

simultaneously. To scale numerically, enter a value in the

Options bar.


Rotate: You can choose to rotate a preset amount by select-
ing Rotate 180˚, Rotate 90˚ CW, or Rotate 90˚ CCW. To rotate

freely by dragging, move your mouse outside

the Free Transform box. It will become a

curved, two-headed arrow. Hold down the

Shift key while rotating to constrain the rota-

tion to 15° increments. Additionally, you can

rotate numerically by entering degrees in the

rotation box in the Options bar.


Skew: Skewing an image creates a sense
of distortion, as if the image were leaning.

To skew the image, hold down Command/

Ctrl+Shift and drag a side handle (not a

corner handle). The cursor will change to a

white arrowhead with a small double arrow.


50 Chapter 4 Sizing Digital Images


Distort: If you want to distort an image freely, choose Distort.
This allows you to move the corners of the image freely (a process
also known as corner-pinning). You can also access this com-
mand by pressing Command/Ctrl while dragging a corner point.
Perspective: Transforming perspective creates the il-
lusion that the image is being viewed from above or
from the side. You can access this command by pressing
Command+Option+Shift/Ctrl+Alt+Shift or from the context
menu. This is a useful command to fix perspective problems or
to add perspective effects.


Warp: The Warp command was first intro-
duced in Photoshop CS2. It allows you to
distort an image into a number of predefined
shapes available in the Options bar (such as
Arch, Flag, or Twist). By choosing Custom,
several points can be freely dragged to distort
the image as desired.
Flip Horizontal and Flip Vertical: These
simple commands let you flip an individual
layer without flipping the entire canvas.


The Free Transform command
has one major benefit over
choosing individual transform
commands from the Image
menu: Free Transform lets
you apply transformations
in one continuous operation,
which reduces quality loss in
raster images.


Open the file Ch04_Free_Transform_Additional.psd. Using the Free Transform

command, you can rotate, size, and flip the images to create a better layout.


Resizing an Image  51


Using Smart Objects Before Transforming


TIP

Adobe launched a new technology with Photoshop CS2 called

Smarter Smart Objects

Smart Objects. This powerful command allows you to embed ras-

When using Photoshop CS4, you

ter or vector data into a layer. The layer can then be transformed

can now apply perspective transfor-

indefinitely because the embedded data remains editable and scal-

mations to Smart Objects as well.

able. You can convert one or more layers into a new Smart Object.

Simply follow the instruction in the

A Smart Object is simply one file embedded inside another. This

“Free Transform Command” section
earlier in this chapter.

can be very useful because Smart Objects allow greater flexibility

than simply applying the Free Transform command to a regular

layer. With a Smart Object, you can perform multiple nondestruc-

tive transforms with no loss in quality (as long as you don’t exceed

the pixel dimensions of the original raster object).

1. Open the file Ch04_Smart_

Object.psd from the Chap-

ter 4 folder.

2. Select the layer City in the

Layers panel.

3. Choose Layer > Smart

Objects > Group into New

Smart Object.

4. Invoke the Free Transform

command and scale down

the image to a very small

size. Apply the transfor-

mation.

5. Invoke the Free Transform

command and scale up the

image to its original size.

Apply the transformation. Notice that the image remains clear.

When you place a vector object into Photoshop (such as an Adobe

Illustrator or EPS file), it will automatically come in as a Smart

Object. Additionally, you can choose Layer > Smart Objects >

Group into New Smart Object for raster-based layers.


52 Chapter 4 Sizing Digital Images


TOOL PRESETS SAVE TIME

If you have a specific image size that you use often, harness the power
of Photoshop’s Preset Manager. You can create tool presets that already
have the values for a tool loaded.


13

VIDEO
TRAINING
Smart Objects

1. Type a desired size and resolution into the Options bar.
2. When the Crop tool is selected, you’ll see its icon in the upper-left
corner of the Options bar. Click the triangle to access the drop-down
menu.
3. You’ll see several preset sizes that are stored in Photoshop. Select
the Current Tool Only check box to narrow the presets.
4. Click the Create new tool preset icon in the drop-down menu
(it looks like a pad of paper).
5. Photoshop stores the preset crop size in a temporary
preferences file.
6. To permanently save cropping sizes, click the submenu icon in the
drop-down menu (the small triangle in a circle). Choose Save Tool
Presets, and save them in a desired location.


Selection Tools
and Techniques


If you really want to get things done in Photoshop, you have to be


5

good at making selections. You might want to remove an object

from a picture or maybe change the sky to another shade of blue?

Or, maybe the sweater in your advertisement needs to be orange

instead of red, or you’d like to duplicate some of the background

crowd so your photo doesn’t look so empty. In each case, you’ll

need an accurate selection.

Why? You may be able to look

at a digital image and clearly

recognize that it’s a brown bear

sitting on a rock ledge, but your

computer just sees a bunch of

pixels. A little human interven-

tion is necessary to distinguish

which part of the image you

want to manipulate or process.

While this means extra effort, it

also means that much of digital

imaging requires human inter-

vention (which means jobs for

designers and artists). Accurate

selections are important, and
there are several techniques


While your eye can easily distinguish between the bear and the background in this
photo, Photoshop just recognizes pixels. It will take some human intervention to

you can employ to get them

make an accurate selection of the bear.

just right. Some are easier than

others, and some are more accurate. Knowing several techniques

lets you make an accurate selection no matter what your source

image looks like.

Selection Tools and Techniques


Selection Tools and Techniques


Basic Selection Tools
Photoshop’s Tools panel contains three categories of tools that you
can use to create a basic selection: Marquee tools, Lasso tools, and
Wand tools. While these three are very useful, many users forget
that they are only starting points. Learning to use them is impor-
tant, but again, it’s just the beginning.


Marquee Tools
The Marquee tools allow you to click and drag
to define a selection. The keyboard shortcut for
selecting the Marquee tool is the letter M. To
toggle between the Rectangular and Elliptical
Marquee tool, press Shift+M.


Rectangular Marquee tool: Use this tool to make a rectan-
gular selection. Press the Shift key to draw a square.
Elliptical Marquee tool: Use this tool to make an elliptical
selection. Press the Shift key to draw a circle.
Single Row or Single Column Marquee tool: Creates
a selection that is 1 pixel wide in the shape of a row or column.
To be honest, these two tools are not used very often, which
is why Adobe did not assign the keyboard shortcut M to
trigger them.

Putting the Marquees into action
Let’s give the Rectangular and Elliptical Mar-
quee tools a try:
1. Open the file Ch05_Marquee_Practice.tif
from the Chapter 5 folder on the CD.
2. Practice selecting each of the four objects
using both the Elliptical and Rectangular
Marquee tools. Remember to use the Shift
key to constrain proportions for the square
and circle shapes.


Basic Selection Tools  55


A FASTER TOOLS PANEL


There are a few ways to access tools from the Tools panel:

•  You can click the tool icon.

•  To access nested tools (those that share the same well), click and

hold the mouse button on the tool icon.

•  You can press the letter shortcut key. Hovering over a tool’s icon will

teach you the shortcut keys when the tool tip pops up.

•  To switch to a nested tool, hold down the Shift key and press the

tool’s shortcut key.

•  If the Shift key is an extra step you’d rather not use, modify your

user preferences. Press Command/Ctrl+K to call up your Preferences

screen. Deselect the box next to Use Shift Key for Tool Switch.


Selection options for Marquee tools

When using the Marquee tools, several options are available to

you in the Options bar. These modifiers can improve or alter

your selection.

The first four icons specify the kind of selection:


New selection: Creates a new selection.


Add to selection: After you create one
selection, you can click this button so subsequent selections are

combined with the existing selection. You can also hold down

the Shift key to add to a selection.


Subtract from selection: After you create one selection, you
can click this button so subsequent selections are subtracted

from the existing selection. You can also hold down the Op-

tion/Alt key to subtract from a selection.


Intersect with selection: Requires you to make a first selec-
tion. When you draw a second selection, Photoshop creates a

new selection where the two selections overlap.


56 Chapter 5 Selection Tools and Techniques


The following options modify the selection tool and must be cho-
sen before making a selection:


Feather: A normal selection has a crisp edge. Feathering a
selection creates a gradual blend at the selection’s edges. Think
of it as the difference between a line drawn with a pencil and
one drawn with a felt-tip marker. Feathered selections are use-
ful when you want to extract objects.
Anti-alias: When working with the Elliptical Marquee tool,
you can select Anti-alias. This will create a smoother edge for
curved lines (especially if your image is at a low-resolution).
Style: For the Rectangular Marquee tool and Elliptical Mar-
quee tool, you can choose from three styles in the Options bar:


Normal: This is the default option. Click to draw your
marquee freehand.
Fixed Ratio: You can set a width-to-height ratio. For ex-
ample, to draw a marquee three times as wide as it is high,
enter 3 for the width and 1 for the height.
Fixed Size: You can specify an exact size for the mar-
quee’s height and width. You can enter the value in pixels

(px), inches (in), or centimeters (cm).

Moving a selection
There are a few ways to reposition a selection:


While drawing a selection (with the mouse button still depressed)
you can hold down the spacebar and move the selection.
With an active selection, move the tool’s cursor inside the se-
lection border (marching ants). The icon changes to a triangle
with a marquee border. You can then click inside and drag the
selection to move it.
To modify a selection using controls similar to the Free Trans-
form command, choose Select > Transform Selection. All the
options available to the Free Transform command can be ap-
plied to the selection border. For more on Free Transform, see
Chapter 4, “Sizing Digital Images.”


Basic Selection Tools  57


Selection Lassos

The Lasso tools allow you to draw freeform

segments to create a selection border. The Lasso

tools are most often used to create a rough selec-

tion (which can then be refined using techniques

such as Quick Mask Mode; see the section

“Quick Mask Mode” later in this chapter). The

keyboard shortcut for selecting the Lasso tool is

the letter L. To select the next Lasso tool, press

Shift+L.


Lasso tool: Use this tool to make a freehand selection. You
must return to your starting point to close the selection loop.


Polygonal Lasso tool: Use this tool to draw straight-edged
segments for a selection border. With every click, a part of the

segment is drawn. Continue clicking to set endpoints for addi-

tional segments. Click your starting point to close the loop and

create an active selection. To constrain the tool to 45-degree

angles, hold down the Shift key while drawing.


Magnetic Lasso tool: When you use the Magnetic Lasso tool,
Photoshop attempts to snap the border to the edges of the im-

age. If the anchor point doesn’t snap accurately, click once to

manually add a point.


Putting the Lasso tools into action

Let’s give these tools a try:

1. Open the file Ch05_Boat.tif.

2. Try using both the Poly-

gonal and Magnetic Lasso

tools to select the boat.

Make multiple attempts at

practicing the selection.

In the middle of making a

selection with the Polygonal

or Magnetic Lassos, you

can press the Delete key to

remove segments. Press and hold once, and then release and

press subsequent times to remove segments (one per click).


58 Chapter 5 Selection Tools and Techniques


Selection options for Lasso tools
When using the Lasso tools, several options are available to you in
the Options bar to improve or alter your selection. These modifiers
are very similar to those for the Marquee tools, so I’ll just briefly
mention them.
The first four icons specify the kind of selection:


New selection
Add to selection
Subtract from selection
Intersect with selection

The next two options create a smoother selection:


Feather: This option creates a softer edge on your selection.
Anti-alias: This option creates a smoother edge for curved lines.


Magnetic Lasso options
The Magnetic Lasso has a few additional options that mainly deal
with its snapping behavior. You can change the following proper-
ties in the Options bar:


Width: The width specifies how wide an area the Magnetic
Lasso looks at when trying to detect edges. If you’d like to
see the width area visually, activate the Caps Lock key before
making a selection.
Edge Contrast: This value (measured in percent) determines the
lasso’s sensitivity to edges in the image. Higher values detect high
contrast edges, whereas lower values detect lower-contrast edges.
On an image with well-defined edges, you should use a higher
width and edge contrast setting. For an image with soft edges,
use a lower setting for both width and edge contrast.
Frequency: The rate at which Photoshop adds anchor points is
based on the Frequency setting. An anchor point is the point at
which the lasso attaches, so you can move the selection border
in another direction. You can enter a value between 0 and 100.
Higher values add more anchor points to your selection border.
Stylus Pressure: Click the Stylus Pressure icon if you have a
tablet connected. This option allows you to use the pressure of
the pen to affect edge width.


Basic Selection Tools  59


Wand Tools

The Magic Wand and Quick Selection tools

(W is the keyboard shortcut) allow you to click

an area of color to have Photoshop create a

selection based on adjacent pixels and your

Tolerance setting. The Magic Wand tool works

reasonably well on photos with large areas of

similar color. The Quick Selection tool is a sig-

nificant improvement over the Magic Wand tool

however, and has quickly become a favorite tool

of Photoshop pros.


Selection options for the Magic Wand tool

When using the Magic Wand tool, several options are available

to you in the Options bar that can improve or alter your selection.

These modifiers are very similar to those for the Marquee and

Lasso tools, so I’ll cover them briefly.

The first four icons specify the kind of selection:


New selection


Add to selection


Subtract from selection


Intersect with selection

The remaining settings allow you to refine your
selection parameters:
Tolerance: This setting determines how
similar the pixels must be to your initial click

TIP
A Better Wand
The Magic Wand tool works best
if you turn on the pixel-averaging

in order to be selected. You can enter a value

option. But where is it? It doesn’t

in pixels, ranging from 0 to 255. A higher

appear in the Options bar when the

value selects a broader range of colors.

Magic Wand tool is selected. In-


Anti-alias: This creates a smoother edge
when you click.

stead you must select the Eyedrop-
per tool. Then in the Options bar
you can change the Sample Size to


Contiguous: When Contiguous is selected,
only adjacent areas with the same colors are

a 5 by 5 Average. The Magic Wand
tool (as well as a few other tools)

selected. If deselected, all pixels in the entire
image that use the same colors will be selected.

then becomes less sensitive to
erroneous clicks.


Sample All Layers: If you have a multilayered document
and want to select colors on all layers, select this check box.


60 Chapter 5 Selection Tools and Techniques


Putting the Magic Wand into action
Let’s try out the Magic Wand
tool:
1. Open the file Ch05_Magic_Wand.tif from the Chapter 5
folder.
2. Select the Magic Wand tool by pressing Shift+W for wand.
3. Deselect the Contiguous check box to avoid placing limits on
the selection. Because there is good separation between subject
and sky, no limits are needed.
4. Set the Tolerance to 50 and select the Anti-alias check box.
5. Click the sky in the upper-left corner to make
an initial selection.
6. Part of the sky will be selected. Hold down
the Shift key and click another area of the
sky to add to the selection. Repeat as needed
until the entire sky is selected.

Quick Selection tool
The Quick Selection tool is a recent addition to
Photoshop (unveiled with CS3). It builds on the
functionality of the Magic Wand and produces
better results with fewer clicks. In fact, the Quick
Selection tool takes priority over the Magic
Wand, and it is a suitable replacement.
1. Open the file Ch05_Quick_Selection.tif from
the Chapter 5 folder.
2. Select the Quick Selection tool by pressing
Shift+W.
3. Press the right bracket key ] to make the se-
lection brush larger, press the left bracket key
[ to make it smaller.
4. Click and drag in the flower to make an ini-
tial selection.
5. To make another selection, click and drag again.
If too much of a selection is made, hold down the
Option/Alt key to subtract from the selection.


Additional Selection Commands  61


Additional Selection Commands

A few more Selection commands are found on

the Select menu or by choosing Select > Modify.

For a sense of completion, let’s take a quick look:


All: The All command selects everything on
the active layer or in your flattened document

within the edges of the canvas. The keyboard

shortcut is Command/Ctrl+A when the can-

vas window is selected.


Deselect: The Deselect command removes
the active selection. You may need to do this

when you’re finished altering your selection

to avoid accidentally modifying your image.

The keyboard shortcut is Command/Ctrl+D

when the canvas window is selected.


Reselect: The Reselect command is truly
useful because it allows you to reactivate

the last selection in your document. It only

works with selections made since you’ve last

opened the document. The keyboard shortcut

is Shift+Command/Ctrl+D when the canvas

window is selected.


Inverse: The concept of inverse is very important. It is often
far easier to select what you don’t want, and then inverse the
selection to get what you do want. The keyboard shortcut is


14

VIDEO
TRAINING
Modify a Selection

Shift+Command/Ctrl+I when the canvas window is selected.


Grow: The Grow command selects adjacent pixels that fall
within a certain tolerance range. To modify the range, adjust

the Tolerance settings of the Magic Wand tool.


Similar: The Similar command also selects pixels based on
the Tolerance settings of the Magic Wand tool. However, the

pixels do not need to be adjacent.


Transform Selection: The Transform Selection command al-
lows you to modify an existing selection. Invoking it gives you

controls similar to the Free Transform command (see Chap-

ter 4 for more on the Free Transform command).


62 Chapter 5 Selection Tools and Techniques


The following commands appear on the Modify submenu:


Border: If you have an existing selection, you can use the
Border command. You can enter a value between 1 and 200
pixels. A new selection that frames the existing selection will
be created.
Smooth: The Smooth command simplifies the selection by
adding more pixels to the selection to make it less jagged.
Expand: The Expand command allows you to add pixels in
an outward fashion to the selection. The border will get wider
based on the number of pixels you add.
Contract: The Contract command works the opposite of the
Expand command. Specify the amount of pixels that you want
the selection to decrease.
Feather: The Feather command blurs the edge of the selec-
tion. While this creates a loss of detail at the edges, it can

be very useful to create a blending transition (such as when
extracting an object with a soft edge, like fabric or hair). The
feather becomes apparent when you move, copy, or fill the
selection. If you feather the edges too much, you might lose the
selection border (marching ants), which is only visible above
a 50% threshold. The keyboard shortcut is Shift+F6 when you
have an active selection.
Let’s try out the concept of Inverse, as well as some of the other
commands:
1. Open the file Ch05_Inverse.tif from the Chapter 5 folder.
2. Select the Magic Wand tool.
3. Set the Tolerance to 32 and select the Anti-
alias and Contiguous check boxes.
4. Click the sky to make an initial selection.
5. When most of the sky is active, choose
Select > Grow. If needed, repeat the
command.
6. Choose Select > Inverse to capture the castle.


Intermediate Selection Techniques  63


Intermediate Selection Techniques

Simply put, don’t stop now! Most Photoshop users develop an over-

dependence on the Magic Wand tool. While the basic selection

techniques are important, they are not necessarily the best solution.


Color Range Command

If you liked the Magic Wand tool, then prepare to love the Color

Range command. The Color Range command allows you to select

a specified color within the document. You can then easily add to

the selection to refine it. All of its speed and power is complement-

ed by a very intuitive user interface.

Let’s experiment with the Color Range command:

1. Open the file Ch05_Color_Range.tif from the Chapter 5 folder.

2. Choose Select > Color Range.

3. With the eyedropper, click the green vegeta-

ble. You’ll see an initial selection created in

the dialog window. A black and white matte

is shown to preview the selection. The white

areas indicate the selection you are creating.

4. Hold down the Shift key and click more of

the vegetables to build a larger selection.

5. Adjust the Fuzziness slider to your preference.

6. If too much is selected, you can hold down

the Option/Alt key to subtract from the selec-

tion. You can also enable the Localized Color

Clusters option to require similar pixels to be

closer together.

7. When you’re satisfied, click OK.

8. Soften the selection further by choosing

Select > Feather and enter a value of 5 pixels.

9. Let’s use the selection to make an isolated image adjustment.

One way to do this nondestructively is with an adjustment layer.

Choose Layer > New Adjustment Layer > Hue/Saturation.


64 Chapter 5 Selection Tools and Techniques


10. Adjust the Hue slider to change the colors of the vegetables
(try a value of +10 to make the vegetables greener, adjust the
saturation to your preference.
11. Click OK.
Adjustment layers are covered in greater detail throughout the rest
of the book.


Quick Mask Mode
The Quick Mask Mode can be a bit time-consuming, but its ac-
curacy and flexibility make it worth using. The primary advan-
tage of editing your selection as a mask is that you can use almost
any Photoshop tool or filter to modify the mask. You can create
a rough selection using a basic tool like the Magnetic Lasso, and
then refine it with other tools such as the Brush or Blur tools.
Let’s give Quick Mask a try:
1. Open the file Ch05_Pump.tif from the Chapter 5 folder. You’ll
create an accurate selection around the water pump.
2. Select the Polygonal Lasso tool from the Tools panel.
3. Make an accurate selection around the pump, but don’t worry
about perfection. Treat it as if you were cutting out the image
with a pair of scissors. Remember, you must return to the start-
ing point with the Lasso tool and click to close the loop.


Intermediate Selection Techniques  65


4. Click the Quick Mask icon (near the bottom
of the Tools panel) or press Q. The shielded
(tinted) areas will become the area outside


TIP
Abort a Selection

the active selection when you exit Quick
Mask Mode.

If you need to exit a Lasso tool
without making a selection, you can
press the Esc key.

5. The default Quick Mask color is red set to

50%. In this case, another color may be more

helpful. Double-click the Quick Mask icon

to call up the Quick Mask Options window.

Change the color to blue and set the opacity

to 75%. You may want to revisit this window

when masking to adjust your settings to im-

prove visibility.

6. Select the Brush tool from the Tools panel

or press B. You’ll paint in the mask using

brushes. However, you must first “adjust” the

Brush tool, so it’s more accurate.

7. Press Command/Ctrl+K to call up the Preferences dialog box.

Choose the Cursors category from the column to the left of the

window. In the Painting Cursors area, click Normal Brush Tip

(this will show you the size of your brush before clicking) and

select Show Crosshair in Brush Tip. While in the Preferences

dialog box, change the Other Cursors to Precise.

8. Call up the Navigator panel. This useful panel makes it easy to

zoom in and pan around your image. The slider changes your

magnification level; the red box indicates your work area.

9. Zoom in to a high magnification level (between 200–300%) to

make it easier to paint in the rest of your selection.

10. Examine your Brush options in the Options bar and Tools

panel. Black adds to your mask; white subtracts from it.


Pressing the D key loads the default black and white values.


You can quickly adjust the size of your brush from the key-
board. Press the right bracket ] to enlarge the brush or the

left bracket [ to reduce the size of the brush.


You can soften your brush if you want a feathered edge.
Shift+] makes the brush harder; Shift +[ makes the

brush softer.


66 Chapter 5 Selection Tools and Techniques


11. Click and paint in the remaining areas of the mask.


Use smaller brushes to paint in tiny areas.
Use larger brushes to paint in big areas.
Use the keyboard shortcuts to quickly change the size of
your brush as needed.


If you have a long, straight run (like an edge),
you can click once with a brush. Hold down
the Shift key and click again farther away.
Photoshop will “connect the dots.” This is the
fastest way to fill in the mask.
If you paint too close to the image, you can
fix it. Press X to toggle from black to white.

Painting with white subtracts from the mask
(the color overlay is removed from areas
painted with white). Painting with gray cre-
ates a semitransparent area, which is useful
for feathering edges. (Semitransparent areas
may not appear to be selected when you exit
Quick Mask Mode, but they are.)
12. To pan around your image, you can move the red box in the
Navigator panel. Alternately, hold down the spacebar and drag
around in the document window.


15

VIDEO
TRAINING
Quick Mask Mode

13. If you want to soften the edge of the Quick Mask, use the
Smudge or Blur tools. The Smudge tool set to Darken mode
works well. You can change the tool’s mode in the Options bar.
14. Continue to paint in the mask. For an image of this complexity,
it may take 5–20 minutes, but professional work takes time.
15. When finished, press Q to exit Quick Mask Mode. You should
now have an active selection.
16. Let’s test the selection by making an image adjustment. Choose
Layer > New Adjustment Layer > Hue/Saturation. Move the
Hue slider left or right to see the color of the pump change.
Move the Saturation slider left to reduce the intensity of the
color change. Click OK when you are done with the adjust-
ment to apply it. Because you had an active selection, the
adjustment is constrained to only the selected areas.


Intermediate Selection Techniques  67


17. Let’s make one more adjustment. Reload the selection by

choosing Select > Reselect. Then reverse it by choosing

Select > Inverse.

18. You’ll now reduce the balance of the grass using the Levels

command. Choose Layer > New Adjustment Layer > Levels.

Move the middle (gray) input slider. Notice how the image gets

darker? You adjusted the gamma or midtones of the image and

changed its exposure. Click OK to apply the Levels change.


68 Chapter 5 Selection Tools and Techniques


19. You may now notice a slight red fringe around the pump. This
is easy to fix. In the Layers panel, click the black and white
mask icon (which looks like a silhouette of the pump) for the
Hue Saturation adjustment layer.
20. You’ll use a filter to perform a specialized image processing
command (in this case soften the mask). Choose Filter > Blur >
Gaussian Blur and enter a low value like 3 pixels. (This softens
the edge of the mask.)
21. Press Command/Ctrl+L to invoke the Levels command. Lev-
els is used to adjust the balance between light and dark areas
in an image (or mask). Moving the middle (gray) input slider
allows you to gently adjust the mask. When satisfied, click OK.


SAVING AND RELOADING SELECTIONS

If you’d like to save your selection for later use, you need to create a
channel (see the section “Using a Channel” later in this chapter). With
an active selection made, choose Select > Save Selection. Name the
selection and click OK to save the selection as an alpha channel. Alpha
channels are simply saved selections that can be reloaded at a later
time. They are also stored with your document when you close the file
(unlike a Quick Mask, which is discarded when you exit the selection).
Channels are covered in greater depth in Chapter 7, “Layer Masking.”

Was that easy? Probably not,
but with time and practice it gets
significantly easier, so don’t give
up. Accurate selections are ex-
tremely important as you begin
to combine multiple images or
need to make specialized image
adjustments such as color cor-
rection. If you’d like more prac-
tice, use the images provided in

the Quick Mask Practice folder
in the Chapter 5 folder.


Creating a Path with the Pen Tool
You can use the Pen tool to create paths. Many users swear by the
Pen tool, but be warned: It’s not the easiest tool to use. The Pen
tool allows you to click around the image, adding anchor points.
Photoshop then connects those points with vector lines, which can
be adjusted or resized. Those users coming to Photoshop from
Adobe Illustrator may find the Pen tool relatively easy to use.
Let’s give the Pen tool a try:
1. Open the file Ch05_Paths.tif from the Chap-
ter 5 folder.
2. Choose the Pen tool from the Tools panel or
press the keyboard shortcut P.


Intermediate Selection Techniques  69


3. Choose the following options from the Options bar:
Choose Shape Layer from the first three buttons to put a
solid color over your image and make it easier to see if you


16


VIDEO
TRAINING
Using a Path

are accurately tracing the object.


Select Auto Add/Delete so anchor points will automatically
be added when you click a line segment. Likewise, Photo-

shop will automatically delete a previous anchor point if

you click directly on the

anchor point with the

Pen tool.


Click the inverted arrow
next to the shape but-

tons in the Options bar to access the sub-

menu. Choose the Rubber Band option to

make it easier to preview path segments

while drawing.

4. Position the Pen tool in the lower-left corner

of the tower and click. An initial anchor point

is added.

5. You’ll now need to draw curved paths. When

you click at the top of the tower to add a new

point, keep the mouse button depressed. You

can drag to create the curve.


Drag toward the curve for the first point.
Drag in the opposite direction for the

second point.


Dragging both direction points in the
same direction will create an S-shaped

curve.


Try to minimize the number of anchor
points added. Move forward along the

object and pull to form the curve.

6. When you reach the end of your path, click

to close the shape. As with the Polygonal

Lasso tool, you must click your starting point to close the path.

The path for this photo can be created with only three points.

7. To end an open path, Command/Ctrl-click away from the path.


70 Chapter 5 Selection Tools and Techniques


8. You can adjust the path by
using the Direct Selection
tool (A). This allows you to
click an anchor point, or
handle, and adjust the posi-
tion or shape.
9. When satisfied, Command/
Ctrl-click on the path’s
thumbnail in the Layers
panel. You will see the
marching ants, which indi-
cate an active selection has
been made.
And that is how paths work. Either you found that enjoyable (and
if so, keep practicing—it gets easier) or you disliked it. Like many
features in Photoshop, paths are optional and don’t have to be part
of your Photoshop workflow. They are worth learning, though,
because they make it easier to select curved objects.


Refine Edge Command
Even though the Select menu offers several options, there is always
room for improvement. Photoshop provides a powerful option for
refining an existing selection—the Refine Edge command, which
can be accessed in two ways. It is available in the Options bar for
all selection tools. You can also access it by choosing Select > Re-
fine Edge. This command is very intuitive, and its sliders provide
quick feedback as you refine a selection.
1. Open the file Ch05_Bracelets.tif from the Chapter 5 folder.
2. Make an initial selection using a tool of your choice (the Quick
Selection tool works well).
3. Click the Refine Edge button in the
Options bar.
4. Click the triangle next to the word Descrip-
tion to see a more detailed description of the
options for selection refinement.
5. Make sure the check box next to Preview is selected.


Advanced Selection Techniques  71


6. Adjust the different sliders to tweak the selection:
Radius: Refines the selection edge.


17


VIDEO
TRAINING
Refining Edges


Contrast: Increases the contrast of a selection’s edge.


Smooth: Removes any jagged edges.


Feather: Softens the edge of the selection.


Contract/Expand: Grows or shrinks a selection.

Click one of the preview icons to change how the selection

is displayed. There are five options to choose from, experi-

ment with the different choices to see which one you prefer.

7. Click OK to create the selection.


Advanced Selection Techniques

Two additional selection techniques—channels and Calculations—

are advanced (in that they utilize channels). Remember, channels

represent the components of color. The brighter the area in the

individual channel, the more coverage there is for that color. By

harnessing the black and white details of one (or more) channel

you can create a mask. These two techniques won’t be appropriate

to use every time (they are image dependent), but they are pretty

easy to use and should be part of your skill set.


72 Chapter 5 Selection Tools and Techniques


Using a Channel
In many images, there is often high contrast between the different
elements. For example, a person framed by a bright blue sky may
clearly stand out, since there are a lot of red values in skin and a
lot of blue in the sky. You can make a quick decision whether the
channel selection technique will work by looking at the Channels
panel. Look for a single channel that is high contrast. It doesn’t
need to be perfect; you can use the Paintbrush tool to touch up the
channel to make a more accurate selection.
Let’s use the channel selection techniques to select and modify a
logo on the side of a building. By isolating the logo, you can make
a targeted selection to improve its appearance:
1. Open the image Ch05_Hotel.tif from the Chapter 5 folder.
2. Open the Channels panel. Click the Channels panel submenu
(the triangle in the upper-right corner). Choose Palette Options
and set the thumbnail to the largest size.
3. In the Channels panel, click on the word Red
to view just the red channel. Examine the
channel for contrast detail. Repeat for the
green and blue channels. Look for the chan-
nel with the cleanest separation of the motel’s
name. The blue channel should appear the
cleanest.
4. Right-click/Ctrl-click on the blue channel
and choose Duplicate Channel. Name it
Selection and click OK to create a new (alpha)
channel.
5. The new channel should automatically be
selected.
6. Press Command/Ctrl+L to invoke a Levels
adjustment. This will allow you to adjust
contrast on the mask. Make sure the Preview
check box is selected.
7. Move the Black Input Levels slider to the
right to increase contrast in the black areas.


Advanced Selection Techniques  73


8. Move the White Input Levels slider to the left to increase con-

trast in the white areas.

9. Move the middle (gray) input slider to the right to touch up the

spotty areas.


10. Click OK to apply the adjustment to the channel.

11. To soften the edges of the channel, choose Filter > Blur >

Gaussian Blur. Apply the filter with a value of 2 or 3 pixels to

soften the edge.

12. To load the selection, Command/Ctrl-click the Selection chan-

nel. This will create an active selection. By selecting the logo,

you can make a controlled adjustment.

13. Because you want to work with the image data (in this case the

sign), you need to select and enable the RGB channels. Click

the visibility icon next to the RGB channels to enable them.

Turn off the Selection channel by clicking the visibility icon.

You should still have an active selection.

14. Switch back to the Layers panel and click the Background layer

to activate it.

15. Press Command/Ctrl+C to copy the logo to your clipboard.

16. You are done with the current selection, so choose Select >

Deselect or press Command/Ctrl+D to disable the active

selection.

17. Choose Layer > New Fill Layer > Solid Color, and then click OK.

18. From the Color Picker choose a highly saturated color and

click OK.


74 Chapter 5 Selection Tools and Techniques


19. Choose Edit > Paste or press Command/
Ctrl+V to paste your clipboard contents. The
logo from your clipboard should be added
above the solid color layer on a new layer.
20. If you then want to clean up the text, you
can reload the selection by choosing Select >
Reselect.
21. Choose Edit > Fill and select White at 100%.
Click OK to apply the fill.
The logo is now cleaned up and high contrast. It
could be used in an additional design project such
as on a Web site or in a television commercial.


NOTE


Calculations Command

Calming Math Fear

You can use the Calculations command to create a new selec-

The word Calculations can be scary,

tion based on the details in an image’s channels. This technique

because math is not the most

is hit or miss, because it won’t work with every image. But when

popular subject for many people.

it succeeds, it’s a big success. The Calculations command works

But don’t worry: The computer will

well when there is high contrast between the subject and the

do all the calculations for you as it

background. You should look at each channel independently until

combines two channels to create a
new selection.

you find those with the highest contrast. Depending on the source
photo, the selection you can generate will be anything from a great

start to perfect.
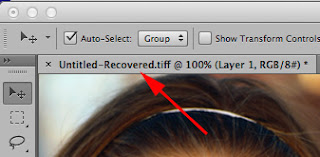
Let’s put the Calculations command into action to create an active
selection and a saved alpha channel. You will first create a new
channel based on the existing channels:
1. Open the file Independence Ch05_Independence_Hall.tif
from the Chapter 5 folder.
2. Bring up the Channels panel (Windows > Channels) and
look for the highest contrasting channels. Because you want
to remove the background, look for the contrast between the
foreground and background. The blue channel should stand
out the most.
3. Choose Image > Calculations and make sure the Preview
check box is selected. You’ll now combine two of the color
channels to create a new alpha channel. An alpha channel is
simply a saved selection. You can Command/Ctrl-click it to
turn it into an active selection.


Advanced Selection Techniques  75


4. In the Source 1 area, set the

Channel to Blue.

5. In the Source 2 area, you’ll

experiment to find the right

combination. The red chan-

nel is a good place to start,

because it looks very dif-

ferent than the blue chan-

nel. It’s also a good idea to

experiment by clicking the

Invert button to reverse the

channel. Calculations is all

about trial and error, but

since it works so well, tak-

ing a little time to experi-

ment is worth it.

6. Combine the red and blue channels by using

Blending. From the drop-down list, try differ-

ent blending modes. Blending modes control

how two different images or channels blend

together based on their color and luminance

values (for more on blending modes see

Chapter 9, “Using Blending Modes”). Differ-

ent source images will need different modes.

Experiment by clicking through each mode

on the list. You may also want to try deselect-

ing the Invert box when working with other

images. In the Independence Hall image, the

blue and red (inverted) channels combine

most effectively using the Vivid Light blend-

ing mode. This will create a new channel that

has a clean separation between the building

and sky.

7. Click OK to create a new channel. The chan-

nel, called Alpha 1, should be selected in the

Channels panel. Photoshop turned off the

RGB channels for now.


76 Chapter 5 Selection Tools and Techniques


8. Choose the Brush tool and set the foreground color to white.


9. Paint over the trees so the sky becomes pure white.
10. Run a Levels adjustment on the channel to adjust the contrast
between black and white. Choose Image > Adjust > Levels or
press Command/Ctrl+L. Move the Black Input Levels slider
to the right to darken the gray areas to black. Move the White
Input Levels slider to the left to brighten the whites in the im-
age. Move the gray (gamma) input slider to the right to close
up gray areas.
11. Click the OK button to apply the Levels
adjustment.
12. Zoom in to 100% magnification to look for
gaps in the alpha channel. You should see a
few in the tower. With your Paintbrush set
to black, paint out the spotting. You can also
run a 1 pixel Gaussian Blur on the channel
with the Filter command.


Advice on Selections  77


13. Command/Ctrl-click on the

alpha channel thumbnail

to load the selection. You

will need to choose Select >

Inverse to choose Indepen-

dence Hall.

14. Click the visibility icon next

to the RGB composite chan-

nel to enable it.

15. Click the visibility icon next

to the alpha channel to dis-

able it.

Look closely at the selection; it

should be pretty impressive. At

this point, you could copy the

image and add it to a different

composite image, or run a filter

or image processing command

on the building. With a little bit of experimentation, you can
generate a perfect alpha channel and turn it into a layer mask
(you’ll try this in Chapter 7). Calculations won’t work every time,

18

VIDEO
TRAINING
Calculations Command

but it’s a great solution that’s worth a try when you have high-

contrast channels.


Advice on Selections

No single technique is ideal for making the perfect selections.

Every image is unique and will require you to analyze it. Knowing

multiple techniques is very important, because it expands your op-

tions. Get comfortable with all the techniques in this chapter and

be sure to practice. Practice really does make perfect.