This lesson will take about 90 minutes to complete. Copy the Lesson12 folder onto your hard drive if you have not already done so. As you work on this lesson, you’ll preserve the start files. If you need to restore the start files, copy them again from the Adobe Photoshop CS6 Classroom in a Book DVD.

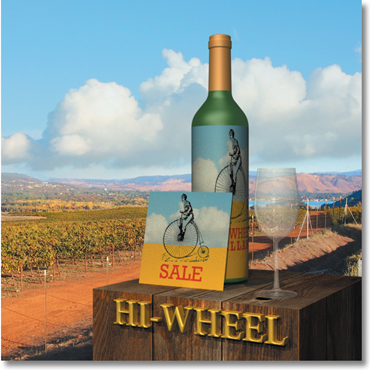
In this lesson, you’ll create a three-dimensional scene for a wine advertisement. First, you’ll view the finished scene.

Traditional 3D artists spend hours, days, and weeks creating photo-realistic images. The 3D capabilities in Photoshop let you create sophisticated, precise 3D images easily—and you can change them easily, too.
Getting started
This lesson explores 3D features, which are available only if OpenGL 2.0 is supported by your video card and enabled on your computer. To learn about your video card, choose Edit > Preferences > Performance (Windows) or Photoshop > Preferences > Performance (Mac OS). Information about your video card is in the Graphics Processor Settings area of the dialog box.In this lesson, you’ll create a three-dimensional scene for a wine advertisement. First, you’ll view the finished scene.
- Start Photoshop, and then immediately hold down Ctrl+Alt+Shift (Windows) or Command+Option+Shift (Mac OS) to restore the default preferences. (See “Restoring default preferences” on page 4.)
- When prompted, click Yes to delete the Adobe Photoshop Settings file.
- Choose File > Browse In Bridge to open Adobe Bridge.
- In Bridge, click Lessons in the Favorites panel. Double-click the Lesson12 folder in the Content panel.
- View the 12End.psd file in Bridge. A three-dimensional wine bottle, wine glass, and sale card sit atop a wooden box with 3D lettering.
- Double-click the 12End.mp4 file to view the movie in which light has been animated to simulate a sunrise. When you’re done viewing the movie, exit QuickTime.
- Double-click the 12Start.psd file to open it in Photoshop.
2. Creating a 3D shape from a layer

